My NuGet

Want your own NuGet repo? Don’t want to pay for MyGet or similar?

Here’s how I’ve done it recently at Mailcloud (over an espresso that didn’t even have time to get cold – it’s that easy)

Setting up a NuGet Server

Creating your own nuget server could barely be any easier than it is now.

Open Visual Studio -> New Project -> WebSite

visual studio new website

Empty Website

visual studio empty azure website

Open Package Manager/Console -> Install-Package Nuget.Server

install nuget server

It’ll look something like this afterwards:

nuget server installed

Add API key to appsettings

nuget server add api key

For the API key: I just grabbed mine from newguid.com:
newguid.com

Publish site

If you’re using Azure and you selected the “Create remote resources” back at the start when creating the project, you can just push this straight out to the newly created website with a right click on the project -> publish :

publish azure website

Or use powershell, or msbuild to webdeploy, or ftp it somewhere, or keep it local – your call, buddy!

And that’s the hard part done 🙂

Using it

First visit

nuget server first visit

If you haven’t configured an API key then the first visit page will alert you to this.

Push a package

This is done in the usual manner – don’t forget your API key:

push a package

Check the repo

pushed package

Let’s reference our shiny new nuget repo:

Add a new source

Edit your Package Manager settings and add in a new source, using your new repo:

package manager sources

Find your packages!

Now you can open Package Manager window or console and find your pushed nuget package:

new source packages

Happy packaging!

Azure WebJobs and Azure Scheduler

Creating functionality in Azure to subscribe to messages on a queue is so 2013. You have to set up a service bus, learn about queues, topics, maybe subscribers and filters, blah, BLAH, BLAH.

Let’s not forget configuring builds and deployments and all that.

Fun though this may be, what if you want to have just the equivalent of a cronjob or scheduled task kicking off every few hours or days for some long-running or CPU-intensive task

Scheduled tasks – Old School: IaaS

Well, sure, you could create a VM, log in, and configure cron/scheduled tasks. However, all the cool kids are using webjobs instead these days. Get with the programme, grandpa! (Or something)

So what’s a webjob when it’s at home?

It depends. Each version is the equivalent of a small console app that lives in the ether (i.e., on some company’s server in a rainy field in Ireland), but how it kicks off the main functionality is different.

These webjobs can be deployed as part of a website, or ftp-ed into a specific directory; we’ll get onto this a bit later. Once there, you have an extra dashboard available which gives you a breakdown of the job execution history.

It uses the Microsoft.WindowsAzure.Jobs assemblies and can be best installed via nuget:

Install-Package Microsoft.WindowsAzure.Jobs.Host -Pre

(Notice the “-Pre”: this item is not fully cooked yet. It might need a few more months before you can safely eat it without fear of intestinal infrastructure blowout)

Let’s check out the guts of that assembly shall we?

Jobs - attributes

We’ll get onto these attributes momentarily; essentially, these allow you to decorate a public method for the job host to pick up and execute when the correct event occurs.

Here’s how the method will be called:
host - assemly methods

Notice that all of the other demos around at the moment not only use RunAndBlock, but they don’t even use the CancellationToken version (if you have a long running process, stopping it becomes a lot easier if you’re able to expose a cancellation token to another – perhaps UI – thread).

Setting it up

Right now you have limited options for deploying a webjob.

For each option you firstly need to create a new Website. Then click the WebJobs (Preview) tab at the top. Click Add at the bottom.

Now it gets Old Skool.

Zip

Zip the contents of your app’s bin/debug folder, call it WebJob.zip (I don’t actually know if the name matters though).

Enter the name for your job and browse to the zip file to upload.

You can choose; run continuously, run on a schedule (if you have Azure Scheduler Preview enabled), and run on demand.

There’s a great article on asp.net covering this method.

FTP

Webjobs are automagically picked up via convention from a particular directory structure. As such, you can choose to ftp (or other deployment method, perhaps via WebDeploy within the hosting website itself, a git commit hook, or a build server) the files that would have been in the zip into:

site\wwwroot\App_Data\jobs\{job type}\{job name}

What I’ve discovered doing this is that the scheduled jobs are in fact actually triggered jobs, which means that they are actually triggered via an HTTP POST from the Azure Scheduler.

There’s a nice intro to this over on Amit Apple’s blog

When to execute

Remember those attributes?

Jobs - attributes

Storage Queue

One version can be configured to monitor a Storage Queue (NOT a service bus queue, as I found out after writing an entire application to do this, deploy it, then click around the portal for an entire morning, certain I was missing a checkbox somewhere).

By using the attribute [QueueInput] (and optionally [QueueOutput]) your method can be configured to automatically monitor a Storage Queue, and execute when the appropriate queue has something on it.

Blob

A method with the attribute [BlobInput] (and optionally [BlobOutput]) will kick off when a blob storage container has something uploaded into it.

Woah there!
Yep, that’s right. Just by using a reference to an assembly and a couple of attributes you can shortcut the entire palava of configuring azure connections to a namespace, a container, creating a block blob reference, and/or a queue client, etc; it’s just there.

Crazy, huh?

On Demand

When you upload your webjob you are assigned a POST endpoint to that job; this allows you to either click a button in the Azure dashboard to execute the method, or alternatively execute it via an HTTP POST using Basic Auth (automatically configured at the point of upload and available within the WebJobs tab of your website).

You’ll need a [NoAutomaticTrigger] or [Description] attribute on this one.

Scheduled

If you successfully manage to sign up for the Azure Scheduler Preview then you will have an extra option in your Azure menu:

finding scheduler

Where you can even add a new schedule:

setting up scheduler

This isn’t going to add a new WebJob, just a new schedule; however adding a new scheduled webjob will create one of these implicitly.

In terms of attributes, it’s the same as On Demand.

How to execute

Remember those methods?

host - assemly methods

RunAndBlock

These require the Main method of your non-console app to instantiate a JobHost and “runandblock”. The job host will find a matching method with key attribute decorations and depending on the attributes used will fire the method when certain events occur.

static void Main()
{
    JobHost h = new JobHost();
    h.RunAndBlock();
}

public static void MyAwesomeWebJobMethod(
    [BlobInput("in/{name}")] Stream input,
    [BlobOutput("out/{name}")] Stream output)
{
    // A new cat picture! Resize all the things!
}

Scott Hanselman has a great example of this.

Call

Using some basic reflection you can look at the class itself (in my case it’s called “Program”) and get a reference to the method you want to call such that each execution just calls that method and stops.

static void Main()
{
        var host = new JobHost();
    host.Call(typeof(Program).GetMethod("MyAwesomeWebJobMethod"));
}

[NoAutomaticTrigger]
public static void MyAwesomeWebJobMethod()
{
    // go find epic cat pictures and send for lulz.
}

I needed to add in that [NoAutomaticTrigger] attribute, otherwise the webjob would fail completely due to no valid method existing.

In summary

WebJobs are fantastic for those offline, possibly long running tasks that you’d rather not have to worry about implementing in a website or a cloud service worker role.

I plan to use them for various small functions; at Mailcloud we already use a couple to send the sign-ups for the past few days to email and hipchat each morning.

Have a go with the non-scheduled jobs, but if you get the chance to use Azure Scheduler it’s pretty cool!

Good luck!

References

Generate a Blob Storage Web Site using RazorEngine

Last episode I introduced the concept of utilising RazorEngine and RazorMachine to generate html files from cshtml Razor view files and json data files, without needing a hosted ASP.Net MVC website.

We ended up with a teeny ikkle console app which could reference a few directories and spew out some resulting html.

This post will build on that concept and use Azure Blob Storage with a worker role.

File System

We already have a basic RazorEngine implementation via the RenderHtmlPage class, and that class uses some basic dependency injection/poor man’s IoC to abstract the functionality to pass in the Razor view, the json data, and the output location.

IContentRepository

The preview implementation of the IContentRepository interface merely read from the filesystem:

namespace CreateFlatFileWebsiteFromRazor
{
    internal class FileSystemContentRepository : IContentRepository
    {
        private readonly string _rootDirectory;
        private const string Extension = ".cshtml";

        public FileSystemContentRepository(string rootDirectory)
        {
            _rootDirectory = rootDirectory;
        }

        public string GetContent(string id)
        {
            var result = 
                File.ReadAllText(string.Format("{0}/{1}{2}", _rootDirectory, id, Extension));
            return result;
        }
    }
}

IDataRepository

A similar story for the IDataRepository file system implementation:

namespace CreateFlatFileWebsiteFromRazor
{
    internal class FileSystemDataRepository : IDataRepository
    {
        private readonly string _rootDirectory;
        private const string Extension = ".json";

        public FileSystemDataRepository(string rootDirectory)
        {
            _rootDirectory = rootDirectory;
        }

        public string GetData(string id)
        {
            var results = 
                File.ReadAllText(string.Format("{0}/{1}{2}", _rootDirectory, id, Extension));
            return results;
        }
    }
}

IUploader

Likewise for the file system implemention of IUploader:

namespace CreateFlatFileWebsiteFromRazor
{
    internal class FileSystemUploader : IUploader
    {
        private readonly string _rootDirectory;
        private const string Extension = ".html";

        public FileSystemUploader(string rootDirectory)
        {
            _rootDirectory = rootDirectory;
        }

        public void SaveContentToLocation(string content, string location)
        {
            File.WriteAllText(
                string.Format("{0}/{1}{2}", _rootDirectory, location, Extension), content);
        }
    }
}

All pretty simple stuff.

Blob Storage

All I’m doing here is changing those implementations to use blob storage instead. In order to do this it’s worth having a class to wrap up the common functions such as getting references to your storage account. I’ve given mine the ingenious title of BlobUtil:

class BlobUtil
{
    public BlobUtil(string cloudConnectionString)
    {
        _cloudConnectionString = cloudConnectionString;
    }

    private readonly string _cloudConnectionString;

    public void SaveToLocation(string content, string path, string filename)
    {
        var cloudBlobContainer = GetCloudBlobContainer(path);
        var blob = cloudBlobContainer.GetBlockBlobReference(filename);
        blob.Properties.ContentType = "text/html";

        using (var ms = new MemoryStream(Encoding.UTF8.GetBytes(content)))
        {
            blob.UploadFromStream(ms);
        }
    }

    public string ReadFromLocation(string path, string filename)
    {
        var blob = GetBlobReference(path, filename);

        string text;
        using (var memoryStream = new MemoryStream())
        {
            blob.DownloadToStream(memoryStream);
            text = Encoding.UTF8.GetString(memoryStream.ToArray());
        }
        return text;
    }

    private CloudBlockBlob GetBlobReference(string path, string filename)
    {
        var cloudBlobContainer = GetCloudBlobContainer(path);
        var blob = cloudBlobContainer.GetBlockBlobReference(filename);
        return blob;
    }

    private CloudBlobContainer GetCloudBlobContainer(string path){
        var account = CloudStorageAccount.Parse(_cloudConnectionString);
        var cloudBlobClient = account.CreateCloudBlobClient();
        var cloudBlobContainer = cloudBlobClient.GetContainerReference(path);
        return cloudBlobContainer;
    }
}

This means that the blob implementations can be just as simple.

IContentRepository – Blob Style

Just connect to the configured storage account, and read form the specified location to get the Razor view:

class BlobStorageContentRepository : IContentRepository
{
    private readonly BlobUtil _blobUtil;
    private readonly string _contentRoot;

    public BlobStorageContentRepository(string connectionString, string contentRoot)
    {
        _blobUtil = new BlobUtil(connectionString);
        _contentRoot = contentRoot;
    }

    public string GetContent(string id)
    {
        return _blobUtil.ReadFromLocation(_contentRoot, id + ".cshtml");
    }
}

IDataRepository – Blob style

Pretty much the same as above, except with a different “file” extension. Blobs don’t need file extensions, but I’m just reusing the same files from before.

public class BlobStorageDataRespository : IDataRepository
{
    private readonly BlobUtil _blobUtil;
    private readonly string _dataRoot;

    public BlobStorageDataRespository(string connectionString, string dataRoot)
    {
        _blobUtil = new BlobUtil(connectionString);
        _dataRoot = dataRoot;
    }

    public string GetData(string id)
    {
        return _blobUtil.ReadFromLocation(_dataRoot, id + ".json");
    }
}

IUploader – Blob style

The equivalent for saving it is similar:

class BlobStorageUploader : IUploader
{
    private readonly BlobUtil _blobUtil;
    private readonly string _outputRoot;

    public BlobStorageUploader(string cloudConnectionString , string outputRoot)
    {
        _blobUtil = new BlobUtil(cloudConnectionString);
        _outputRoot = outputRoot;
    }
    public void SaveContentToLocation(string content, string location)
    {
        _blobUtil.SaveToLocation(content, _outputRoot, location + ".html");
    }
}

Worker Role

And tying this together is a basic worker role which looks all but identical to the console app:

public override void Run()
{
    var cloudConnectionString = 
        CloudConfigurationManager.GetSetting("Microsoft.Storage.ConnectionString");

    IContentRepository content = 
        new BlobStorageContentRepository(cloudConnectionString, "content");

    IDataRepository data = 
        new BlobStorageDataRespository(cloudConnectionString, "data");

    IUploader uploader = 
        new BlobStorageUploader(cloudConnectionString, "output");

    var productIds = new[] { "1", "2", "3", "4", "5" };
    var renderer = new RenderHtmlPage(content, data);

    foreach (var productId in productIds)
    {
        var result = renderer.BuildContentResult("product", productId);
        uploader.SaveContentToLocation(result, productId);
    }
}

The Point?

By setting the output container to be public, the html files can be browsed to directly; we’ve just created an auto-generated flat file website. You could have the repository implementations access the local file system and the console app access blob storage; generate the html locally but store it remotely where it can be served from directly!

Given that we’ve already created the RazorEngine logic, the implementations of content location are bound to be simple. Swapping file system for blob storage is a snap. Check out the example code over on github

Next up

There’s a few more stages in this master plan, and following those I’ll swap some stuff out to extend this some more.

Azure Image Proxy

The previous couple of articles configured an image resizing Azure Web Role, plopped those resized images on an Azure Service Bus, picked them up with a Worker Role and saved them into Blob Storage.

This one will click in the last missing piece; the proxy at the front to initially attempt to get the pregenerated image from blob storage and failover to requesting a dynamically resized image.

New Web Role

Add a new web role to your cloud project – I’ve called mine “ImagesProxy” – and make it an empty MVC4 Web API project. This is the easiest of the projects, so you can just crack right on and create a new controller – I called mine “Image” (not the best name, but it’ll do).

Retrieve

This whole project will consist of one controller with one action – Retrieve – which does three things;

  1. attempt to retrieve the resized image directly from blob storage
  2. if that fails, go and have it dynamically resized
  3. if that fails, send a 404 image and the correct http header

Your main method/action should look something like this:

[HttpGet]
public HttpResponseMessage Retrieve(int height, int width, string source)
{
    try
    {
        var resizedFilename = BuildResizedFilenameFromParams(height, width, source);
        var imageBytes = GetFromCdn("resized", resizedFilename);
        return BuildImageResponse(imageBytes, "CDN", false);
    }
    catch (StorageException)
    {
        try
        {
            var imageBytes = RequestResizedImage(height, width, source);
            return BuildImageResponse(imageBytes, "Resizer", false);
        }
        catch (WebException)
        {
            var imageBytes = GetFromCdn("origin", "404.jpg");
            return BuildImageResponse(imageBytes, "CDN-Error", true);
        }
    }
}

Feel free to alt-enter and clean up the red squiggles by creating stubs and referencing the necessary assemblies.

You should be able to see the three sections mentioned above within the nested try-catch blocks.

  1. attempt to retrieve the resized image directly from blob storage

    var resizedFilename = BuildResizedFilenameFromParams(height, width, source);
    var imageBytes = GetFromCdn("resized", resizedFilename);
    return BuildImageResponse(imageBytes, "CDN", false);
    
  2. if that fails, go and have it dynamically resized

    var imageBytes = RequestResizedImage(height, width, source);
    return BuildImageResponse(imageBytes, "Resizer", false)
    
  3. if that fails, send a 404 image and the correct http header

    var imageBytes = GetFromCdn("origin", "404.jpg");
    return BuildImageResponse(imageBytes, "CDN-Error", true);
    

So let’s build up those stubs.

BuildResizedFilenameFromParams

Just a little duplication of code to get the common name of the resized image (yes, yes, this logic should have been abstracted out into a common library for all projects to reference, I know, I know..)

private static string BuildResizedFilenameFromParams(int height, int width, string source)
{
    return string.Format("{0}_{1}-{2}", height, width, source.Replace("/", string.Empty));
}

GetFromCDN

We’ve seen this one before too; just connecting into blob storage (within these projects blob storage is synonymous with CDN) to pull out the pregenerated/pre-reseized image:

private static byte[] GetFromCdn(string path, string filename)
{
    var connectionString = CloudConfigurationManager.GetSetting("Microsoft.Storage.ConnectionString");
    var account = CloudStorageAccount.Parse(connectionString);
    var cloudBlobClient = account.CreateCloudBlobClient();
    var cloudBlobContainer = cloudBlobClient.GetContainerReference(path);
    var blob = cloudBlobContainer.GetBlockBlobReference(filename);

    var m = new MemoryStream();
    blob.DownloadToStream(m);

    return m.ToArray();
}

BuildImageResponse

Yes, yes, I know – more duplication.. almost. The method to create an HTTP response message from before, but this time with extras params to set a header saying where the image came from, and allow to set the HTTP status code correctly. We’re just taking the image bytes and putting them in the message content, whilst setting the headers and status code appropriately.

private static HttpResponseMessage BuildImageResponse(byte[] imageBytes, string whereFrom, bool error)
{
    var httpResponseMessage = new HttpResponseMessage { Content = new ByteArrayContent(imageBytes) };
    httpResponseMessage.Content.Headers.ContentType = new MediaTypeHeaderValue("image/jpeg");
    httpResponseMessage.Content.Headers.Add("WhereFrom", whereFrom);
    httpResponseMessage.StatusCode = error ? HttpStatusCode.NotFound : HttpStatusCode.OK;

    return httpResponseMessage;
}

RequestResizedImage

Build up a request to our pre-existing image resizing service via a cloud config setting and the necessary dimensions and filename, and return the response:

private static byte[] RequestResizedImage(int height, int width, string source)
{
    byte[] imageBytes;
    using (var wc = new WebClient())
    {
        imageBytes = wc.DownloadData(
            string.Format("{0}?height={1}&width={2}&source={3}",
                          CloudConfigurationManager.GetSetting("Resizer_Endpoint"), 
                          height, width, source));
    }
    return imageBytes;
}

And that’s all there is to it! A couple of other changes to make within your project in order to allow pretty URLs:

  1. Create the necessary route:

    config.Routes.MapHttpRoute(
        name: "Retrieve",
        routeTemplate: "{height}/{width}/{source}",
        defaults: new { controller = "Image", action = "Retrieve" }
    );
    
  2. Be a moron:

      <system.webServer>
        <modules runAllManagedModulesForAllRequests="true" />
      </system.webServer>
    

That last one is dangerous; I’m using it here as a quick hack to ensure that URLs ending with known file extensions (e.g., /600/200/image1.jpg) are still processed by the MVC app instead of assuming they’re static files on the filesystem. However, this setting is not advised since it means that every request will be picked up by your .Net app; don’t use it in regular web apps which also host images, js, css, etc!

If you don’t use this setting then you’ll go crazy trying to debug your routes, wondering why nothing is being hit even after you install Glimpse..

In action

First request

Hit your proxy with a request for an image that exists within your blob storage “origin” folder; this will raise a storage exception when attempting to retrieve from blob storage and drop into the resizer code chunk e.g.:
image proxy, calling the resizer
Notice the new HTTP header that tells us the request was fulfilled via the Resizer service, and we got an HTTP 200 status code. The resizer web role will have also added a message to the service bus awaiting pick up.

Second request

By the time you refresh that page (if you’re not too trigger happy) the uploader worker role should have picked up the message from the service bus and saved the image data into blob storage, such that subsequent requests should end up with a response similar to:
image proxy, getting it from cdn
Notice the HTTP header tells us the request was fulfilled straight from blob storage (CDN), and the request was successful (HTTP 200 response code).

Failed request

If we request an image that doesn’t exist within the “origin” folder, then execution drops into the final code chunk where we return a default image and set an error status code:
image proxy, failed request

So..

This is the last bit of the original plan:

Azure Image Resizing - Conceptual Architecture

Please grab the source from github, add in your own settings to the cloud config files, and have a go. It’s pretty cool being able to just upload one image and have other dimension images autogenerated upon demand!

Automated Image Resizing and Hosting in Azure #2

Saving the resized images

Last article concluded with us creating a web role that will retrieve an image from blob storage, resize it, raise an event, and stream the result back.

This article is about the worker role to handle those raised events.

Simply enough, all we’ll be doing is creating a worker role, hooking into the same azure service bus queue, picking up each message, pulling out the relevant data within, and uploading that to blob storage.

Overall Process

A reminder of the overall process:
Azure Image Resizing Conceptual Architecture

The Worker Role

The section of that which the worker role is responsible for is as below:

Azure-Image-Resizing-Uploader-Achitecture

Add a new worker role to the Cloud project within the solution from last time (or a new one if you like). This one consists of four little methods; Run, OnStart, and OnEnd, where Run will call an UploadBlob method.

Run

This method will pick up any messages appearing on the queue, deserialize the contents of the message to a known structure, and pass them to an uploading method.

Kick off by pasting over the Run method with this one, including the definitions at the top – set the QueueName to the same queue you configured for the resize notification from the last post:

    const string QueueName = "azureimages";
    QueueClient _client;
    readonly ManualResetEvent _completedEvent = new ManualResetEvent(false);

    public override void Run()
    {
        _client.OnMessage(receivedMessage =>
        {
            try
            {
                // Process the message
                var receivedImage = receivedMessage.GetBody<ImageData>();
                UploadBlob("resized", receivedImage);
            }
            catch (Exception e)
            {
                Trace.WriteLine("Exception:" + e.Message);
            }
        }, new OnMessageOptions
        {
            AutoComplete = true,
            MaxConcurrentCalls = 1
        });

        _completedEvent.WaitOne();
    }

Yes, I’m not doing anything with exceptions; that’s an exercise for the reader.. ahem… (Me? Lazy? Never..happypathhappypathhappypath)

Naturally you’ll get a few squiggles and highlights to fix; Install-Package Microsoft.ServiceBus.NamespaceManager will help with some, as will creating the stub UploadBlob.

Now, to tidy up the reference to ImageData you could do a few things:

  1. Copy the ImageData.cs over from the previous project into this one
  2. Create a reference to the previous project and add in a using to this file
  3. Extract ImageData from the previous project into a common referenced project for them both to share.

I can live with my own conscience, so am just whacking in a reference to the previous project. Don’t hate me.

OnStart and OnStop

   public override bool OnStart()
    {
        // Set the maximum number of concurrent connections 
        ServicePointManager.DefaultConnectionLimit = 2;

        // Create the queue if it does not exist already
        var connectionString = CloudConfigurationManager.GetSetting("Microsoft.ServiceBus.ConnectionString");
        var namespaceManager = NamespaceManager.CreateFromConnectionString(connectionString);
        if (!namespaceManager.QueueExists(QueueName))
        {
            namespaceManager.CreateQueue(QueueName);
        }

        // Initialize the connection to Service Bus Queue
        _client = QueueClient.CreateFromConnectionString(connectionString, QueueName);
        return base.OnStart();
    }

    public override void OnStop()
    {
        // Close the connection to Service Bus Queue
        _client.Close();
        _completedEvent.Set();
        base.OnStop();
    }

OnStart gets a connection to the service bus, creates the named queue if necessary, and creates a queue client referencing that queue within that service bus.

OnStop kills everything off.

So, off you pop and add the requisite service connection string details; right click the role within the cloud project, properties:

Cloud-Service-Role-Properties

Click settings, add setting “Microsoft.ServiceBus.ConnectionString” with the value you used previously.

Role-Settings

Lastly:

UploadBlob

    public void UploadBlob(string path, ImageData image)
    {
        var connectionString = CloudConfigurationManager.GetSetting("Microsoft.Storage.ConnectionString");
        var account = CloudStorageAccount.Parse(connectionString);
        var cloudBlobClient = account.CreateCloudBlobClient();
        var cloudBlobContainer = cloudBlobClient.GetContainerReference(path);

        cloudBlobContainer.CreateIfNotExists();

        var blockref = image.FormattedName ?? Guid.NewGuid().ToString();
        var blob = cloudBlobContainer.GetBlockBlobReference(blockref);

        if (!blob.Exists())
            blob.UploadFromStream(new MemoryStream(image.Data));
    }

Pretty self explanatory, isn’t it? Get a reference to an area of blob storage within a container associated with an account, and stream some data to it if it doesn’t already exist (you might actually want to overwrite it so could remove that check). Bosch. Done. Handsome.

Notice we’re using the FormattedName property on ImageData to get a blob name which includes the requested dimensions; this will be used in the next article where we create the image proxy.

This means that for a request like:

http://127.0.0.1/api/Image/Resize?height=600&width=400&source=image1.jpg

The formatted name will be set to:

600_400-image1.jpg

You shouldn’t get any compile errors here but you’ll need to add in the setting for your storage account (“Microsoft.Storage.ConnectionString”).

Kick it off

To run that you’ll need VS to be running as admin (right click VS, run as admin):

run-as-admin

After you’ve got it running, fire off a request within the resizing web api (if it’s not the same solution/cloud service) for something like:

http://127.0.0.1/api/Image/Resize?height=600&width=400&source=image1.jpg

Resulting in:
Resized-Image

Then open up your Azure storage explorer to see something similar to the below within the “resized” blob container:

Resized-Blob

What happened?

  1. The ImageController on your Resizer Web API web role did the hard work and popped a message on an Azure Service Bus queue containing the image data
  2. The new Uploader worker role is subscribed to the same Azure Service Bus queue
    1. it picks up the message
    2. pulls out the image data
    3. generates an image name based on the image dimensions and origin
    4. streams the image data into a blob block with the generated name

Cool, huh?

The code for this series is up on GitHub

Next up

One more web role to act as a proxy for checking blob storage first before firing off the resize request. Another easy one. Azure is easy. Everyone should be doing this. You should wait and see what else I’ll write about Azure.. it’s awesome.. and easy..!

Smart TV 101 : Part #3 – Deploying to TV

I’m committing to doing 12 months of “101”s; posts and projects themed at beginning something new (or reasonably new) to me. January was all about node development awesomeness. February is all about Smart TV apps.

Deploying to a TV

Now that we’ve got a basic Smart TV app this post will investigate how to get that app on to the TV itself.

Packaging using the IDE

During the initial installation of the IDE you will have been asked to installed Apache; this is what it’s all been leading up to! You actually just need a web server on your home network somewhere; doesn’t have to be apache, doesn’t have to be on your developer pc.

Prerequisites

Make sure you’ve configured your Server settings within the IDE preferences:
samsung-packaging-server-prefs
samsung-packaging-server-prefs-root

The packaging process will drop a zip file into a Widget/ subdirectory of this directory.

Initiating package creation

As for actually creating the package, if you’re using the Eclipse IDE then you’re spoiled for choice: highlight the project in your project explorer and then either

  1. Click the Samsung App Packaging button
    samsung-app-packaging-1
  2. Click the Samsung Smart TV SDK menu, then click App Packaging
    samsung-smart-sdk-packaging-menu
  3. Right click the project in project explorer, Samsung Smart TV SDK, Packaging
    samsung-sdk-packaging-context-menu

Whichever you do you’ll end up with the same results:
samsung-packaging-dialog
samsung-packaging-confirmation

Results

Assuming you’ve set up the server settings in your preferences then you’ll end up with:

  1. a zip file placed within the SDK installation’s Package/ directory
    samsung-package-sdk-dir
  2. the same zip file placed in a Widget/ subdirectory on your configured server
    samsung-package-widget-dir
  3. a new (or updated) widgetlist.xml file in the root of your configured server’s directory

    samsung-widgetlist-xml

Make sure that you can browse to this file and that Apache is running by opening a browser and putting in http://<your development pc’s IP>/widgetlist.xml

Anatomy of a package and a widgetlist

So what is a package made of? Looking at the image above for the the zip file that’s created you’ll see that it looks almost identical to the contents of your application within the workspace:
samsung-app-workspace

So essentially the packaging step is zipping up your project directory, putting it into a specified web server subdirectory, and updating an XML file. Obviously, you shouldn’t need an IDE or SDK to do this sort of thing and I’ll be getting on to this development & deployment process without using Eclipse or installing Apache in a later post.

Deploying!!

Now that we have a package it’s time to load it on to your Smart TV. For this post I’ll be talking about deploying from the development pc via your home network, and in a later post will be talking about loading in packages externally.

TV setup

Make sure your TV is connected to your network and that your development pc’s Windows Firewall is off (or at least configured to allow local network traffic).

  • Turn on the TV
  • Go to your app hub/Smart Hub
  • Press the Login button
  • Create an account using the username “develop” and set a password

developer account

After you’ve successfully created the develop user you need to

  • Open the Settings menu
  • Open the new Development sub menu
  • Choose Setting server IP and enter the IP of your development PC
  • Choose User application synchronisation to check the apps that are listed in widgetlist.xml and install (or update) them all

download dev app

You should now find your application on the App Hub screen with a little red “user” banner over it; select it to run it, just like any other app.

asos-app-running-on-smart-tv-1

Node.js 101: Wrap up

Year of 101s, Part 1 – Node January

Summary – What was it all about?

I set out to spend January learning some node development fundementals.

Part #1 – Intro

I started with a basic intro to using node – a Hello World – which covered what node.js is, how to create the most basic of all programs, and mentioned some of the development environments.

Part #2 – Serving web content

Second was creating a very simple node web server, which covered using nodemon to develop your node app, the concept of exports, basic request routing, and serving various content types.

Part #3 – A basic API

Next was a simple API implementation, where I proxy calls to the Asos API, return a remapped subset of the data returned, reworked the routing creating basic search functionality and a detail page, and touched on being able to pass in command line arguements.

Part #4 – Basic deployment and hosting with Appharbor, Azure, and Heroku

Possibly the most interesting and fun post for me to work on involved deploying the node code on to three cloud hosting solutions where I discovered the oddities each provider has, various solutions to the problems this raises, as well as some debugging cleverness (nice work, Heroku!). The simplicity of a git-remote-push-deploy process is incredible, and really makes quick application development and hosting even more enjoyable!

Part #5 – Packages

Another interesting one was getting to play with node packages, the node package manager (npm), the express web framework, jade templating engine, and stylus css pre-processor, and deploying node apps with packages to cloud hosting.

Part #6 – Web-based development

The final part covered the fantastic Cloud9IDE, including a (very) basic intro to github, and how Cloud9 can still be used in developing and deploying directly to Azure, Appharbor, or Heroku.

What did I get out of it?

I really got into githubbing and OSSing, and really had to try hard to not over stretch myself as I had starting forking repos to try and make a few tweaks to things whilst working on the node month.

It has been extremely inspiring and has opened up so many other random tangents for me to explore in other projects at some other time. Very motivating stuff.

I’ve now got a month of half decent blog posts – I had only intended to do a total of 4 posts but including this one I’ve done 7, since I kept adding more information as it turned up and needed to split a few posts into two.

Also I’ve learned a bit about blogging; trying to do posts well in advance allowed me to build up the details once I’d discovered more whilst working on subsequent posts. For example, how Appharbor and Azure initially track master – but can be configured to track different branches. Also, debugging with Heroku only came up whilst working with packages in Heroku.

Link list

Node tutorials and references

Setting up a node development environment on Windows
Node Beginner – a great article, and I’ve also bought the associated eBooks.
nodejs.org – the official node site, the only place to go for reference

Understanding Javascript better

Execution in The Kingdom of Nouns
Object Orientation and Inheritance in Javascript

Appharbor

Appharbor and git

Heroku

Heroku toolbelt download and reference
node on Heroku

Azure

Checkout what Azure can do!

February – coming up, Samsung Smart TV App Development!

Yeah, seriously. How random is that?.. 🙂

Node.js 101: Part #6 – Web-Based Development

Web-Based Development

Following on from my recent post about doing something this year, I’m committing to doing 12 months of “101”s; posts and projects themed at begining something new (or reasonably new) to me

January is all about node, and I started with a basic intro, then cracked open a basic web server with content-type manipulation and basic routing, created a basic API, before getting stuck into some great deployment and hosting solutions and then an intro to using node packages including cloud deployment

In my previous posts I’ve been developing code locally, committing to a local git repo and pushing to a remote git repo. This is fine for the particular situation, but what about when I’m not at my own pc and feel the need to make some changes? Maybe I’m at my dad’s place using his netbook with no dev tools installed?

Cloud9IDE

Cloud9 is an incredible web-based development environment that is so feature-rich you’d usually expect to fork out wads of cash for the opportunity to use it: LIVE interactive collaborative development in the same shared IDE (see multiple people editing a file at once), code completion, syntax highlighting, an integrated console for those useful commands like ssh, git, npm.

It’s frikkin open source too, so you could install it on your own servers and have your own private IDE for your own code, based in a web browser. How amazing is that?

It’s built on Node.js in the back-end and javascript and HTML5 at the front. I’ve been playing around on there for the past year, and it’s been improving all the time – it’s just the best thing around. Go and start using it now. There are still some bugs, but if you find something you can always try to fix it and send a pull request!

c9-demo-1

So. That’s great for my web-based development, so how about if I need to collaborate on this project with people who I’m not sharing my C9 environment with?

GitHub

If you’re not already using github but are already using git (what the hell are you playing at?!), go and sign up for this exceptionally “powerful collaboration, review, and code management for open source and private development projects.”

You configure github as your git remote, push your code to it, and other users can pull, fork, edit, and send pull requests, so that you’re still effectively in charge of your own code repository whilst others can contribute to it or co-develop with you.

github-demo-1

Great. So how do I deploy my code if I’m using this sort of remote, web-based development environment?

Azure/AppHarbor/Heroku

Deploying to an existing Azure/Appharbor/Azure site from Cloud9IDE is the same as from your local dev pc; set up a remote and push to it! C9 has a built in terminal should the bare command line at the bottom of the screen not do it for you.

As for creating a new hosting environment, C9 also includes the ability to create them from within itself for both Azure and Heroku! I’ve actually never managed to get this working, but am quite happy to create the empty project on Heroku/Azure/Appharbor and use git from within C9 to deploy.

c9-azure-setup-1

Coming up

Next post will be the last for this first month of my Year of 101s: January Wrap-Up – Node.js 101; a summary of what I’ve learned in January whilst working with Node, as well as a roundup of the useful links I’ve used to get all of the information.

What’s in February’s 101?.. wait and see..!

Node.js 101: Part #5 – Packages

Following on from my recent post about doing something this year, I’m committing to doing 12 months of “101”s; posts and projects themed at begining something new (or reasonably new) to me

January is all about node, and I started with a basic intro, then cracked open a basic web server with content-type manipulation and basic routing, created a basic API, before getting stuck into some great deployment and hosting solutions

Node Packages

Up until now I’ve been working with node using the basic code I’ve written myself. What about if you want to create an application that utilises websockets? Or how about a Sinatra-inspired web framework to shortcut the routing and request handling I’ve been writing? Maybe you want to have a really easy to build website without having to write HTML with a nice look without writing any CSS? Like coffeescript? mocha? You gaddit.

Thanks to the node package manager you can easily import pre-built packages into your project to do alllll of these things and loads more. This command line tool (which used to be separate but is now a part of the node install itself) can install the packages in a ruby gem-esque/.Net nuget fashion, pulling down all the dependencies automatically.

Example usage:

npm install express -g

The packages (compiled C++ binaries, just like node itself) are pulled either into your working directory (local node_modules folder) or as a global package (with the “-g” parameter). You then reference the packages in your code using “requires”.

Or you can install everything your project needs at once by creating a package.json e.g.:

{
  "name": "basic-node-package",
  "version": "0.0.1",
  "dependencies": {
    "express": "*",
    "jade": "*",
    "stylus": "*",
    "nib": "*"
  }
}

And then call

npm install

A great intro to using these four packages can be found on the clock website

I’ve decided to write a wrapper for my basic node API using express, jade, stylus, and nib. All I’m doing is call the api and displaying the results on a basic page. The HTML is being written in jade and the css in stylus & nib. Routing is being handled by express.

app.js

var express = require('express')
  , stylus = require('stylus')
  , nib = require('nib')
  , proxy = require('./proxy')

var app = express()
function compile(str, path) {
  return stylus(str)
    .set('filename', path)
    .use(nib())
}
app.set('views', __dirname + '/views')
app.set('view engine', 'jade')
app.use(express.logger('dev'))
app.use(stylus.middleware(
  { src: __dirname + '/public'
  , compile: compile
  }
))
app.use(express.static(__dirname + '/public'))

var host = 'rposbo-basic-node-api.azurewebsites.net';

app.get('/products/:search/:key', function (req,response) {
console.log("Request handler 'products' was called");

  var requestPath = '/products/' + req.params.search + '?key=' + req.params.key;
    
  proxy.getRemoteData(host, requestPath, function(json){
    var data = JSON.parse(json);
    
    response.render('products',
        {
            title: 'Products for' + data.category,
            products: data.products,
            key: req.params.key
        }
    );
  })
});

app.get('/product/:id/:key', function (req,response) {
console.log("Request handler 'product' was called");

  var requestPath = '/product/' + req.params.id + '?key=' + req.params.key;
    
  proxy.getRemoteData(host, requestPath, function(json){
    var data = JSON.parse(json);
    
    response.render('product',
        {
            title: data.title,
            product: data
        }
    );
  })
});

app.get('/', function (req,response) {
    console.log("Request handler 'index' was called");
    response.end("Go");
});

app.listen(process.env.PORT);

So that file sets up the express, jade, and stylus references and wires up the routes for /products/ and /product/ which then make a call using my old proxy.js to the API; I can probably do all of this with a basic inline http get, but I’m just reusing it for the time being.

Notice how the route “/products/:search/:key” which would actually be something like “/products/jeans/myAp1k3Y” is referenced using req.params.search and req.params.key.

Then all I’m doing is making the API call, parsing the returned JSON and passing that parsed object to the view.

The views are written in jade and have a main shared one:
layout.jade

!!!5
html
  head
    title #{title}
    link(rel='stylesheet', href='/stylesheets/style.css')
  body
    header
      h1 basic-node-packages
    .container
      .main-content
        block content
      .sidebar
        block sidebar
    footer
      p Running on node with Express, Jade and Stylus

Then the route-specific ones:

products.jade:

extend layout
block content
  p
    each product in products
        li
            a(href='/product/' + product.id + '/' + key)
                img(src=product.image)
                p
                    =product.title

and

product.jade:

extend layout
block content
  p
    img(src=product.image)
    li= product.title
    li= product.price

The stylesheet is written in stylus & nib:

style.styl

/*
 * Import nib
 */
@import 'nib'

/*
 * Grab a custom font from Google
 */
@import url('http://fonts.googleapis.com/css?family=Quicksand')

/*
 * Nib provides a CSS reset
 */
global-reset()

/*
 * Store the main color and
 * background color as variables
 */
main-color = #fa5b4d
background-color = #faf9f0

body
  font-family 'Georgia'
  background-color background-color
  color #444

header
  font-family 'Quicksand'
  padding 50px 10px
  color #fff
  font-size 25px
  text-align center

  /*
   * Note the use of the `main-color`
   * variable and the `darken` function
   */
  background-color main-color
  border-bottom 1px solid darken(main-color, 30%)
  text-shadow 0px -1px 0px darken(main-color, 30%)

.container
  margin 50px auto
  overflow hidden

.main-content
  float left

  p
    margin-bottom 20px

  li
    width:290
    float:left

p
  line-height 1.8

footer
  margin 50px auto
  border-top 1px dotted #ccc
  padding-top 5px
  font-size 13px

And this is compiled into browser-agnostic css upon compilation of the app.

The other files used:

proxy.js:

var http = require('http');

function getRemoteData(host, requestPath, callback){
  
    var options = {
        host: host,
        port: 80,
        path: requestPath
    };
 
    var buffer = '';
    var request = http.get(options, function(result){
        result.setEncoding('utf8');

        result.on('data', function(chunk){
            buffer += chunk;
        });

        result.on('end', function(){
            callback(buffer);
        });
    });

    request.on('error', function(e){console.log('error from proxy call: ' + e.message)});
    request.end();
};
exports.getRemoteData = getRemoteData;

package.json

{
  "name": "basic-node-package",
  "version": "0.0.1",
  "dependencies": {
    "express": "*",
    "jade": "*",
    "stylus": "*",
    "nib": "*"
  }
}

web.config

<configuration>
    <system.web>
        <compilation batch="false" />
    </system.web>
    <system.webServer>
        <handlers>
            <add name="iisnode" path="app.js" verb="*" modules="iisnode" />
        </handlers>
        <iisnode loggingEnabled="false" />

        <rewrite>
            <rules>
                <rule name="myapp">
                    <match url="/*" />
                    <action type="Rewrite" url="app.js" />
                </rule>
            </rules>
        </rewrite>
    </system.webServer>
</configuration>

All of these files are, as usual, on Github

Deployment with Packages

Something worth bearing in mind is that deploying something which includes packages and the result of packages (e.g. minified js or css from styl) requires all of these artifacts to be added into your git repo before deployment to certain hosts such as Appharbor and Azure; Heroku will actually run an npm install as part of the deployment step, I believe, and also compile the .styl into .css, unlike Azure/Appharbor.

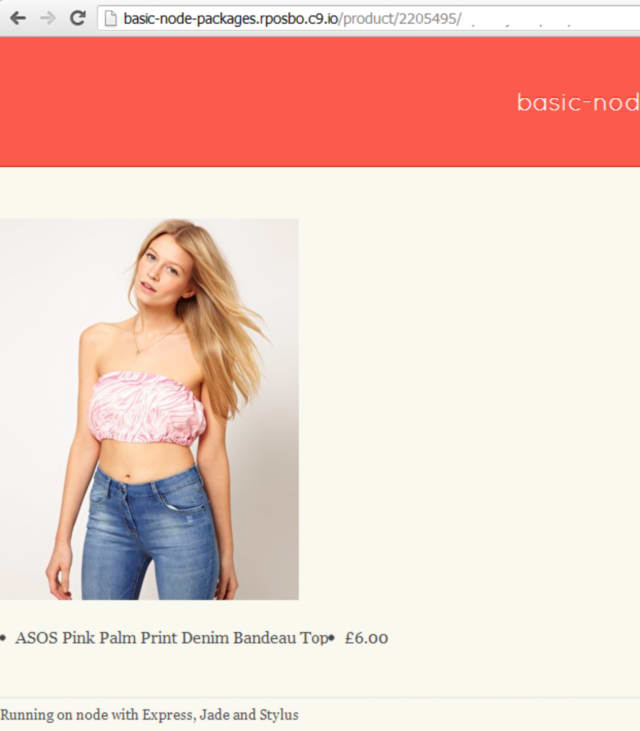
The files above give a very basic web interface to the /products/ and /product/ routes:
asos-jade-products-1

asos-jade-product-1

Coming up

Web-based node development and deployment!