Following on from my recent post about doing something this year, I’m committing to doing 12 months of “101”s; posts and projects themed at begining something new (or reasonably new) to me
Basic web server in node
(if you have no clue what node.js is, check out my quick overview from the last post)
Having installed node locally your easiest option for starting development is to open a text editor (notepad, sublimetext, notepad++, whatever) and to launch a command prompt.
- Create an initial node file, say app.js, put some content in there (such as console.log(“hiyaa”)) and save it.
- In the command prompt change to your working directory and fire off “node app.js”
- Now that you’ve seen that work, kill the node process with Ctrl+C
Making Changes 1 – the slow way
Now let’s move from command line development to web development.
- For this you’ll need a web server, so create this server.js file:
[js]var http = require("http");
http.createServer(function(request, response) {
response.writeHead(200, {"Content-Type": "text/plain"});
response.write("Hello World");
response.end();
}).listen(3000);[/js]
- Save it, run “node server.js”, open a browser and navigate to http://localhost:3000
- Now change the server.js file to:
[js highlight=”5″]var http = require("http");
http.createServer(function(request, response) {
response.writeHead(200, {"Content-Type": "text/plain"});
response.write("Hello moon");
response.end();
}).listen(3000);
[/js]
- Save, refresh your browser… Huh? Nothing’s changed?
You need to restart the node process in order to pick up the changes to the code; your first port of call will be hitting Ctrl+C, up, enter.
Now refresh the page and bask in the glorious result:
Making Changes 2 – the easy way
That restart process is going to get annoying after the first hundred times; surely there’s a better way? Darn right there is! Some clever people out there have come up with numerous solutions to this, of which I have gone with nodemon, which monitors for file changes and automatically restarts the node process:
- Firstly run [code]npm install -g nodemon[/code]
- Then instead of using node server.js you use [code]nodemon server.js[/code]
- Give that a go, open your browser at your node site, change server.js to:
[js highlight=”5″]var http = require("http");
http.createServer(function(request, response) {
response.writeHead(200, {"Content-Type": "text/plain"});
response.write("CIAO MARS");
response.end();
}).listen(3000);
[/js]
- Save it and notice that your command line has output an alert that the file change has been detected and the node process is restarting. Refresh your browser and you’ll see the changes already available. Hurrah!
Getting stuck in
The majority of this next section is lifted from the best node.js introduction tutorial, nodebeginner. I won’t rewrite too much of it, I’d suggest you read that post if there’s anything here I gloss over too much.
1) Exports & a basic web server
So far we’ve seen how to use a single file to run a basic web server. Using the concept of “exports” we can set this up as a self-contained module (modules are a key concept in node) and reference it from a different initialisation file.
Rewrite our current basic web server as a module and save it as “server.js”:
[js]var http = require("http");
function start(port) {
http.createServer(function(request, response) {
response.writeHead(200, {"Content-Type": "text/plain"});
response.write("Hello world");
response.end();
}).listen(port);
console.log("Server has started listening on port " + port);
}
exports.start = start;[/js]
You can see that the same functionality is in there, except that the module now returns a function instead of executing the code; no server is actually created yet.
Now let’s create a new initialisation file called “app.js” and reference the server module:
[js]var server = require("./server");
var port = process.env.PORT || 3000;
server.start(port);[/js]
Firstly, there’s the reference at the top to “./server” – this just links our server.js file so that we can call the “start” function that we exposed from that server.js file.
Secondly I’m now passing in the port to use; either the current process’s environment setting (useful for deployment later on, when you can’t control the port your process will actually run on) or default to 3000 (for development purposes).
Now kick off node and point it at “app.js” – the same familiar “Hello world” text should greet you in the browser.
2) Basic routing
That’s all well and good, but it’s not much use displaying “hello world” all the time. Firstly, let’s introduce the (exceptionally) basic concepts of routing.
Define the request handler for a particular route, and expose the function:
requestHandler.js – creating a single route, “hello”, defining what it does, and exporting it:
[js]function hello(response) {
console.log("Request handler ‘hello’ was called.");
response.writeHead(200, {"Content-Type": "text/plain"});
response.write("hello world");
response.end();
}
exports.hello = hello;[/js]
Create a basic router to match the request against the defined handlers:
router.js – a function to take an array of routes that have been wired up (“handle”), that current request’s path (“pathname”), and the response to manipulate, and attempt to match and call the correct function else return a 404:
[js]function route(handle, pathname, response) {
if (typeof handle[pathname] === ‘function’) {
handle[pathname](response);
} else {
console.log("No request handler found for " + pathname);
response.writeHead(404, {"Content-Type": "text/plain"});
response.write("404 Not found");
response.end();
}
}
exports.route = route;[/js]
Now let’s update the server.js and app.js to wire these together:
server.js – the web server, made more generic, and using the “url” module to expose the “pathname” of the current request for matching to a route, as well as slightly abstracting the request function itself:
[js]var http = require("http"),
url = require("url");
function start(route, handle, port) {
function onRequest(request, response) {
var pathname = url.parse(request.url).pathname;
route(handle, pathname, response);
}
http.createServer(onRequest).listen(port);
console.log("Server has started listening on port " + port);
}
exports.start = start;[/js]
app.js – wire up the router and request handler, define the “hello” route in a new “handles” array and map it to the “requestHandlers.hello” function, passing those into the server function:
[js]var server = require("./server"),
router = require("./route"),
requestHandlers = require("./requestHandlers");
var handle = {}
handle["/hello"] = requestHandlers.hello;
var port = process.env.PORT || 3000;
server.start(router.route, handle, port);[/js]
Fire up nodemon pointing at app.js and visit http://localhost:3000/hello to see the route “/hello” rendered magnificently on screen.
3) Returning content
Now we’ve just got the same functionality we had right at the start – good old “hello world”. Adding new request handlers and registering the routes will allow us to return more content. First up, let’s add “goodbye”:
requestHandlers.js – update this with the new content:
[js highlight=”8-13,16″]function hello(response) {
console.log("Request handler ‘hello’ was called.");
response.writeHead(200, {"Content-Type": "text/plain"});
response.write("hello world");
response.end();
}
function goodbye(response) {
console.log("Request handler ‘goodbye’ was called.");
response.writeHead(200, {"Content-Type": "text/plain"});
response.write("goodbye cruel world");
response.end();
}
exports.hello = hello;
exports.hello = goodbye;[/js]
app.js – register the new route by referencing the newly created function into the “handle” array:
[js highlight=”7″]var server = require("./server"),
router = require("./route"),
requestHandlers = require("./requestHandlers");
var handle = {}
handle["/hello"] = requestHandlers.hello;
handle["/goodbye"] = requestHandlers.goodbye;
var port = process.env.PORT || 3000;
server.start(router.route, handle, port);[/js]
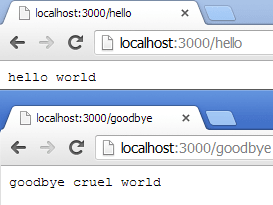
That’s all you need to do. Now kick off your process and visit http://localhost:3000/hello and http://localhost:3000/goodbye to see:
So adding new content is a case of defining a function to return content and registering a new route.
4) Returning different types of content
You may have noticed that when making any call to your node app you see two responses:
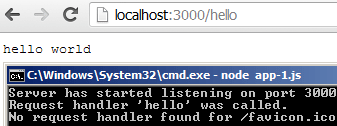
That second one is the browser asking for the favicon. You can either register a route to return an HTTP 200 and nothing else (in order to avoid 404s) or you can create a route and send back an actual favicon.
requestHandlers.js – add a reference to the filesystem module “fs” and create a new handler to read an actual favicon image (I’m using my own website’s favicon) and write it out to the response stream:
[js highlight=”1,5,6,12,13,17-22,26″]var fs = require(‘fs’);
function hello(response) {
console.log("Request handler ‘hello’ was called.");
response.writeHead(200, {"Content-Type": "text/html"});
response.write("<em>hello world</em>");
response.end();
}
function goodbye(response) {
console.log("Request handler ‘goodbye’ was called.");
response.writeHead(200, {"Content-Type": "text/html"});
response.write("<em>goodbye cruel world</em>");
response.end();
}
function favicon(response) {
console.log("Request handler ‘favicon’ was called.");
var img = fs.readFileSync(‘./favicon.ico’);
response.writeHead(200, {"Content-Type": "image/x-icon"});
response.end(img,’binary’);
}
exports.hello = hello;
exports.goodbye = goodbye;
exports.favicon = favicon;[/js]
Notice the “favicon” function reads in the icon file from the filesystem and also sets the content type to “image/x-icon”.
app.js – wire up the new route:
[js highlight=”8″]var server = require("./server"),
router = require("./route"),
requestHandlers = require("./requestHandlers");
var handle = {}
handle["/hello"] = requestHandlers.hello;
handle["/goodbye"] = requestHandlers.goodbye;
handle["/favicon.ico"] = requestHandlers.favicon;
var port = process.env.PORT || 3000;
server.start(router.route, handle, port);[/js]
Refresh and you’ll get:
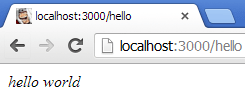
Oooh – pretty. So adding new content is a new request handler and registering a new route, and outputting a different content type if necessary.
In summary
So that’s the basics of serving web content via node, including basic routing and content type manipulation.
The files for this post can all be found over on github
Next up: a basic RESTful API in node which I’ll be using for several of the other 101 projects throughout this year.