Following on from my recent post about doing something this year, I’m committing to doing 12 months of “101”s; posts and projects themed at begining something new (or reasonably new) to me.
January is all about node, and I started with a basic intro, then cracked open a basic web server with content-type manipulation and basic routing.
Building and calling an API in node
Now on to the meat of this month; building a basic RESTful API. I don’t plan on writing the underlying business logic myself, so will just wrap an existing API in order to further demonstrate the routing, content type usage, and proxying calls to another server.
For this post I’ll be using the Asos API for querying the Asos database of clothes and returning the data necessary to build other basic applications on; intially a web site, but later on various apps on various devices.
The Underlying API: Asos.com
Asos, the online fashion “destination”, had an API open for developers to mess aorund with for a short period and as one of the first people to get involved I managed to snap up an api key. This will give me the ability to query the product catalogue and do basic functions such as adding products to a basket.
Asos

Asos API
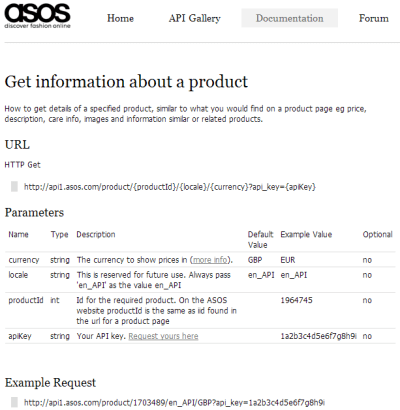
An example request takes the format:
[code]http://api1.asos.com/product/{productId}/{locale}/{currency}?api_key={apiKey}[/code]
and an example response is:
[code]
{
"BasePrice":35.0,
"Brand":"ASOS",
"Colour":null,
"CurrentPrice":"£35.00",
"InStock":true,
"IsInSet":false,
"PreviousPrice":"",
"PriceType":"Full",
"ProductId":1703489,
"ProductImageUrls":[
"http://images.asos.com/inv/media/9/8/4/3/1703489/red/image1xxl.jpg",
"http://images.asos.com/inv/media/9/8/4/3/1703489/image2xxl.jpg",
"http://images.asos.com/inv/media/9/8/4/3/1703489/image3xxl.jpg",
"http://images.asos.com/inv/media/9/8/4/3/1703489/image4xxl.jpg"
],
"RRP":"",
"Size":null,
"Sku":"101050",
"Title":"ASOS Fringe Sleeve Mesh Crop",
"AdditionalInfo":"100% Polyester\n\n\n\n\n\nSIZE & FIT \n\nModel wears: UK 8/ EU 36/ US 4\n\n\n\nSize UK 8/ EU 36/ US 4 side neck to hem measures: 46cm/18in",
"AssociatedProducts":[{
"BasePrice":35.0,
"Brand":"ASOS",
"Colour":null,
"CurrentPrice":"£35.00",
"InStock":false,
"IsInSet":false,
"PreviousPrice":"",
"PriceType":"Full",
"ProductId":1645550,
"ProductImageUrls":[
"http://images.asos.com/inv/media/0/5/5/5/1645550/black/image1l.jpg"
],
"RRP":"",
"Size":null,
"Sku":null,
"Title":"ASOS Panel Mesh Body Contour Top",
"ProductType":"Recommendations"
}],
"CareInfo":"Machine wash according to instructions on care label",
"Description":"Fringed crop top, featuring a reinforced boat neckline, raglan style slashed sleeves with tasselled fringe trim, and a cropped length, in a sheer finish.",
"Variants":[
{
"BasePrice":35.00,
"Brand":null,
"Colour":"Beige",
"CurrentPrice":"£35.00",
"InStock":true,
"IsInSet":false,
"PreviousPrice":"",
"PriceType":"Full",
"ProductId":1716611,
"ProductImageUrls":[
"http://images.asos.com//inv/media/9/8/4/3/1703489/beige/image1xxl.jpg"
],
"RRP":"",
"Size":"UK 6",
"Sku":null,
"Title":null
}]
}[/code]
For the purposes of this post all I want to do is wrap a couple of the slightly confusing and overly complex Asos API calls with some really basic, more RESTy, ones.
To do this I’m going to initially create a new module called:
proxy.js
[js]var http = require(‘http’);
function getRemoteData(host, requestPath, callback){
var options = {
host: host,
port: 80,
path: requestPath
};
var buffer = ”;
var request = http.get(options, function(result){
result.setEncoding(‘utf8’);
result.on(‘data’, function(chunk){
buffer += chunk;
});
result.on(‘end’, function(){
callback(buffer);
});
});
request.on(‘error’, function(e){console.log(‘error from proxy call: ‘ + e.message)});
request.end();
};
exports.getRemoteData=getRemoteData;[/js]
As you can see, all this does is make an HTTP GET call to a remote server, passing the “options” object.
Using the “on” event wiring up notation, I’ve just appended the chunks of data returned from the GET call to a variable, which is then passed to the referenced callback function.
Now I’ll wire this up:
requestHandlers.js:
[js]var proxy = require(‘./proxy’);
function products(response) {
console.log("Request handler ‘products’ was called");
var host = ‘api1.asos.com’;
var requestPath = ‘/productlisting/search/jeans/1/PriceAscending/en_API/GBP?api_key={snipped api key}’;
response.writeHead(200, {"Content-Type": "application/json"});
proxy.getRemoteData(host, requestPath, function(json){
response.write(json);
response.end();
});
}
exports.products = products;[/js]
I’m removing the previously entered hello, goodbye, and favicon routes for brevity. Notice the reference to the proxy module at the top as well as the new handler itself.
The URL used above executes a product search for the term “jeans”.
Wire it all up:
server.js:
[js]var http = require("http"),
url = require("url");
function start(route, handle, port) {
function onRequest(request, response) {
var pathname = url.parse(request.url).pathname;
route(handle, pathname, response);
}
http.createServer(onRequest).listen(port);
console.log("Server has started listening on port " + port);
}
exports.start = start;[/js]
app.js
[js highlight=”6″]var server = require("./server"),
router = require("./route"),
requestHandlers = require("./requestHandlers");
var handle = {}
handle["/products"] = requestHandlers.products
var port = process.env.PORT || 3000;
server.start(router.route, handle, port);[/js]
Kick off [code]nodemon app.js[/code]
If you were to have an API key and had put it in the URL above, you’d see something like:
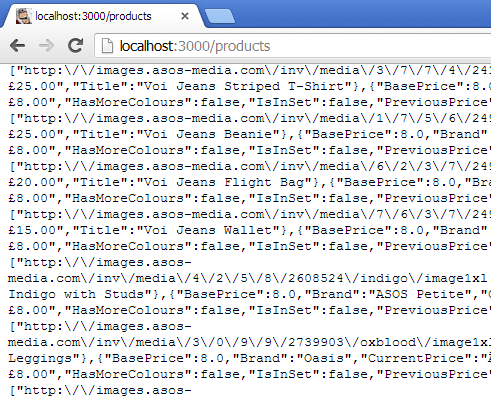
Right. Ok. That’s a lot of data. Just for now I’d like to make it easier to view, so I’ll limit what is returned and also just write out a basic HTML page.
requestHandlers.js:
[js highlight=”8,11,13-20″]var proxy = require(‘./proxy’);
function products(response) {
console.log("Request handler ‘products’ was called");
var host = ‘api1.asos.com’;
var requestPath = ‘/productlisting/search/jeans/1/PriceAscending/en_API/GBP?api_key={snipped api key}’;
response.writeHead(200, {"Content-Type": "text/html"});
proxy.getRemoteData(host, requestPath, function(json){
var data = JSON.parse(json);
var html = "<h1>Asos Search for JEANS</h1>";
response.write(html);
for(var i=0; i<data.ItemCount; i++) {
if (data.Listings[i] != null){
response.write("<li>"
+ data.Listings[i].Title + "<br /><img src=’"
+ data.Listings[i].ProductImageUrl + "’ /></li>");
}
}
response.end();
});
}
exports.products = products;
[/js]
Given that the Asos Api returns valid JSON I can just parse it and then access the structure of that JSON; in this case the ItemCount & Listings at the top level and Title & ProductImageUrl within Listings.
This will now display something like:
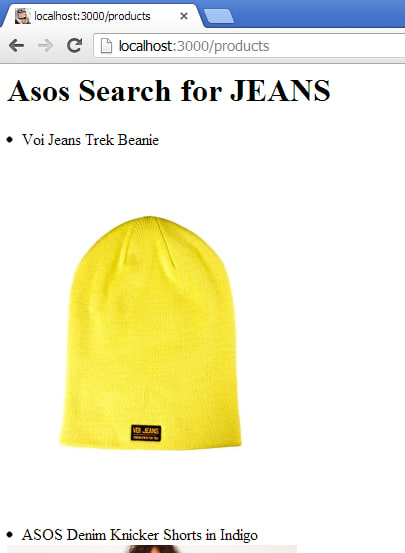
(Really? A beanie is the first result in the search for “jeans”? Anyway…)
Actually searching
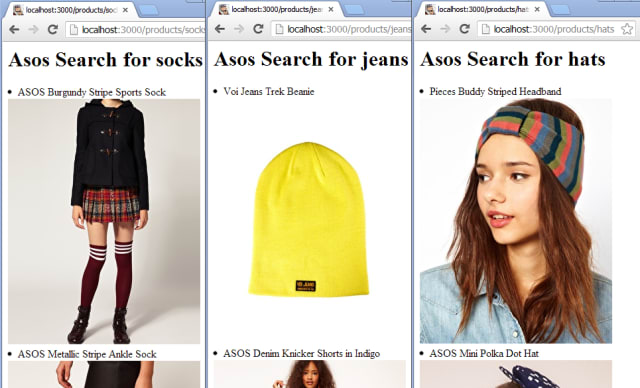
Next we’ll just make the request actually execute a search with the value passed in to our own API, using the format “/products/{search term}”
Firstly I’ll edit the router to take the primary route handler from the first part of the URL (e.g “http://localhost:3000/products/jeans”) and pass the full path into the router for further use.
router.js:
[js highlight=”2,4,5″]function route(handle, pathname, response) {
var root = pathname.split(‘/’)[1];
if (typeof handle[root] === ‘function’) {
handle[root](response, pathname);
} else {
console.log("No request handler found for " + pathname);
response.writeHead(404, {"Content-Type": "text/plain"});
response.write("404 Not found");
response.end();
}
}
exports.route = route;[/js]
Next change the request handler to pick out the next section from the url e.g. “http://localhost:3000/products/jeans”
requestHandlers.js:
[js highlight=”6,8,15″]var proxy = require(‘./proxy’);
function products(response) {
console.log("Request handler ‘products’ was called");
var search = path.split(‘/’)[2];
var host = ‘api1.asos.com’;
var requestPath = ‘/productlisting/search/’ + search + ‘/1/PriceAscending/en_API/GBP?api_key={snipped api key}’;
response.writeHead(200, {"Content-Type": "text/html"});
proxy.getRemoteData(host, requestPath, function(json){
var data = JSON.parse(json);
var html = "<h1>Asos Search for " + search + "</h1>";
response.write(html);
for(var i=0; i<data.ItemCount; i++) {
if (data.Listings[i] != null){
response.write("<li>"
+ data.Listings[i].Title + "<br /><img src=’"
+ data.Listings[i].ProductImageUrl + "’ /></li>");
}
}
response.end();
});
}
exports.products = products;
[/js]
One last tweak to the initialisation file to remove a leading slash which isn’t needed now that we’re splitting the url to match instead of using the full url path:
app.js:
[js highlight=”6″]var server = require("./server"),
router = require("./router"),
requestHandlers = require("./requestHandlers");
var handle = {}
handle["products"] = requestHandlers.products;
var port = process.env.PORT || 3000;
server.start(router.route, handle, port);[/js]
We now have basic search capabilities:
Now let’s get a basic product detail page working. For this I should need to just add a new request handler and wire it up.
requestHandlers.js:
[js highlight=”20,22″]var proxy = require(‘./proxy’);
function products(response, path) {
console.log("Request handler ‘products’ was called");
var search = path.split(‘/’)[2];
var host = ‘api1.asos.com’;
var requestPath = ‘/productlisting/search/’ + search + ‘/1/PriceAscending/en_API/GBP?api_key={snipped api key}’;
response.writeHead(200, {"Content-Type": "text/html"});
proxy.getRemoteData(host, requestPath, function(json){
var data = JSON.parse(json);
var html = "<h1>Asos Search for " + search + "</h1>";
response.write(html);
for(var i=0; i<data.ItemCount; i++) {
if (data.Listings[i] != null){
response.write("<li><a href=’/product/" + data.Listings[i].ProductId + "’>"
+ data.Listings[i].Title + "<br /><img src=’"
+ data.Listings[i].ProductImageUrl + "’ /></a></li>");
}
}
response.end();
});
}
function product(response, path) {
console.log("Request handler ‘product’ was called for " + path);
var productId = path.split(‘/’)[2];
var host = ‘api1.asos.com’;
var requestPath = ‘/product/’ + productId + ‘/en_API/GBP?api_key={snipped api key}’;
response.writeHead(200, {"Content-Type": "text/html"});
proxy.getRemoteData(host, requestPath, function(json){
var data = JSON.parse(json);
var html = "<h1>" + data.Title + "</h1>"
+ "<img src=’" + data.ProductImageUrls[0].replace(‘xxl’,’xl’) + "’ />"
response.write(html);
response.end();
});
}
exports.products = products;
exports.product = product;
[/js]
As well as the new handler I’ve also added a link from the listing page to the detail page, just for FUN.
app.js:
[js highlight=”7″]var server = require("./server"),
router = require("./router"),
requestHandlers = require("./requestHandlers");
var handle = {}
handle["products"] = requestHandlers.products;
handle["product"] = requestHandlers.product;
var port = process.env.PORT || 3000;
server.start(router.route, handle, port);[/js]

Back to JSON
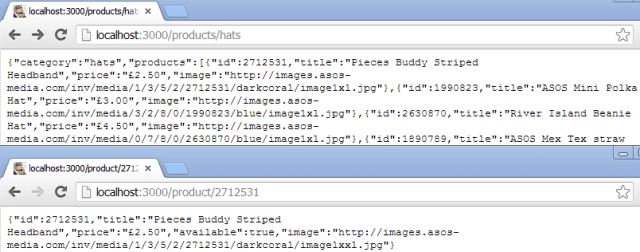
Ok, so that’s a very basic website wrapped around an API. Since I plan to use this wrapper as a basic API itself I’m going to revert it to returning JSON and simplify the data structure for my needs.
requestHandlers.js:
[js]var proxy = require(‘./proxy’);
function products(response, path) {
console.log("Request handler ‘products’ was called");
var search = path.split(‘/’)[2];
var host = ‘api1.asos.com’;
var requestPath = ‘/productlisting/search/’ + search + ‘/1/PriceAscending/en_API/GBP?api_key={stripped api key}’;
response.writeHead(200, {"Content-Type": "application/json"});
proxy.getRemoteData(host, requestPath, function(json){
var data = JSON.parse(json);
var newJson = {
category: data.Description,
products: []
};
data.Listings.forEach(function(listing){
newJson.products.push({
id: listing.ProductId,
title: listing.Title,
price: listing.CurrentPrice,
image: listing.ProductImageUrl[0]
})
});
response.write(JSON.stringify(newJson));
response.end();
});
}
function product(response, path) {
console.log("Request handler ‘product’ was called for " + path);
var productId = path.split(‘/’)[2];
var host = ‘api1.asos.com’;
var requestPath = ‘/product/’ + productId + ‘/en_API/GBP?api_key={snipped api key}’;
response.writeHead(200, {"Content-Type": "application/json"});
proxy.getRemoteData(host, requestPath, function(json){
var data = JSON.parse(json);
var newJson = {
id: data.ProductId,
title: data.Title,
price: data.CurrentPrice,
available: data.InStock,
image: data.ProductImageUrls[0]
};
response.write(JSON.stringify(newJson));
response.end();
});
}
exports.products = products;
exports.product = product;[/js]
Which ends up looking like:
That’ll do me for now, even though it would be nice to abstract the mapping out somewhere else. Out of scope for me at the moment though.
Once last thing for this post:
Passing in command line arguments
Throughout this post I’ve been diligently snipping out my API key before pasting the code in. There are many approaches to dev/qa/staging/production configuration management (some as basic as a text file, some a bit more complex) which would handle this sort of thing but for my immediate requirements I will just pass the API key in as a command line argument.
To handle this I need to edit the initialisation code in order to pick up any args passed, and documented on the nodejs.org site:
app.js:
[js highlight=”9,11″]var server = require("./server"),
router = require("./router"),
requestHandlers = require("./requestHandlers");
var handle = {}
handle["products"] = requestHandlers.products;
handle["product"] = requestHandlers.product;
var apiKey = process.argv[2];
var port = process.env.PORT || 3000;
server.start(router.route, handle, port, apiKey);[/js]
Now just pass that value around the rest of the system:
server.js:
[js highlight=”4,7″]var http = require("http"),
url = require("url");
function start(route, handle, port, apiKey) {
function onRequest(request, response) {
var pathname = url.parse(request.url).pathname;
route(handle, pathname, response, apiKey);
}
http.createServer(onRequest).listen(port);
console.log("Server has started listening on port " + port);
}
exports.start = start;[/js]
route.js:
[js highlight=”1,5″]function route(handle, pathname, response, apiKey) {
var root = pathname.split(‘/’)[1];
if (typeof handle[root] === ‘function’) {
handle[root](response, pathname, apiKey);
} else {
console.log("No request handler found for " + pathname + " (" + root+ ")");
response.writeHead(404, {"Content-Type": "text/plain"});
response.write("404 Not found");
response.end();
}
}
exports.route = route;[/js]
requestHandlers.js:
[js highlight=”3,8,34,39″]var proxy = require(‘./proxy’);
function products(response, path, apiKey) {
console.log("Request handler ‘products’ was called");
var search = path.split(‘/’)[2];
var host = ‘api1.asos.com’;
var requestPath = ‘/productlisting/search/’ + search + ‘/1/PriceAscending/en_API/GBP?api_key=’ + apiKey;
response.writeHead(200, {"Content-Type": "application/json"});
proxy.getRemoteData(host, requestPath, function(json){
var data = JSON.parse(json);
var newJson = {
category: data.Description,
products: []
};
data.Listings.forEach(function(listing){
newJson.products.push({
id: listing.ProductId,
title: listing.Title,
price: listing.CurrentPrice,
image: listing.ProductImageUrl[0]
})
});
response.write(JSON.stringify(newJson));
response.end();
});
}
function product(response, path, apiKey) {
console.log("Request handler ‘product’ was called for " + path);
var productId = path.split(‘/’)[2];
var host = ‘api1.asos.com’;
var requestPath = ‘/product/’ + productId + ‘/en_API/GBP?api_key=’ + apiKey;
response.writeHead(200, {"Content-Type": "application/json"});
proxy.getRemoteData(host, requestPath, function(json){
var data = JSON.parse(json);
var newJson = {
id: data.ProductId,
title: data.Title,
price: data.CurrentPrice,
available: data.InStock,
image: data.ProductImageUrls[0]
};
response.write(JSON.stringify(newJson));
response.end();
});
}
exports.products = products;
exports.product = product;[/js]
Then to pass in the api key just change the nodemon call to [code]nodemon app.js myApIK3y[/code]
The files for this post can be found over on github
Coming up
The next post this month will cover some nice deployment & hosting options for node!


