As a developer, there are often tasks that we need to automate to make our daily lives easier. You may have heard about GruntJS or even Gulp before.
In this article, I am going to run through a quick intro to successfully using gruntjs to automate your build process within the usual IDE of .Net developers: Visual Studio..
gruntjs (Grunt)

What is it?
Gruntjs is a JavaScript task runner; one of a few that exist, but only one of two to become mainstream – the other being Gulp. Both do pretty similar things, both have great support and great communities.
Whereas gulp = tasks defined in code, grunt = tasks defined in configuration.
It’s been going on for a while – check this first commit from 2011!
What does it do?
A JavaScript task runner allows you to define a set of tasks, subtasks, and dependent tasks, and execute these tasks at a time of your choosing; on demand, before or after a specific event, or any time a file changes, for example.
These tasks range from things like CSS and JS minification and combination, image optimisation, HTML minification, HTML generation, redact code, run tests, and so on. A large number of the available plugins are in fact grunt wrappers around existing executables, meaning you can now run those programs from a chain of tasks; for example: LESS, WebSocket, ADB, Jira, XCode, SASS, RoboCopy.
The list goes on and on – and you can even add your own to it!
How does it work?
GruntJS is a nodejs module, and as such is installed via npm (node package manager). Which also means you need both npm and nodejs installed to use Grunt.


By installing it globally or just into your project directory you’re able to execute it from the command line (or other places) and it will check the current directory for a specific file called “gruntfile.js“. It is in this gruntfile.js that you will specify and configure your tasks and the order in which you would like them to run. Each of those tasks is also a nodejs module, so will also need to be installed via npm and referenced in the package.json file.
The package.json is not a grunt-specific file, but an npm-specific file; when you clone a repo containing grunt tasks, you must first ensure all development dependencies are met by running npm install, which installs modules referenced within this packages.json file. It can also be used by grunt to pull in project settings, configuration, and data for use within the various grunt tasks; for example, adding a copyright to each file with your name and the current date.
Using grunt – WITHOUT Visual Studio
Sounds AMAAAAYYZING, right? So how can you get your grubby mitts on it? I’ve mentioned a few dependencies before, but here they all are:
- nodejs – grunt is a nodejs module, so needs to run on nodejs.
- npm – grunt is a nodejs module and depends on many other nodejs packages; sort of makes sense that you’d need a nodejs package manager for this job, eh?
- grunt-cli – the grunt command line tool, which is needed to actually run grunt tasks
- package.json – the package dependencies and project information, for npm to know what to install
- gruntfile.js – the guts of the operation; where we configure the tasks we want to run and when.
First things first
You need to install nodejs and npm (both are installed with nodejs).
grunt-cli
Now you’ve got node and npm, open a terminal and fire off npm install -g grunt-cli to install grunt globally. (You could skip this step and just create a package.json with grunt as a dependency and then run npm install in that directory)
Configuration
The package.json contains information about your project, and the various package dependencies. Think of it as a slice of NuGet’s packages.config and a sprinkle of your project’s .sln file; it contains project-specific data, such as the name, author’s name, repo location, description, as well as defining modules on which your project depends in order to build and run
Create a package.json file with some simple configuration, such as that used on the gruntjs site:
{
  "name": "my-project-name",
  "version": "0.1.0"
}
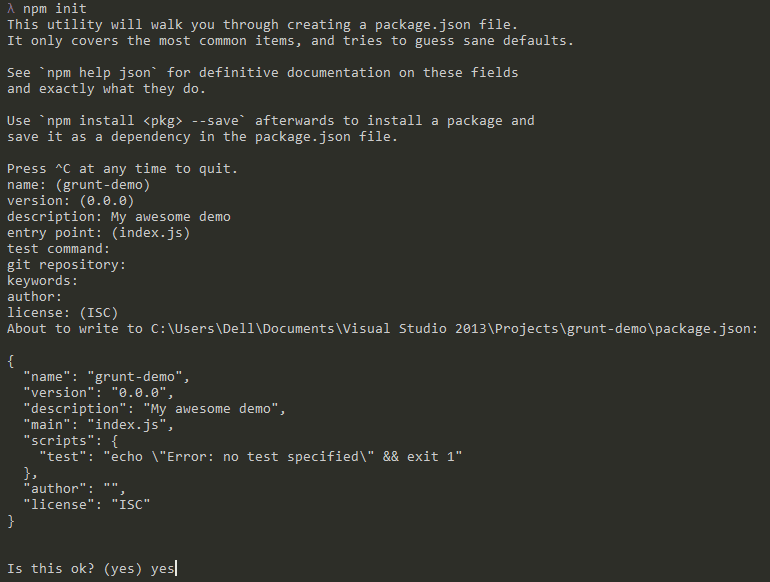
Or you could run npm-init, but that asks for lots more info that we really need here, so the generated package.json is a bit bloated:
So, what’s going on in the code above? We’re setting a name for our project and a version. Now we could just add in a few more lines and run npm install to go and get those for us, for example:
{
  "name": "my-project-name",
  "version": "0.1.0",
  "devDependencies": {
    "grunt": "~0.4.5",
    "grunt-contrib-jshint": "~0.10.0",
    "grunt-contrib-nodeunit": "~0.4.1",
    "grunt-contrib-uglify": "~0.5.0"
 }
}
Here we’re saying what we need to run our project; if you’re writing a nodejs or iojs project then you’ll have lots of your own stuff referenced in here, however for us .Net peeps we just have things our grunt tasks need.
Within devDependencies we’re firstly saying we use grunt, and we want at least version 0.4.5; the tilde versioning means we want version 0.4.5 or above, up to but not including 0.5.0.
Then we’re saying this project also needs jshint, nodeunit, and uglify.
A note on packages: “grunt-contrib” packages are those verified and officially maintained by the grunt team.
But what if we don’t want to write stuff in, have to check the right version from the npm website, and then run npm install each time to actually pull it down? There’s another way of doing this.
Rewind back to when we just had this:
{
  "name": "my-project-name",
  "version": "0.1.0"
}
Now if you were to run the following commands, you would have the same resulting package.json as before:
npm install grunt --save-dev
npm install grunt-contrib-jshint --save-dev
npm install grunt-contrib-nodeunit --save-dev
npm install grunt-contrib-uglify --save-dev
However, this time they’re already installed and their correct versions are already set in your package.json file.
Below is an example package.json for an autogenerated flat file website
{
  "name": "webperf",
  "description": "Website collecting articles and interviews relating to web performance",
  "version": "0.1.0",
  "devDependencies": {
    "grunt": "^0.4.5",
    "grunt-directory-to-html": "^0.2.0",
    "grunt-markdown": "^0.7.0"
  }
}
In the example here we’re starting out by just depending on grunt itself, and two other modules; one that creates an html list from a directory structure, and one that generates html from markdown files.
Last step – gruntfile.js
Now you can create a gruntfile.js and paste in something like that specified from the gruntjs site:
module.exports = function(grunt) {
grunt.initConfig({
pkg: grunt.file.readJSON('package.json'),
uglify: {
options: {
banner: '/*! <%= pkg.name %> <%= grunt.template.today("yyyy-mm-dd") %> */\n'
},
build: {
src: 'src/<%= pkg.name %>.js',
dest: 'build/<%= pkg.name %>.min.js'
}
}
});
grunt.loadNpmTasks('grunt-contrib-uglify');
grunt.registerTask('default', ['uglify']);
};
What’s happening in here then? The standard nodejs module.exports pattern is used to expose your content as a function. Then it’s reading in the package.json file and putting that object into the variable pkg.
Then it gets interesting; we configure the grunt-contrib-uglify npm package with the uglify task, setting a banner for the minified js file to contain the package name – as specified in package.json – and today’s date, then specifying a “target” called build with source and destination directories.
Then we’re telling grunt to bring in the grunt-contrib-uglify npm module (that must already be installed locally or globally).
After the configuration is specified, we’re telling grunt to load the uglify task (which you must have previously installed for this to work) and then set the default grunt task to call the uglify task.
BINGO. Any javascript in the project’s “src” directory will get minified, have a header added, and the result dumped into the project’s “build” directory any time we run grunt.
Example gruntfile.js for an autogenerated website
module.exports = function(grunt) {

  grunt.initConfig({
  markdown: {
    all: {
      files: [
        {
          cwd:'_drafts',
          expand: true,
          src: '*.md',
          dest: 'articles/',
          ext: '.html'
        }
      ]
    },
    options: {
      template: 'templates/article.html',
      preCompile: function(src, context) {
        var matcher = src.match(/@-title:\s?([^@:\n]+)\n/i);
        context.title = matcher && matcher.length > 1 && matcher[1];
      },
      markdownOptions: {
        gfm: false,
        highlight: 'auto'
        }
      }
  },
  to_html: {
    build:{
        options: {
          useFileNameAsTitle: true,
          rootDirectory: 'articles',
          template: grunt.file.read('templates/listing.hbs'),
          templatingLanguage: 'handlebars',

        },
        files: {
          'articles.html': 'articles/*.html'
        }
    }
  }
});

grunt.loadNpmTasks('grunt-markdown');
grunt.loadNpmTasks('grunt-directory-to-html');

grunt.registerTask('default', ['markdown','to_html']);

};
This one will convert all markdown files in a _drafts directory to html based on a template html file (grunt-markdown), then create a listing page based on the directory structure and a template handlebars file (grunt-directory-to-html).
Using grunt – WITH Visual Studio
Prerequisites
You still need nodejs, npm, and grunt-cli so make sure you install nodejs and npm install -g grunt-cli.
To use task runners within Visual Studio you first need to have a version that supports them. If you already have VS 2015 you can skip these install sections.
Visual Studio 2013.3 or above
If you have VS 2013 then you need to make sure you have at least RC3 or above (free upgrades!). Go and install if from your pals at Microsoft.
This is a lengthy process, so remember to come back here once you’ve done it!
TRX Task Runner Explorer Extension
This gives your Visual Studio an extra window that displays all available tasks, as defined within your grunt or gulp file. So go and install that from the Visual Studio Gallery
NPM Intellisense Extension
You can get extra powers for yourself if you install the intellisense extension, which makes using grunt in Visual Studio much easier. Go get it from the Visual Studio Gallery.
Grunt Launcher Extension
Even more extra powers; right-click on certain files in your solution to launch grunt, gulp, bower, and npm commands using the Grunt Launcher Extension
Tasks Configuration
Create a new web project, or open an existing one, and add a package.json and a gruntfile.js.
Example package.json
{
  "name": "grunt-demo",
  "version": "0.1.0",
  "devDependencies": {
    "grunt": "~0.4.5",
    "grunt-contrib-uglify": "~0.5.0"
 }
}
Example gruntfile.js
module.exports = function(grunt) {
grunt.initConfig({
pkg: grunt.file.readJSON('package.json'),
uglify: {
options: {
banner: '/*! <%= pkg.name %> <%= grunt.template.today("yyyy-mm-dd") %> */\n'
},
build: {
src: 'Scripts/bootstrap.js',
dest: 'Scripts/build/bootstrap.min.js'
}
}
});
grunt.loadNpmTasks('grunt-contrib-uglify');
grunt.registerTask('default', ['uglify']);
};
Using The Task Runner Extension in Visual Studio
Up until this point the difference between without Visual Studio and with Visual Studio has been non-existent; but here’s where it gets pretty cool.
If you installed everything mentioned above, then you’ll notice some cool stuff happening when you open a project that already contains a package.json.
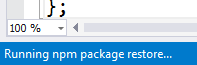
The Grunt Launcher extension will “do a nuget” and attempt to restore your “devDependencies” npm packages when you open your project:
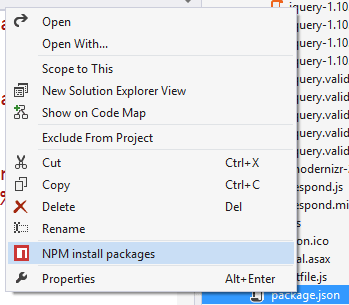
And the same extension will give you a right click option to force an npm install:
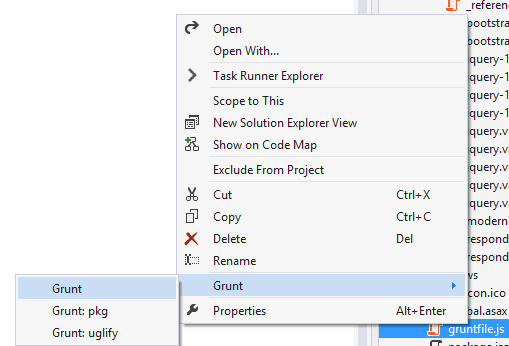
This one also allows you to kick off your grunt tasks straight from a context menu on the gruntfile itself:
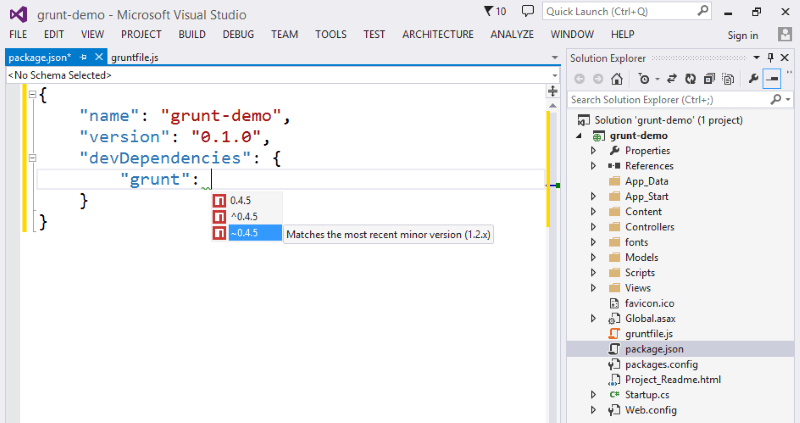
Assuming you installed the intellisense extension, you now get things like auto-suggestion for npm package versions, along with handy tooltip explainers for what the version syntax actually means:
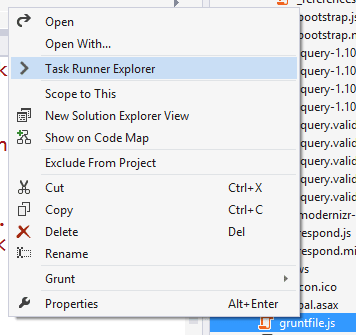
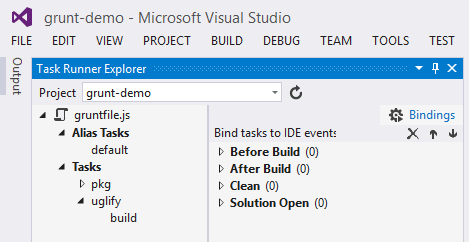
If you’d like some more power over when the grunt tasks run, this is where the Task Runner Explorer extension comes in to play:
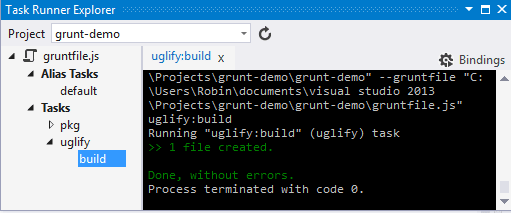
This gives you a persistent window that lists your available grunt tasks and lets you kick any one of them off with a double click, showing the results in an output window.
Which is equivalent of running the same grunt tasks outside of Visual Studio.
What’s really quite cool with this extension is being able to configure when these tasks run automatically; your options are:
- Before Build
- After Build
- Clean
- Solution Open
Which means you can ensure that when you hit F5 in Visual Studio all of your tasks will run to generate the output required to render your website before the website is launched in a browser, or when you execute a “Clean” on the solution it can fire off that task to delete some temp directories, or the output from the last tasks execution.
Summary
Grunt and Gulp are fantastic tools to help you bring in automation to your projects; and now they’re supported in Visual Studio, so even you .Net developers have no excuse to not try playing around with them!
Have a go with the tools above, and let me know how you get on!