Chef For Developers part 3

I’m continuing with my plan to create a series of articles for learning Chef from a developer perspective.

Part #1 gave an intro to Chef, Chef Solo, Vagrant, and Virtualbox. I also created my first Ubunutu VM running Apache and serving up the default website.

Part #2 got into creating a cookbook of my own, and evolved it whilst introducing PHP into the mix.

In this article I’ll get MySQL installed and integrated with PHP, and tidy up my own recipe.

Adding a database into the mix

1. Getting MySQL

Download mysql cookbook from the Opscode github repo into your “cookbooks” subdirecctory:

mysql

[bash]git clone https://github.com/opscode-cookbooks/mysql.git
[/bash]

Since this will be a server install instead of a client one you’ll also need to get OpenSSL:

openssl

[bash]git clone https://github.com/opscode-cookbooks/openssl.git
[/bash]

Now use Chef Solo to configure it by including the recipe reference and the mysql password in the Vagrantfile I’ve been using in the previous articles;

Vagrantfile

[ruby highlight=”14-17,26″]Vagrant.configure("2") do |config|
config.vm.box = "precise32"
config.vm.box_url = "http://files.vagrantup.com/precise32.box"
config.vm.network :forwarded_port, guest: 80, host: 8080

config.vm.provision :shell, :inline => "apt-get clean; apt-get update"

config.vm.provision :chef_solo do |chef|

chef.json = {
"apache" => {
"default_site_enabled" => false
},
"mysql" => {
"server_root_password" => "blahblah",
"server_repl_password" => "blahblah",
"server_debian_password" => "blahblah"
},
"mysite" => {
"name" => "My AWESOME site",
"web_root" => "/var/www/mysite"
}
}

chef.cookbooks_path = ["cookbooks","site-cookbooks"]
chef.add_recipe "mysql::server"
chef.add_recipe "mysite"
end
end
[/ruby]

No need to explicitly reference OpenSSL; it’s in the “cookbooks” directory and since the mysql::server recipe references it it just gets pulled in.

If you run that now you’ll be able to ssh in and fool around with mysql using the user root and password as specified in the chef.json block.

[bash]vagrant ssh
[/bash]

and then

[bash]mysql -u root -p
[/bash]

and enter your password (“blahblah” in my case) to get into your mysql instance.

MySQL not doing very much

Now let’s make it do something. Using the mysql::ruby recipe it’s possible to orchestrate a lot of mysql functionality; this also relies on the build-essential cookbook, so download that into your “cookbooks” directory:

Build essential

[bash]git clone https://github.com/opscode-cookbooks/build-essential.git
[/bash]

To get some useful database abstraction methods we need the database cookbook:

Database

[bash]git clone https://github.com/opscode-cookbooks/database.git
[/bash]

The database cookbook gives a nice way of monkeying around with an RDBMS, making it possible to do funky things like:

[ruby]mysql_connection = {:host => "localhost", :username => ‘root’,
:password => node[‘mysql’][‘server_root_password’]}

mysql_database "#{node.mysite.database}" do
connection mysql_connection
action :create
end
[/ruby]

to create a database.

Add the following to the top of the mysite/recipes/default.rb file:

[ruby]include_recipe "mysql::ruby"

mysql_connection = {:host => "localhost", :username => ‘root’,
:password => node[‘mysql’][‘server_root_password’]}

mysql_database node[‘mysite’][‘database’] do
connection mysql_connection
action :create
end

mysql_database_user "root" do
connection mysql_connection
password node[‘mysql’][‘server_root_password’]
database_name node[‘mysite’][‘database’]
host ‘localhost’
privileges [:select,:update,:insert, :delete]
action [:create, :grant]
end

mysql_conn_args = "–user=root –password=#{node[‘mysql’][‘server_root_password’]}"

execute ‘insert-dummy-data’ do
command %Q{mysql #{mysql_conn_args} #{node[‘mysite’][‘database’]} <<EOF
CREATE TABLE transformers (name VARCHAR(32) PRIMARY KEY, type VARCHAR(32));
INSERT INTO transformers (name, type) VALUES (‘Hardhead’,’Headmaster’);
INSERT INTO transformers (name, type) VALUES (‘Chromedome’,’Headmaster’);
INSERT INTO transformers (name, type) VALUES (‘Brainstorm’,’Headmaster’);
INSERT INTO transformers (name, type) VALUES (‘Highbrow’,’Headmaster’);
INSERT INTO transformers (name, type) VALUES (‘Cerebros’,’Headmaster’);
INSERT INTO transformers (name, type) VALUES (‘Fortress Maximus’,’Headmaster’);
INSERT INTO transformers (name, type) VALUES (‘Chase’,’Throttlebot’);
INSERT INTO transformers (name, type) VALUES (‘Freeway’,’Throttlebot’);
INSERT INTO transformers (name, type) VALUES (‘Rollbar’,’Throttlebot’);
INSERT INTO transformers (name, type) VALUES (‘Searchlight’,’Throttlebot’);
INSERT INTO transformers (name, type) VALUES (‘Wideload’,’Throttlebot’);
EOF}
not_if "echo ‘SELECT count(name) FROM transformers’ | mysql #{mysql_conn_args} –skip-column-names #{node[‘mysite’][‘database’]} | grep ‘^3$’"
end
[/ruby]

and add in the new database variable in Vagrantfile:

[ruby highlight=”22″]Vagrant.configure("2") do |config|
config.vm.box = "precise32"
config.vm.box_url = "http://files.vagrantup.com/precise32.box"
config.vm.network :forwarded_port, guest: 80, host: 8080

config.vm.provision :shell, :inline => "apt-get clean; apt-get update"

config.vm.provision :chef_solo do |chef|

chef.json = {
"apache" => {
"default_site_enabled" => false
},
"mysql" => {
"server_root_password" => "blahblah",
"server_repl_password" => "blahblah",
"server_debian_password" => "blahblah"
},
"mysite" => {
"name" => "My AWESOME site",
"web_root" => "/var/www/mysite",
"database" => "great_cartoons"
}
}

chef.cookbooks_path = ["cookbooks","site-cookbooks"]
chef.add_recipe "mysql::server"
chef.add_recipe "mysite"
end
end
[/ruby]

Now we need a page to display that data, but we need to pass in the mysql password as a parameter. That means we need to use a template; create the file templates/default/robotsindisguise.php.erb with this content:

[php]<?php
$con = mysqli_connect("localhost","root", "<%= @pwd %>");
if (mysqli_connect_errno($con))
{
die(‘Could not connect: ‘ . mysqli_connect_error());
}

$sql = "SELECT * FROM great_cartoons.transformers";
$result = mysqli_query($con, $sql);

?>
<table>
<tr>
<th>Transformer Name</th>
<th>Type</th>
</tr>
<?php
while($row = mysqli_fetch_array($result, MYSQL_ASSOC))
{
?>
<tr>
<td><?php echo $row[‘name’]?></td>
<td><?php echo $row[‘type’]?></td>
</tr>
<?php
}//end while
?>
</tr>
</table>
<?php
mysqli_free_result($result);
mysqli_close($con);
?>
[/php]

That line at the top might look odd:

[php]$con = mysqli_connect("localhost","root", "<%= @pwd %>");
[/php]

But bear in mind that it’s an ERB (Extended RuBy) file so gets processed by the ruby parser to generate the resulting file; the PHP processor only kicks in once the file is requested from a browser.

As such, if you kick off a vagrant up now and (eventually) vagrant ssh in, open /var/www/robotsindisguise.php in nano/vi and you’ll see the line

[php]$con = mysqli_connect("localhost","root", "<%= @pwd %>");
[/php]

has become

[php]$con = mysqli_connect("localhost","root", "blahblahblah");
[/php]

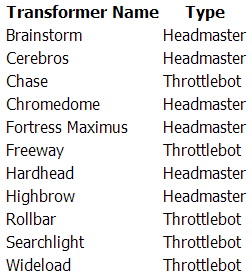
browsing to http://localhost:8080/robotsindisguise.php should give something like this:

Autobots: COMBINE!

2. Tidy it up a bit

Right now we’ve got data access stuff in the default.rb recipe, so let’s move that lot out; I’ve created the file /recipes/data.rb with these contents:

data.rb
[ruby]include_recipe "mysql::ruby"

mysql_connection = {:host => "localhost", :username => ‘root’,
:password => node[‘mysql’][‘server_root_password’]}

mysql_database node[‘mysite’][‘database’] do
connection mysql_connection
action :create
end

mysql_database_user "root" do
connection mysql_connection
password node[‘mysql’][‘server_root_password’]
database_name node[‘mysite’][‘database’]
host ‘localhost’
privileges [:select,:update,:insert, :delete]
action [:create, :grant]
end

mysql_conn_args = "–user=root –password=#{node[‘mysql’][‘server_root_password’]}"

execute ‘insert-dummy-data’ do
command %Q{mysql #{mysql_conn_args} #{node[‘mysite’][‘database’]} <<EOF
CREATE TABLE transformers (name VARCHAR(32) PRIMARY KEY, type VARCHAR(32));
INSERT INTO transformers (name, type) VALUES (‘Hardhead’,’Headmaster’);
INSERT INTO transformers (name, type) VALUES (‘Chromedome’,’Headmaster’);
INSERT INTO transformers (name, type) VALUES (‘Brainstorm’,’Headmaster’);
INSERT INTO transformers (name, type) VALUES (‘Highbrow’,’Headmaster’);
INSERT INTO transformers (name, type) VALUES (‘Cerebros’,’Headmaster’);
INSERT INTO transformers (name, type) VALUES (‘Fortress Maximus’,’Headmaster’);
INSERT INTO transformers (name, type) VALUES (‘Chase’,’Throttlebot’);
INSERT INTO transformers (name, type) VALUES (‘Freeway’,’Throttlebot’);
INSERT INTO transformers (name, type) VALUES (‘Rollbar’,’Throttlebot’);
INSERT INTO transformers (name, type) VALUES (‘Searchlight’,’Throttlebot’);
INSERT INTO transformers (name, type) VALUES (‘Wideload’,’Throttlebot’);
EOF}
not_if "echo ‘SELECT count(name) FROM transformers’ | mysql #{mysql_conn_args} –skip-column-names #{node[‘mysite’][‘database’]} | grep ‘^3$’"
end
[/ruby]

I’ve moved the php recipe references into recipes/webfiles.rb:

webfiles.rb
[ruby]include_recipe "php"
include_recipe "php::module_mysql"

# — Setup the website
# create the webroot
directory "#{node.mysite.web_root}" do
mode 0755
end

# copy in an index.html from mysite/files/default/index.html
cookbook_file "#{node.mysite.web_root}/index.html" do
source "index.html"
mode 0755
end

# copy in my usual favicon, just for the helluvit..
cookbook_file "#{node.mysite.web_root}/favicon.ico" do
source "favicon.ico"
mode 0755
end

# copy in the mysql demo php file
template "#{node.mysite.web_root}/robotsindisguise.php" do
source "robotsindisguise.php.erb"
variables ({
:pwd => node.mysql.server_root_password
})
mode 0755
end

# use a template to create a phpinfo page (just creating the file and passing in one variable)
template "#{node.mysite.web_root}/phpinfo.php" do
source "testpage.php.erb"
mode 0755
variables ({
:title => node.mysite.name
})
end
[/ruby]

So /receipes/default.rb now looks like this:

default.rb
[ruby]include_recipe "apache2"
include_recipe "apache2::mod_php5"

# call "web_app" from the apache recipe definition to set up a new website
web_app "mysite" do
# where the website will live
docroot "#{node.mysite.web_root}"

# apache virtualhost definition
template "mysite.conf.erb"
end

include_recipe "mysite::webfiles"
include_recipe "mysite::data"
[/ruby]

Summary

Over the past three articles we’ve automated the creation of a virtual environment via a series of code files, flat files, and template files, and a main script to pull it all together. The result is a full LAMP stack virtual machine. We also created a new website and pushed that on to the VM also.

All files used in this post can be found in the associated github repo.

Any comments or questions would be greatly appreciated, as would pull requests for improving my lame ruby and php skillz! (and lame css and html..)

Chef For Developers part 2

I’m continuing with my plan to create a series of articles for learning Chef from a developer perspective.

Part #1 gave an intro to Chef, Chef Solo, Vagrant, and Virtualbox. I also created my first Ubuntu VM running Apache and serving up the default website.

In this article I’ll get on to creating a cookbook of my own, and evolve it whilst introducing PHP into the mix.

Creating and evolving your own cookbook

1. Cook your own book

Downloaded configuration cookbooks live in the cookbooks subdirectory; this should be left alone as you can exclude it from version control knowing that the cookbooks are remotely hosted and can be downloaded as needed.

For your own ones you need to create a new directory; the convention for this has become to use site-cookbooks, but you can use whatever name you like as far as I can tell. You just need to add a reference to that directory in the Vagrantfile:

[bash]chef.cookbooks_path = ["cookbooks", "site-cookbooks", "blahblahblah"][/bash]

Within that new subdirectory you need to have, at a minimum, a recipes subdirectory with a default.rb ruby file which defines what your recipe does. Other key subdirectories are files (exactly that: files to be referenced/copied/whatever) and templates (ruby ERB templates which can be referenced to create a new file).

To create this default structure (for a cookbook called mysite) just use the one-liner:

[bash]mkdir -p site-cookbooks/mysite/{recipes,{templates,files}/default}[/bash]

You’ll need to create two new files to spin up our new website; a favicon and a flat index html file. Create something simple and put them in the files/default/ directory (or use my ones).

Now in order for them to be referenced there needs to be a default.rb in recipes:

[ruby]# — Setup the website
# create the webroot
directory "#{node.mysite.web_root}" do
mode 0755
end

# copy in an index.html from mysite/files/default/index.html
cookbook_file "#{node.mysite.web_root}/index.html" do
source "index.html"
mode 0755
end

# copy in my usual favicon, just for the helluvit..
cookbook_file "#{node.mysite.web_root}/favicon.ico" do
source "favicon.ico"
mode 0755
end[/ruby]

This will create a directory for the website (the location of which needs to be defined in the chef.json section of the Vagrantfile), copy the specified files from files/default/ over, and set the permissions on them all so that the web process can access them.

You can also use the syntax:

[ruby]directory node[‘mysite’][‘web_root’] do[/ruby]

in place of

[ruby]directory "#{node.mysite.web_root}" do[/ruby]

So how will Apache know about this site? Better configure it with a conf file from a template; create a new file in templates/default/ called mysite.conf.erb:

[ruby]<VirtualHost *:80>
DocumentRoot <%= @params[:docroot] %>
</VirtualHost>[/ruby]

And then reference it from the default.rb recipe file (add to the end of the one we just created, above):

[ruby]web_app "mysite" do
# where the website will live
docroot "#{node.mysite.web_root}"

# apache virtualhost definition
template "mysite.conf.erb"
end[/ruby]

That just calls the web_app method that exists within the Apache cookbook to create a new site called “mysite”, set the docroot to the same directory as we just created, and configure the virtual host to reference it, as configured in the ERB template.

The Vagrantfile now needs to become:

[ruby]Vagrant.configure("2") do |config|
config.vm.box = "precise32"
config.vm.box_url = "http://files.vagrantup.com/precise32.box"
config.vm.network :forwarded_port, guest: 80, host: 8080

config.vm.provision :chef_solo do |chef|

chef.json = {
"apache" => {
"default_site_enabled" => false
},
"mysite" => {
"name" => "My AWESOME site",
"web_root" => "/var/www/mysite"
}
}

chef.cookbooks_path = ["cookbooks","site-cookbooks"]
chef.add_recipe "apache2"
chef.add_recipe "mysite"
end
end[/ruby]

Pro tip: be careful with quotes around the value for default_site_enabled; “false” == true whereas false == false, apparently.

Make sure you’ve destroyed your existing vagrant vm and bring this new one up, a decent one-liner is:

[bash]vagrant destroy –force && vagrant up[/bash]

You should see a load of references to your new cookbook in the output and hopefully once it’s finished you’ll be able to browse to http://localhost:8080 and see something as GORGEOUS as:

Salmonpink is underrated

2. Skipping the M in LAMP, Straight to the P: PHP

Referencing PHP

Configure your code to bring in PHP; a new recipe needs to be referenced as a module of Apache:

[ruby]chef.add_recipe "apache2::mod_php5"[/ruby]

It’s probably worth mentioning that

[ruby]add_recipe "apache"[/ruby]

actually means

[ruby]add_recipe "apache::default"[/ruby]

As such, mod_php5 is a recipe file itself, much like default.rb is; you can find it in the Apache cookbook under cookbooks/apache2/recipes/mod_php5.rb and all it does is call the approriate package manager to install the necessary libraries.

You may find that you receive the following error after adding in that recipe reference:

[bash]apt-get -q -y install libapache2-mod-php5=5.3.10-1ubuntu3.3 returned 100, expected 0[/bash]

To get around this you need to add in some simple apt-get housekeeping before any other provisioning:

[ruby]config.vm.provision :shell, :inline => "apt-get clean; apt-get update"[/ruby]

PHPInfo

Let’s make a basic phpinfo page to show that PHP is in there and running. To do this you could create a new file and just whack in a call to phpinfo(), but I’m going to create a new template so we can pass in a page title for it to use (create your own, or just use mine):

[html]<html>
<head>
<title><%= @title %></title>
.. snip..
</head>
<body>
<h1><%= @title %></h1>
<div class="description">
<?php
phpinfo( );
?>
</div>
.. snip ..
</body>
</html>[/html]

The default.rb recipe now needs a new section to create a file from the template:

[ruby]# use a template to create a phpinfo page (just creating the file and passing in one variable)
template "#{node.mysite.web_root}/phpinfo.php" do
source "testpage.php.erb"
mode 0755
variables ({
:title => node.mysite.name
})
end[/ruby]

Destroy, rebuild, and browse to http://localhost:8080/phpinfo.php:

A spanking new phpinfo page - wowzers!

Notice the heading and the title of the tab are set to the values passed in from the Vagrantfile.

3. Refactor the Cookbook

We can actually put the add_recipe calls inside of other recipes using include_recipe, so that the dependencies are explicit; no need to worry about forgetting to include apache in the Vagrantfile if you’re including it in your recipe itself.

Let’s make default.rb responsible for the web app itself, and make a new recipe for creating the web files; create a new webfiles.rb in recipes/mysite and move the file related stuff in there:

webfiles.rb
[ruby]# — Setup the website
# create the webroot
directory "#{node.mysite.web_root}" do
mode 0755
end

# copy in an index.html from mysite/files/default/index.html
cookbook_file "#{node.mysite.web_root}/index.html" do
source "index.html"
mode 0755
end

# copy in my usual favicon, just for the helluvit..
cookbook_file "#{node.mysite.web_root}/favicon.ico" do
source "favicon.ico"
mode 0755
end

# use a template to create a phpinfo page (just creating the file and passing in one variable)
template "#{node.mysite.web_root}/phpinfo.php" do
source "testpage.php.erb"
mode 0755
variables ({
:title => node.mysite.name
})
end[/ruby]

default.rb now looks like

[ruby]include_recipe "apache2"
include_recipe "apache2::mod_php5"

# call "web_app" from the apache recipe definition to set up a new website
web_app "mysite" do
# where the website will live
docroot "#{node.mysite.web_root}"

# apache virtualhost definition
template "mysite.conf.erb"
end

include_recipe "mysite::webfiles"[/ruby]

And Vagrantfile now looks like:

[ruby]Vagrant.configure("2") do |config|
config.vm.box = "precise32"
config.vm.box_url = "http://files.vagrantup.com/precise32.box"
config.vm.network :forwarded_port, guest: 80, host: 8080

config.vm.provision :shell, :inline => "apt-get clean; apt-get update"

config.vm.provision :chef_solo do |chef|

chef.json = {
"apache" => {
"default_site_enabled" => false
},
"mysite" => {
"name" => "My AWESOME site",
"web_root" => "/var/www/mysite"
}
}

chef.cookbooks_path = ["cookbooks","site-cookbooks"]
chef.add_recipe "mysite"
end
end[/ruby]

The add_recipes are now include_recipes moved to default.rb, the file related stuff is in webfiles.rb and there’s an include_recipe to reference this new file:

[ruby]include_recipe "mysite::webfiles"[/ruby]

Why the refactoring is important!

Well, refactoring is a nice, cathartic, thing to do anyway. But there’s also a specific reason for doing it here: once we move from using Chef Solo to Grown Up Chef (aka Hosted Chef) the Vagrantfile won’t be used anymore.

As such, moving the logic out of the Vagrantfile (e.g., add_recipe calls) and into our own cookbook (e.g. include_recipe calls) will allow us to use our same recipe in both Chef Solo and also Hosted Chef.

Next up

We’ll be getting stuck in to MySQL integration and evolving a slightly more dynamic recipe.

All files used in this post can be found in the associated github repo.

Chef For Developers

Chef, Vagrant, VirtualBox

In this upcoming series of articles I’ll be trying to demonstrate (and learn for myself) how to effectively configure the creation of an environment. I’ve decided to look into Chef as my environment configuration tool of choice, just because it managed to settle in my brain quicker than Puppet did.

I’m planning on starting really slowly and simply using Chef Solo so I don’t need to learn about the concepts of hosted Chef servers and Chef client nodes to begin with. I’ll be using virtual machines instead of metal, so will be using VirtualBox for the VM-ing and Vagrant for the VM orchestration.

Sounds like Ops to me..

The numerous other articles I’ve read about using Chef all seem to assume a fundemental Linux SysOps background, which melted my little brain somewhat; hence why I’m starting my own series and doing it from a developer perspective.

LINUX?!

Don’t worry if you’re not familiar with Linux; although I’ll start with a Linux VM I’ll eventually move on to applying the same process to Windows, and the commands used in Linux will be srsly basic. Srsly.
Lolz.

Part 1 – I ♥ LAMP

This first few articles will cover:

Chef

Chef

“Chef is an automation platform that transforms infrastructure into code”. You are ultimately able to describe what your infrastructure looks like in ruby code and manage your entire server estate via a central repository; adding, removing, and updating features, applications, and configuration from the command line with an extensive Chef toolbelt.

Yes, there are knives. And cookbooks and recipes. Even a food critic!

Here’s the important bit: The difference between Chef Solo and one of the Hosted Chef options

Chef Solo

  1. You only have a single Chef client which uses a local json file to understand what it is comprised of.
  2. Cookbooks are either saved locally to the client or referenced via URL to a tar archive.
  3. There is no concept of different environments.

Hosted Chef

  1. You have a master Chef server to which all Chef client nodes connect to understand what they are comprised of.
  2. Cookbooks are uploaded to the Chef server using the Knife command line tool.
  3. There is the concept of different environments (dev, test, prod).

I’ll eventually get on to this in more detail as I’ll be investigating Chef over the next few posts in this series; for now, please just be aware that in this scenario Chef Solo is being used to demonstrate the benefit of environment configuration and is not being recommended as a production solution. Although in some cases it might be.

VirtualBox

virtualbox

“VirtualBox is a cross-platform virtualization application”. You can easily configure a virtual machine in terms of RAM, HDD size and type, network interface type and number, CPU, even cnfigure shared folders between host and client. Then you can point the virtual master drive at an ISO on the host computer and install an OS as if you were sitting at a physical machine.

This has so many uses, including things like setting up a development VM for installing loads of dev tools if you want to keep your own computer clean, or setting up a presentation machine containing just powerpoint, your slides, and Visual Studio for demos.

Vagrant

vagrant up

Vagrant is an open source development environment virtualisation technology written in Ruby. Essentially you use Vagrant to script against VirtualBox, VMWare, AWS or many others; you can even write your own provider for it to hook into!

The code for Vagrant is open source and can be found on github

Getting started

Downloads

For this first post you don’t even need to download the Chef client, so we’ll leave that for now.

Go and download Vagrant and VirtualBox and install them.

Your First Scripted Environment

1. Get a base OS image

To do this download a Vagrant “box” (an actual base OS, of which there are many) from the specified URL, assign a friendly name (e.g. “precise32”) to it, and create a base “Vagrantfile” using Vagrant’s “init” method, from the command line run:

[bash]vagrant init precise32 http://files.vagrantup.com/precise32.box[/bash]

vagrant init

A Vagrantfile is a little bit of ruby to define the configuration of your Vagrant box; the autogenerated one is HUGE but its pretty much all tutorial-esque comments. Ignoring the comments gives you something like this:

[ruby]Vagrant::Config.run do |config|
config.vm.box = "precise32"
config.vm.box_url = "http://files.vagrantup.com/precise32.box"
end
[/ruby]

Yours might also look like this depending on whether you’re defaulting to Vagrant v2 or v1:

[ruby]Vagrant.configure("2") do |config|
config.vm.box = "precise32"
config.vm.box_url = "http://files.vagrantup.com/precise32.box"
end
[/ruby]

This is worth bearing in mind as the syntax for various operations differ slightly between versions.

2. Create and start your basic VM

From the command line:

Create and start up the basic vm

[bash]vagrant up[/bash]

vagrant up

If you have Virtualbox running you’ll see the new VM pop up and the preview window will show it booting.

vagrant up in virtualbox

SSH into it

[bash]vagrant ssh[/bash]

vagrant ssh

Stop it

[bash]vagrant halt[/bash]

vagrant halt

Remove all trace of it

[bash]vagrant destroy[/bash]

vagrant destroy

And that’s your first basic, scripted, virtual machine using Vagrant! Now let’s add some more useful functionality to it:

3. Download Apache Cookbook

Create a subdirectory “cookbooks” in the same place as your Vagrantfile, then head over to the opscode github repo and download the Apache2 cookbook into the “cookbooks” directory.

OpsCode cookbooks repo for Apache

Apache

[bash]git clone https://github.com/opscode-cookbooks/apache2.git[/bash]

Gitting it

4. Set up Apache using Chef Solo

Now it starts to get interesting.

Update your Vagrantfile to include port forwarding so that browsing to localhost:8080 redirects to your VM’s port 80:

[ruby]Vagrant.configure("2") do |config|
config.vm.box = "precise32"
config.vm.box_url = "http://files.vagrantup.com/precise32.box"
config.vm.network :forwarded_port, guest: 80, host: 8080
end[/ruby]

Now add in the Chef provisioning to include Apache in the build:

[ruby]Vagrant.configure("2") do |config|
config.vm.box = "precise32"
config.vm.box_url = "http://files.vagrantup.com/precise32.box"
config.vm.network :forwarded_port, guest: 80, host: 8080

config.vm.provision :chef_solo do |chef|
chef.cookbooks_path = ["cookbooks"]
chef.add_recipe "apache2"
end
end[/ruby]

Kick it off:

[bash]vagrant up[/bash]

Vagrant with Apache - starting boot

..tick tock..

Vagrant with Apache - finishing boot

So we now have a fresh new Ubunutu VM with Apache installed and configured and running on port 80, with our own port 8080 forwarded to the VM’s port 80; let’s check it out!

Browsing the wonderful Apache site

Huh? Where’s the lovely default site you normally get with Apache? Apache is definitely running – check the footer of that screen.

What’s happening is that on Ubuntu the default site doesn’t get enabled so we have to do that ourselves. This is also a great intro to passing data into the chef provisioner.

Add in this little chunk of JSON to the Vagrantfile:

[ruby]chef.json = {
"apache" => {
"default_site_enabled" => true
}
}[/ruby]

So it should now look like this:

[ruby]Vagrant.configure("2") do |config|
config.vm.box = "precise32"
config.vm.box_url = "http://files.vagrantup.com/precise32.box"
config.vm.network :forwarded_port, guest: 80, host: 8080

config.vm.provision :chef_solo do |chef|

chef.json = {
"apache" => {
"default_site_enabled" => true
}
}

chef.cookbooks_path = ["cookbooks"]
chef.add_recipe "apache2"
end
end[/ruby]

The chef.json section passes the specified variable values into the specified recipe file. If you dig into default.rb in /cookbooks/apache/recipes you’ll see this block towards the end:

[ruby]apache_site "default" do
enable node[‘apache’][‘default_site_enabled’]
end[/ruby]

Essentially this says “for the site default, set it’s status equal to the value defined by default_site_enabled in the apache node config section”. For Ubuntu this defaults to false (other OSs default it to true) and we’ve just set ours to true.

Let’s try that again:

[bash]vagrant reload[/bash]

(reload is the equivalent of vagrant halt && vagrant up)

Notice that this time, towards the end of the run, we get the message

[bash]INFO: execute[a2ensite default] ran successfully[/bash]

instead of on the previous one:

[bash]INFO: execute[a2dissite default] ran successfully[/bash]

  • a2ensite = enable site
  • a2dissite = disable site

So what does this look like?

Browsing the wonderful Apache site.. take 2

BOOM!

Next up

Let’s dig into the concept of Chef recipes and creating our own ones.