Chef, Vagrant, VirtualBox
In this upcoming series of articles I’ll be trying to demonstrate (and learn for myself) how to effectively configure the creation of an environment. I’ve decided to look into Chef as my environment configuration tool of choice, just because it managed to settle in my brain quicker than Puppet did.
I’m planning on starting really slowly and simply using Chef Solo so I don’t need to learn about the concepts of hosted Chef servers and Chef client nodes to begin with. I’ll be using virtual machines instead of metal, so will be using VirtualBox for the VM-ing and Vagrant for the VM orchestration.
Sounds like Ops to me..
The numerous other articles I’ve read about using Chef all seem to assume a fundemental Linux SysOps background, which melted my little brain somewhat; hence why I’m starting my own series and doing it from a developer perspective.
LINUX?!
Don’t worry if you’re not familiar with Linux; although I’ll start with a Linux VM I’ll eventually move on to applying the same process to Windows, and the commands used in Linux will be srsly basic. Srsly.
Lolz.
Part 1 – I ♥ LAMP
This first few articles will cover:
- What Chef (and its different flavours), VirtualBox, and Vagrant are
- Using these to build a Linux + Apache + MySQL + PHP stack (LAMP)
Chef
![]()
“Chef is an automation platform that transforms infrastructure into code”. You are ultimately able to describe what your infrastructure looks like in ruby code and manage your entire server estate via a central repository; adding, removing, and updating features, applications, and configuration from the command line with an extensive Chef toolbelt.
Yes, there are knives. And cookbooks and recipes. Even a food critic!
Here’s the important bit: The difference between Chef Solo and one of the Hosted Chef options
Chef Solo
- You only have a single Chef client which uses a local json file to understand what it is comprised of.
- Cookbooks are either saved locally to the client or referenced via URL to a tar archive.
- There is no concept of different environments.
Hosted Chef
- You have a master Chef server to which all Chef client nodes connect to understand what they are comprised of.
- Cookbooks are uploaded to the Chef server using the Knife command line tool.
- There is the concept of different environments (dev, test, prod).
I’ll eventually get on to this in more detail as I’ll be investigating Chef over the next few posts in this series; for now, please just be aware that in this scenario Chef Solo is being used to demonstrate the benefit of environment configuration and is not being recommended as a production solution. Although in some cases it might be.
VirtualBox
![]()
“VirtualBox is a cross-platform virtualization application”. You can easily configure a virtual machine in terms of RAM, HDD size and type, network interface type and number, CPU, even cnfigure shared folders between host and client. Then you can point the virtual master drive at an ISO on the host computer and install an OS as if you were sitting at a physical machine.
This has so many uses, including things like setting up a development VM for installing loads of dev tools if you want to keep your own computer clean, or setting up a presentation machine containing just powerpoint, your slides, and Visual Studio for demos.
Vagrant
![]()
Vagrant is an open source development environment virtualisation technology written in Ruby. Essentially you use Vagrant to script against VirtualBox, VMWare, AWS or many others; you can even write your own provider for it to hook into!
The code for Vagrant is open source and can be found on github
Getting started
Downloads
For this first post you don’t even need to download the Chef client, so we’ll leave that for now.
Go and download Vagrant and VirtualBox and install them.
Your First Scripted Environment
1. Get a base OS image
To do this download a Vagrant “box” (an actual base OS, of which there are many) from the specified URL, assign a friendly name (e.g. “precise32”) to it, and create a base “Vagrantfile” using Vagrant’s “init” method, from the command line run:
[bash]vagrant init precise32 http://files.vagrantup.com/precise32.box[/bash]

A Vagrantfile is a little bit of ruby to define the configuration of your Vagrant box; the autogenerated one is HUGE but its pretty much all tutorial-esque comments. Ignoring the comments gives you something like this:
[ruby]Vagrant::Config.run do |config|
config.vm.box = "precise32"
config.vm.box_url = "http://files.vagrantup.com/precise32.box"
end
[/ruby]
Yours might also look like this depending on whether you’re defaulting to Vagrant v2 or v1:
[ruby]Vagrant.configure("2") do |config|
config.vm.box = "precise32"
config.vm.box_url = "http://files.vagrantup.com/precise32.box"
end
[/ruby]
This is worth bearing in mind as the syntax for various operations differ slightly between versions.
2. Create and start your basic VM
From the command line:
Create and start up the basic vm
[bash]vagrant up[/bash]
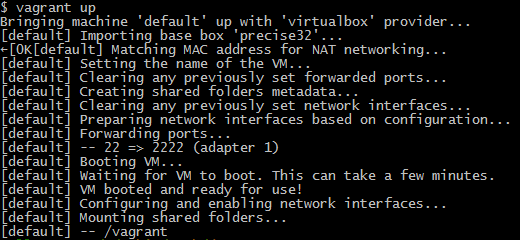
If you have Virtualbox running you’ll see the new VM pop up and the preview window will show it booting.

SSH into it
[bash]vagrant ssh[/bash]

Stop it
[bash]vagrant halt[/bash]

Remove all trace of it
[bash]vagrant destroy[/bash]

And that’s your first basic, scripted, virtual machine using Vagrant! Now let’s add some more useful functionality to it:
3. Download Apache Cookbook
Create a subdirectory “cookbooks” in the same place as your Vagrantfile, then head over to the opscode github repo and download the Apache2 cookbook into the “cookbooks” directory.

Apache
[bash]git clone https://github.com/opscode-cookbooks/apache2.git[/bash]

4. Set up Apache using Chef Solo
Now it starts to get interesting.
Update your Vagrantfile to include port forwarding so that browsing to localhost:8080 redirects to your VM’s port 80:
[ruby]Vagrant.configure("2") do |config|
config.vm.box = "precise32"
config.vm.box_url = "http://files.vagrantup.com/precise32.box"
config.vm.network :forwarded_port, guest: 80, host: 8080
end[/ruby]
Now add in the Chef provisioning to include Apache in the build:
[ruby]Vagrant.configure("2") do |config|
config.vm.box = "precise32"
config.vm.box_url = "http://files.vagrantup.com/precise32.box"
config.vm.network :forwarded_port, guest: 80, host: 8080
config.vm.provision :chef_solo do |chef|
chef.cookbooks_path = ["cookbooks"]
chef.add_recipe "apache2"
end
end[/ruby]
Kick it off:
[bash]vagrant up[/bash]

..tick tock..

So we now have a fresh new Ubunutu VM with Apache installed and configured and running on port 80, with our own port 8080 forwarded to the VM’s port 80; let’s check it out!

Huh? Where’s the lovely default site you normally get with Apache? Apache is definitely running – check the footer of that screen.
What’s happening is that on Ubuntu the default site doesn’t get enabled so we have to do that ourselves. This is also a great intro to passing data into the chef provisioner.
Add in this little chunk of JSON to the Vagrantfile:
[ruby]chef.json = {
"apache" => {
"default_site_enabled" => true
}
}[/ruby]
So it should now look like this:
[ruby]Vagrant.configure("2") do |config|
config.vm.box = "precise32"
config.vm.box_url = "http://files.vagrantup.com/precise32.box"
config.vm.network :forwarded_port, guest: 80, host: 8080
config.vm.provision :chef_solo do |chef|
chef.json = {
"apache" => {
"default_site_enabled" => true
}
}
chef.cookbooks_path = ["cookbooks"]
chef.add_recipe "apache2"
end
end[/ruby]
The chef.json section passes the specified variable values into the specified recipe file. If you dig into default.rb in /cookbooks/apache/recipes you’ll see this block towards the end:
[ruby]apache_site "default" do
enable node[‘apache’][‘default_site_enabled’]
end[/ruby]
Essentially this says “for the site default, set it’s status equal to the value defined by default_site_enabled in the apache node config section”. For Ubuntu this defaults to false (other OSs default it to true) and we’ve just set ours to true.
Let’s try that again:
[bash]vagrant reload[/bash]
(reload is the equivalent of vagrant halt && vagrant up)
Notice that this time, towards the end of the run, we get the message
[bash]INFO: execute[a2ensite default] ran successfully[/bash]
instead of on the previous one:
[bash]INFO: execute[a2dissite default] ran successfully[/bash]
- a2ensite = enable site
- a2dissite = disable site
So what does this look like?

BOOM!
Next up
Let’s dig into the concept of Chef recipes and creating our own ones.
3 thoughts on “Chef For Developers”