Enable AMP Analytics using a custom WordPress plugin

I’ve recently enabled support for Facebook Instant Articles, Google AMP, and Apple News on this blog following this enlightening article.

It wasn’t exactly plain sailing; AMP needs a logo, and a featured image set for every article (both of which must be above a minimum size); the Instant Articles plugin has a feed url which my feedburner plugin breaks; Apple News needs some real tweaking, but still strips out code blocks from posts.

However, I also wanted to get my AMP plugin hooked up with my Google Analytics tracking. Luckily, the plugin from Automattic has support for this, but I needed to implement the analytics configuration using a custom theme or a custom plugin.

I’m not a PHP developer, let alone a WordPress developer, so this doesn’t come naturally to me! Please bear with me..

Continue reading

Backup a WordPress Amazon EC2 instance

Previously I’ve had some difficulty backing up my microistance WordPress MySql db; running mysqldump would cause 100% CPU use until I rebooted the instance and restart apache & mysql.

Why was mysqldump evil?

At least I’ve finally discovered the reason I’d get those nasty CPU spikes:

w2db_fail[1]

The culprit is, most likely, the Slimstat plugin:

screenshot-2[1]

This is a real-time web analytics plugin which has a lovely dashboard view showing you everything about who is or has viewed your site, how long they were there for, how they got there, etc. Addictive stuff.

However, in order to get these stats it saves a lot of data in a new set of mysql tables; these tables not only get really big, but are also being accessed constantly.

As such, a brief overview for backing up from the command line, as referenced in the WordPress codex has a couple of mysqldump commands similar to:

[code]mysqldump –add-drop-table -h <hostname> -u <username> -p <database name>[/code]

This will try to backup everything in the named database, which would include all Slimstat tables.

Solutions

There are a couple of approaches to this. I’ve now done both.

  1. Change your backup script to select the wordpress mysql tables only
  2. Use google analytics instead of slimstat

Using google analytics

Head over to www.google.co.uk/analytics and setup your account, then save the file it gives you onto your web host to prove it’s you. Now you can get lovely stats just by placing a tracking script reference in the footer of your WordPress theme; be careful to reimplement this if you change themes.

analytics

Selecting the WordPress tables

Get the table names for all wordpress tables (assuming you went with the default naming convention of a “wp_” prefix; if not, adapt to suit your convention):

mysql -u<username> -p<password> –skip-column-names -e "select table_name from information_schema.TABLES where TABLE_NAME like ‘wp_%’;"

Pipe it into mysqldump:

mysql -u<username> -p<password> –skip-column-names -e "select table_name from information_schema.TABLES where TABLE_NAME like ‘wp_%’;" | xargs mysqldump –add-drop-table -u<username> -p<password> <database name>

send that output to a file:

mysql -u<username> -p<password> –skip-column-names -e "select table_name from information_schema.TABLES where TABLE_NAME like ‘wp_%’;" | xargs mysqldump –add-drop-table -u<username> -p<password> <database name> > <backup file name>

In summary

Using this info I can now create a backup script that actually works; it will generate a single gzipped tar of all my website’s content files (including wordpress code) and the database backup:

[code]#!/bin/bash

# Set the date format, filename and the directories where your backup files will be placed and which directory will be archived.
NOW=$(date +"%Y-%m-%d-%H%M")
FILE="mywebsitebackup.$NOW.tar"
BACKUP_DIR="/home/ec2-user/_backup"
WWW_DIR="/var/www"

# MySQL database credentials
DB_USER="root"
DB_PASS="enteryourpwdhere"
DB_NAME="wordpress"
DB_FILE="mydbbackup.$NOW.sql"

# dump the wordpress dbs
mysql -u$DB_USER -p$DB_PASS –skip-column-names -e "select table_name from information_schema.TABLES where TABLE_NAME like ‘wp_%’;" | xargs mysqldump –add-drop-table -u$DB_USER -p$DB_PASS $DB_NAME > $BACKUP_DIR/$DB_FILE

# archive the website files
tar -cvf $BACKUP_DIR/$FILE $WWW_DIR

# append the db backup to the archive
tar –append –file=$BACKUP_DIR/$FILE $BACKUP_DIR/$DB_FILE

# remove the db backup
rm $BACKUP_DIR/$DB_FILE

# compress the archive
gzip -9 $BACKUP_DIR/$FILE
[/code]

Save that in a script, make it executable, and if you like you can add a cron task to create a backup on a regular basis. A couple of things to watch out for:

  1. These files can be big, so will use up a good chunk of your elastic block store volumes, which cost a few dollars more than a teeny EC2 instance
  2. Creating the archive can be a bit processor intensive sometimes, which may stress your poor little microinstance

Coming up

Using this backup I automate the creation of a duplicate blog and script the entire process using Chef and Vagrant!

DevOps Consulting: I Think I Will

I posted a lengthy reply to a blog entitled “Devops Consulting: Why I Don’t” (essentially “devops doesn’t mean what you think it means, stop using it badly, there’s no such thing as a devops consultant”, which I disagree with since that’s what I’m trying to become!) so thought I may as well blog it as well to keep any discussion going. Your thoughts are appreciated.

To me a devops consultant is someone who is knowledgeable in many things from the entire length of the development lifecycle; like value stream mapping, impact mapping, fishbone/5 whys retrospectives, multiple development methodologies, various test automation frameworks, various build automation frameworks, various environment automation frameworks, release management tools, various reporting and monitoring frameworks, as well as the business knowledge to know how to put it all together to identify the best mix of things to suit a given company who is struggling to gain business benefit from their projects in a timely manner.

Not necessarily being an expert at hardcore technical depth in all of those areas, but knowing which tools to take out from the toolbox for which job.

I agree that the term devops is ambiguous and hugely incorrectly overused – mainly due to it sounding much like a person instead of a culture – but that doesn’t mean that the term can mean something that is a set of skills a consultant can have.

Recently I’ve started to think that it could be used in a similar fashion to “agile”; you could affix it to existing disciplines to expand their meaning:

devops engineer – someone who knows about implementing a CI process using build automation, packaging, and environment automation

devops tester – someone who knows about building testable software right from the idea initiation through development, defect tracking and reporting, test automation, and the resulting feedback loop

devops developer – bit trickier; possibly someone working on building or expanding the automation tools, as opposed to an application developer?

devops consultant – someone who can be dropped into a company, assess their processes, people, and technologies, and work out what changes would need to be made in order to achieve better throughput, where to make the changes and recommend which technologies to use (without necessarily being able to implement the changes themselves, but having the network of skilled devops-** people who can).

That’s my understanding of it anyway, Environment automation is one part of a big term – and may not even be the right answer for certain companies anyway.

Smart TV 101 : Part #2 – App Development

I’m committing to doing 12 months of “101”s; posts and projects themed at beginning something new (or reasonably new) to me. January was all about node development awesomeness. February is all about Smart TV apps.

SDK

There is a wonderfully detailed SDK document for the current latest version (v4.0) which provides the environment to develop and test apps for the 2011, 2012, and 2013 series of TVs.

This consists of an IDE (a version of Eclipse), a selection of emulators for the three series of TVs it supports, automated test tools, app packaging facilities, and a few other tools.

There are examples and tutorials for projects ranging from gesture recognition, voice recognition, adaptive video streaming, through to advertisment embedding.

Developing gesture recognition apps for the 2013 Smart TV series

IDE – Ecplise

I’ve never been a fan of Eclipse as an IDE, but I’m stuck with it at the moment since it’s part of the Samsung SDK! To be fair, it does integrate into app development process quite well.

Once you’ve downloaded it from the SamsungDForum website and installed it you can create one of three types of application:

  1. Basic – for the less codey-types, using as visual editor. A bit like Visual Studio in design mode.
  2. Javascript – for writing the css, html, and js code yourself; this is the one I’ll be using
  3. Flash – strangely enough, for embedding flash into your app

ecplise-1

Within this flavour of Eclipse is the facility to launch the current application under development directly in an emulator, and also the ability to create a package for deployment (to be covered in the next post).

Emulator

As with any project in which you’re developing an application which will be running on a system that is different to the one on which you’re developing – such as iPhone or Android apps – you’re going to need a solid emulator.

The Samsung ones are actually reasonably good. There are some reasonably advanced debugging and testing facilities built into the SDK but even just having any javascript alert display within a debug window is extremely useful.

Smart TV Emulator

Developing a basic app

Right, let’s get down to business.

  1. Install the SDK
  2. Open up Eclipse
  3. Create a new Javascript app
  4. Make sure you’ve selected the project in the file explorer tab (i.e., not one of the js or html files)
  5. Click the Samsung Smart TV menu and select Open current project in Emulator

aaaaannnnd

samsung-emulator-1

WOW! Nothing!

Ok, let’s make it do something.

Add in a new div, give it an id, and whack in some text. This still won’t actually appear so edit the css and give it a height, width, and garish background colour.

There’s still one thing that you may need to check; I believe that this is now part of the standard base project, but in previous versions of the SDK you had to edit the Main.onLoad event and wire up a call to let the application manager know it was now ok to start showing things:
[js]widgetAPI.sendReadyEvent[/js]

My resulting HTML looks a bit like:
[html highlight=”8,9″]<!DOCTYPE html>
<html>
<head>
<meta http-equiv="Content-Type" content="text/html; charset=utf-8">
<title>AlrightMate</title>

<!– TODO : Common API –>
<script type="text/javascript" language="javascript" src="$MANAGER_WIDGET/Common/API/Widget.js"></script>
<script type="text/javascript" language="javascript" src="$MANAGER_WIDGET/Common/API/TVKeyValue.js"></script>

<!– TODO : Javascript code –>
<script language="javascript" type="text/javascript" src="app/javascript/Main.js"></script>

<!– TODO : Style sheets code –>
<link rel="stylesheet" href="app/stylesheets/Main.css" type="text/css">

<!– TODO: Plugins –>

</head>

<body onload="Main.onLoad();" onunload="Main.onUnload();">
<div id="content">Alright mate?</div>

<!– Dummy anchor as focus for key events –>
<a href="javascript:void(0);" id="anchor" onkeydown="Main.keyDown();"></a>

<!– TODO: your code here –>
</body>
</html>[/html]

and the autogenerated Main.js script has this onLoad method:
[js]Main.onLoad = function()
{
// Enable key event processing
this.enableKeys();
widgetAPI.sendReadyEvent();
}[/js]

Notice the $MANAGER_WIDGET files referenced in the head; these files allow access to common object modules and are on the TV itself and installed as part of the SDK.

Try running the emulator again –

samsung-emulator-2

Stonking.

Developing a slightly less basic app

Using the API created in my January posts on nodejs I’m going to create a tv app which will display the results of a product search on the Asos catalogue.

The main.js file now has an updated onload method, which makes a call to the API and then passes the returned data to a new method:
[js]Main.onLoad = function()
{
var URL = "http://rposbo-basic-node-api.apphb.com/products/socks?key=" + api_key;

if (this.XHRObj != null){
this.XHRObj.destroy();
}
this.XHRObj = new XMLHttpRequest();

if (this.XHRObj) {
alert("got XHR");
this.XHRObj.onreadystatechange = function () {
alert("State changed to " + Main.XHRObj.readyState);
if (Main.XHRObj.readyState == 4) {
alert("got data");
Main.recieveData();
}
};
this.XHRObj.open("GET", URL, true);
this.XHRObj.send(null);
}

// Enable key event processing
this.enableKeys();
widgetAPI.sendReadyEvent();
};[/js]

The new recieveData method which loops through the returned product data and creates some basic html elements to display the image and title in a list item:
[js]Main.recieveData = function () {

alert("alerting data…");
var data = JSON.parse(this.XHRObj.responseText);
for(var i=0; i<data.products.length; i++)
{
var product = data.products[i];
alert("adding " + product.title);

// image
var productImg = document.createElement("img");
productImg.setAttribute("src", product.image);

// text
var title = document.createTextNode(product.title);

// link containing both
var link = document.createElement("a");
link.appendChild(productImg);
link.appendChild(title);

// list item containing link
var listItem = document.createElement("li");
listItem.appendChild(link);

document.getElementById(‘listing’).appendChild(listItem);
}
};[/js]

No jQuery here, since I don’t want to have to load it up locally on to the tv and waste precious memory.

The single html file now looks like
index.html
[html highlight=”12″]<!DOCTYPE html>
<html>
<head>
<meta http-equiv="Content-Type" content="text/html; charset=utf-8">
<title>rposboBasicTvApp</title>

<!– TODO : Common API –>
<script type="text/javascript" language="javascript" src="$MANAGER_WIDGET/Common/API/Widget.js"></script>
<script type="text/javascript" language="javascript" src="$MANAGER_WIDGET/Common/API/TVKeyValue.js"></script>

<!– TODO : Javascript code –>
<script language="javascript" type="text/javascript" src="app/javascript/key.js"></script>
<script language="javascript" type="text/javascript" src="app/javascript/Main.js"></script>

<!– TODO : Style sheets code –>
<link rel="stylesheet" href="app/stylesheets/Main.css" type="text/css">

<!– TODO: Plugins –>

</head>

<body onload="Main.onLoad();" onunload="Main.onUnload();">

<div id="listing"></div>

<!– Dummy anchor as focus for key events –>
<a href="javascript:void(0);" id="anchor" onkeydown="Main.keyDown();"></a>

<!– TODO: your code here –>
</body>
</html>[/html]
The highlighted line is just where I define my API key and refer to it in Main.js.

This subtly changed code now looks something like:
asos-tv-emulator

Next up – deploying to a TV

We’ve got a basic app, now it’s time to get it on to the TV!

The code from this post is available on github

Node.js 101: Wrap up

Year of 101s, Part 1 – Node January

Summary – What was it all about?

I set out to spend January learning some node development fundementals.

Part #1 – Intro

I started with a basic intro to using node – a Hello World – which covered what node.js is, how to create the most basic of all programs, and mentioned some of the development environments.

Part #2 – Serving web content

Second was creating a very simple node web server, which covered using nodemon to develop your node app, the concept of exports, basic request routing, and serving various content types.

Part #3 – A basic API

Next was a simple API implementation, where I proxy calls to the Asos API, return a remapped subset of the data returned, reworked the routing creating basic search functionality and a detail page, and touched on being able to pass in command line arguements.

Part #4 – Basic deployment and hosting with Appharbor, Azure, and Heroku

Possibly the most interesting and fun post for me to work on involved deploying the node code on to three cloud hosting solutions where I discovered the oddities each provider has, various solutions to the problems this raises, as well as some debugging cleverness (nice work, Heroku!). The simplicity of a git-remote-push-deploy process is incredible, and really makes quick application development and hosting even more enjoyable!

Part #5 – Packages

Another interesting one was getting to play with node packages, the node package manager (npm), the express web framework, jade templating engine, and stylus css pre-processor, and deploying node apps with packages to cloud hosting.

Part #6 – Web-based development

The final part covered the fantastic Cloud9IDE, including a (very) basic intro to github, and how Cloud9 can still be used in developing and deploying directly to Azure, Appharbor, or Heroku.

What did I get out of it?

I really got into githubbing and OSSing, and really had to try hard to not over stretch myself as I had starting forking repos to try and make a few tweaks to things whilst working on the node month.

It has been extremely inspiring and has opened up so many other random tangents for me to explore in other projects at some other time. Very motivating stuff.

I’ve now got a month of half decent blog posts – I had only intended to do a total of 4 posts but including this one I’ve done 7, since I kept adding more information as it turned up and needed to split a few posts into two.

Also I’ve learned a bit about blogging; trying to do posts well in advance allowed me to build up the details once I’d discovered more whilst working on subsequent posts. For example, how Appharbor and Azure initially track master – but can be configured to track different branches. Also, debugging with Heroku only came up whilst working with packages in Heroku.

Link list

Node tutorials and references

Setting up a node development environment on Windows
Node Beginner – a great article, and I’ve also bought the associated eBooks.
nodejs.org – the official node site, the only place to go for reference

Understanding Javascript better

Execution in The Kingdom of Nouns
Object Orientation and Inheritance in Javascript

Appharbor

Appharbor and git

Heroku

Heroku toolbelt download and reference
node on Heroku

Azure

Checkout what Azure can do!

February – coming up, Samsung Smart TV App Development!

Yeah, seriously. How random is that?.. 🙂

Year of 101

The Year of 101Following on from my recent post about doing something this year, I think I’ll start simple and commit to doing 12 months of “101”s; posts and projects themed at beginning something new (or reasonably new) to me. As such, I’m going to kick off the year, and the project, with…

January – Node.js 101

Part #1 – Intro

node-js-logo

I may have looked into node a bit during 2012 but haven’t had the chance to actually write anything myself with a point to it. As such, I’m going to start this year off by getting stuck into starting coding node, and bring together resources that help me learn during this month.

Node.js

So what’s Node when it’s at home, then?

JavaScript. A language essentially written in a couple of weeks to enable spam popups filling your screen every time you wanted to browse entertaining quotes from IMDB in the 90s.

Not really..

Ok, fine. Node itself is not JavaScript – Node.js is the engine which runs on a server and executes your JavaScript. The engine and the core modules of node are compiled binaries written in C++ (I think) – and given that it’s open source, you can check it out yourself here

Every modern browser has an ECMAScript engine in it, and it is this which executes the javascript code. A packaged compilation of Google’s V8 engine is at the heart of Node, and that makes it a solid and speedy engine to be running functionality on.

Why is it so popular?

Perhaps because it’s a bit new. Perhaps it’s nice to be able to use JavaScript on the server for once, allowing developers to use a single language for front and back end development. It’s fast, it’s async, it’s non-blocking. I just find it fun to code with.

I’m a big fan due to two particular elements:

  1. I like JavaScript as a language. I like the syntax, I like the dynamic nature. I learned it way back in the late 90s whilst at university by doing loads of “view-source”s on Angelfire and Geocities sites. Plus I was doing a degree in C++ at the time, so the syntax was already familiar but was much easier to see a visible result.

  2. Node strips development right down to basics. No fancy IDE (being practically dependant on Visual Studio for developing .Net on Windows has always really bothered me), no intellisense (you just have to KNOW THE ANSWER. Or Google it.. or check the nodejs.org website’s API documentation). I do have WebStorm (and even bought a licence during the JetBrains recent Apocolypse sale) but I currently prefer to develop Node projects in SublimeText2.

Want to say hello world?

  1. Install Node
  2. Save the below as “hiya.js”:

    [js]console.log("hello world");[/js]

  3. from a command line run:

    [code]node hiya.js[/code]

  4. You will see, amazingly:

    [code]hello world[/code]

Not very impressive, I know, but that’s not what Node is about IMO. I find the ability to easily add layers to your code and make it do a little bit more is very interesting.

Let’s change that script to also send the text to a web browser. Without a web server. No IIS, no Apache, no TomCat.

  1. Create a fully functional web server and limit it to send a single response (save the below as “hiya-web.js”):

    [js]var http = require("http");

    http.createServer(function(request, response) {
    response.writeHead(200, {"Content-Type": "text/plain"});
    response.write("Hello World");
    response.end();
    }).listen(3000);[/js]

  2. from a command line run:

    [code]node hiya-web.js[/code]

  3. open a browser and visit http://localhost:3000

    hello-world-web-0

How about changing that to send an html page instead of plain text?

  1. Change the following lines:

    [js highlight=”4,5″]var http = require("http");

    http.createServer(function(request, response) {
    response.writeHead(200, {"Content-Type": "text/html"});
    response.write("<h1>Hello World</h1>");
    response.end();
    }).listen(3000);[/js]

  2. rerun node – kill your node process (Ctrl+C), then:

    [code]node hiya.js[/code]

  3. Refresh your browser

    hello-world-web-1

You can just keep adding layers to it, which is what I’ve done in my first project (next post).

It’s pretty powerful stuff. But it’s just Javascript being executed on the server’s ECMAScript engine instead of your browser’s one. I mean, look at that code for a second – you’re referencing a global “http” node module, creating a web server, and telling it what it should do. (Don’t ask why it uses port 3000; 3000 and 8888 seem to be the standard Node.js ports for tutorials..); that’s extremely powerful stuff. And it’s pretty much just good old javascript from where you’re sitting.

Starting developing at this level is a nice form of YAGNI (you ain’t gonna need it) – don’t install an MVC framework or a CSS minification module until you actually need one. Although you can do both of those things, and I’ll get onto that in a later post.

Developing Node apps

I’ve said that you don’t need a fancy IDE for writing Node apps, and I fully understand that the same is true of most other languages, but once you get a complex project structure together in .Net writing your own msbuild commands instead of letting Visual Studio build them up for you can be somewhat counterproductive.

I’m a little bit enamoured by the development tools available for Node, and this may just be because they’re new and shiny, but they’re still nice tools. My top three are:

  • JetBrains WebStorm

    webstorm-node-js-asos-api-2

    This is a fully featured Node (and other language) development environment, with intellisense, inline syntax checking, live editing updates via a Chrome plugin, npm integration, VCS integration (including github, natch). Slick.

  • Cloud9IDE

    cloud-9-ide-node-js-asos-api-2

    Amazingly, this is a browser based development environment, also with inline syntax checking and intellisense, npm integration (via an in-browser command line), github/bitbucket integration, and – my favourite – integrated heroku/azure deployment. So you can collaboratively develop, debug, and deploy Node apps from a browser. Take THAT Microsoft volume licencing!

  • Sublime Text 2

    sublimetext-node-js-asos-api-2

    My personal favourite tool for pretty much anything outside of .Net development – a feature rich text editor with extensions available via python plugins. Has nothing whatsoever to do with Node. It’s about as “Node” as Notepad would be.

Coming up

The next few posts this month will cover developing an application in node, installing node packages, version control, and deployment & hosting.

I’m looking forwards to playing with getting stuck in to something new, learning my way around, and seeing how it all works. Hopefully you’ll enjoy reading that experience too!

Backup Backup Backup

Whilst out at a bar in Camden recently a friend started hunting around our area with an increasingly panic stricken look on his face. Turns out that his personal laptop had been taken from under our seats. Six years of his personal dev work lost.

The response from every technical person he told? Should’ve backed up. Also, you’ve got Prey on there, right?.. no?.. Ah..

Not exactly the most compassionate response, but for those of us with a half decent backup solution all you need worry about is getting the insurance paid out on the hardware itself.

My backup solution is pretty minimal; the only things I care about are photos and videos, documents (work and home), and coding fun.

First up – Cloud

Photos

My photos are usually taken on my Samsung Galaxy S3 so exist in several places almost by default. The SG3 is an android device, so my photos are automatically synced up to my google drive using Google Plus Instant Upload.

I have a dropbox account and the android dropbox app so they’re also being synced to dropbox; I have dropbox on my laptops at home and on my work PC, so the photos are downloaded onto those devices too.

I have the Jungledisk agent on all of my PCs which also backup those photos to my jungledisk account. It’s going to be pretty tricky to lose them all.

Documents

Documents are handled by both dropbox and Windows Live Mesh; as soon as I close a document on my office PC it’s synced via Live Mesh to SkyDrive and then downloaded again to my home PC.

Again, this is also backed up to Jungledisk as separate PC backups.

Coding fun

This also uses Windows Live Mesh, and Dropbox, and Jungledisk, but the ones I really like are also pushed up to github.

Pricey, right?

The cost of this security? Not much at all.

  • Live Mesh comes with Windows 7.

  • Dropbox is free and if you by a SG3 you get 50GB free for a year, plus 500MB free for every 500MB of photos you backup to dropbox.

  • Jungledisk costs me around £10 a month, which given that I also use it to automatically back up everything in my and my wife’s laptops’ “My Documents” folders to a secure cloud based solution, including all iTunes, iPhoto, etc folders, I think that’s money well spent; obviously some of that is also on iCloud too!

Physical? Sure!

I’m not relying on internet access to get my files back either. I have both local network and USB attached backup solutions.

External HDD

Western Digital My Passport

This tiny 500GB Western Digital Passport attaches to whichever machine I’m working on at the time and constantly backs up my entire D drive (non-OS) securely and with rollback capabilities.

NAS

LaCie LaCinema

I also have everything in key folders on each laptop within my home network being copied over to a 1TB LaCie LaCinema HD HDMI Media Centre/NAS, which is an amazing bit of kit in its own right. You can now get a 2TB version for about £160.

It Works For Me ©

I’m not saying this is what everyone should do, as requirements will obviously differ. But this works for me, and the last time one of my laptops crashed and burned I was quite happy at the chance to get a shiny new one, not having lost any important data at all.

Applications

No need to back up any applications since it’s so easy to rebuild an entire Windows system using things like Chocolatey, WebPi, and Ninite.

Creating a SublimeText plugin to publish markdown to WordPress

I’ve been using SublimeText for a while now as a no-frills text editor; it has a nice Zen mode which hides all of the tabs and menus and pushes it to full screen which I’ve found perfect for taking notes during seminars:

SublimeText2 Zen mode

I have been trying to take notes using the markdown sytnax, but have found the process between taking the notes in markdown, converting them to HTML, and publishing the HTML to a blog a bit of a pain.

Given that SublimeText supports extension via plugin scripts written in Python, I’ve knocked together an extension which will

  1. convert the markdown to html
  2. push the html directly to wordpress

Before I get into the details of the script, maybe a little background would be useful:

What’s Markdown?

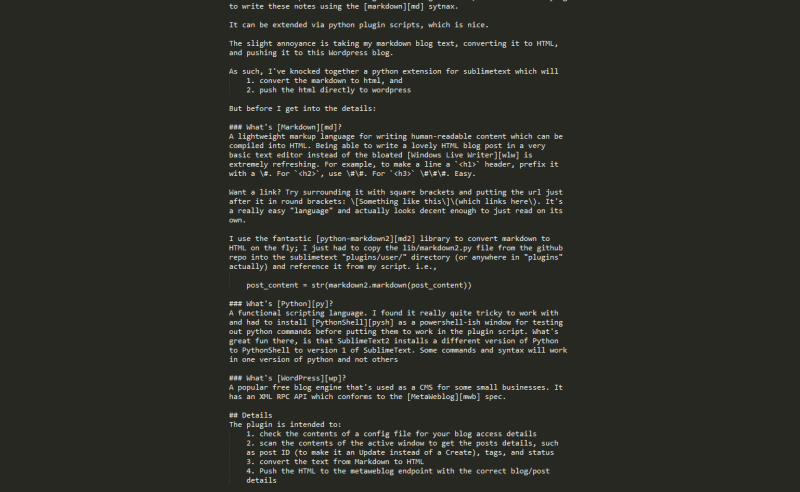
A lightweight markup language for writing human-readable content which can be compiled into HTML. Being able to write a lovely HTML blog post in a very basic text editor instead of the bloated Windows Live Writer is extremely refreshing.

For example, to make a line a <h1> header, prefix it with a #. For <h2>, use ##. For <h3> ###. Easy.

Want a link? Try surrounding it with square brackets and putting the url just after it in round brackets: [Something like this](which links here). It’s a really easy “language” and actually looks decent enough to just read on its own.

To include an image you just need to write ![alt text](image url)

A syntax reference page can be found here.

One problem I do have is the basic support for code highlighting within markdown is poor, obviously, since HTML only has a single <code> block. The Markdown generated HTML conflicts with my wordpress Syntaxhighlighter plugin, hence the ugly clode blocks in this post.

There is support for “fenced-code-blocks” wihtin many implementations of markdown, and with the library that I’m also using, but this is still not playing nicely with Syntaxhighlighter. I’m sure I’ll figure something out eventually – please bear with me until then.

I use the fantastic python-markdown2 library to convert markdown to HTML on the fly; I just had to copy the lib/markdown2.py file from the github repo into the sublimetext “plugins” directory – I created a Markdown subdirectory for it – and reference it from my script. i.e.,

post_content = str(markdown2.markdown(post_content,extras=["code-friendly"]))

What’s Python?

Python

A functional scripting language. I found it really quite tricky to work with and had to install PythonShell as a powershell-ish window for testing out python commands before putting them to work in the plugin script. What’s not great fun is that SublimeText2 installs a different version of Python to PythonShell to version 1 of SublimeText to any version you explicitly install yourself.

Some commands and syntax will work in one version of python and not others

One great example is setting up a proxy; the syntax for this is completely different between versions of python and whatever example code you’re reading might be using the syntax that your version of python doesn’t support.

Working with a functional language took a lot of getting used to; I’d want to return an object from a method but had to instead return a comma delimited list of base types. It’s all a little odd to me, and my messy code shows that!

What’s WordPress?

Wordpress

A popular free blog engine that’s used as a CMS for some small businesses. It has an XML RPC API which conforms to the MetaWeblog spec, and you can really dig into this by looking through the php files that make up a WordPress installation.

Since I’m using Amazon EC2 as my wordpress host I can use Kitty to SSH in and browse to /var/www/html/xmlrpc.php to see the metaweblog service api itself. That file references wp-includes/class-wp-xmlrpc-server.php which contains all of the underlying functionality for the api implementation. This is great reference material to make sure you’re passing the correct values of the correct types to the correct endpoints.

Details

The sublimemarkpress plugin is intended to:

  1. check the contents of a config file for your blog access details
  2. scan the contents of the active window to get the posts details, such as post ID (to make it an Update instead of a Create), tags, and status
  3. convert the text from Markdown to HTML
  4. Push the HTML to the metaweblog endpoint with the correct blog/post details

1. Getting the Blog setup details from a config file

The plugin relies on a settings file called “sublimemarkpress.sublime-settings” using the structure:

{
    "xmlrpcurl": <URL to xml rpc endpoint>,
    "username": <username>,
    "password": <password>
}

to read it:

s = sublime.load_settings("sublimemarkpress.sublime-settings")
mbURL = s.get("xmlrpcurl")
mbUsername = s.get("username")
mbPassword = s.get("password")

2. Get the text and strip out the blog post data

The plugin expects the top of your text file/active window to have optional tags to define blog post details:

<!-- 
#post_id:<id of existing post - optional>
#tags:<comma delimited list of post tags - optional>
#status:<draft or publish - optional>
-->

To get the entire contents of the active window:

all_lines_in_page = self.view.lines(sublime.Region(0, self.view.size()))

Then to extract the header details:

post_id, tags, status, has_header_content = self.GetHeaderContent(all_lines_in_page, header_lines)

where GetHeaderContent is the hack-y:

def GetHeaderContent(self, all_lines_in_page, header_lines):
    page_info = {"has_header_content":False,"post_id":None, "tags":"", "status":""}

    if self.view.substr(all_lines_in_page[0]).startswith("<!--"):
        page_info["has_header_content"] = True
        self.MoveCurrentLineToHeader(header_lines, all_lines_in_page)

        # post_id
        if self.view.substr(all_lines_in_page[0]).startswith("#post_id"):
            page_info["post_id"] = self.view.substr(all_lines_in_page[0]).split(":")[1]
            self.MoveCurrentLineToHeader(header_lines, all_lines_in_page)

        #post tags
        if self.view.substr(all_lines_in_page[0]).startswith("#tags"):
            page_info["tags"] = self.view.substr(all_lines_in_page[0]).split(":")[1]
            self.MoveCurrentLineToHeader(header_lines, all_lines_in_page)

        #post status
        if self.view.substr(all_lines_in_page[0]).startswith("#status"):
            page_info["status"] = self.view.substr(all_lines_in_page[0]).split(":")[1]
            self.MoveCurrentLineToHeader(header_lines, all_lines_in_page)

        self.MoveCurrentLineToHeader(header_lines, all_lines_in_page) # removes the closing comment tag
    return page_info["post_id"],page_info["tags"],page_info["status"],page_info["has_header_content"]

def MoveCurrentLineToHeader(self, header_lines, all_lines_in_page):
        header_lines.insert(len(header_lines),all_lines_in_page[0])
        all_lines_in_page.remove(all_lines_in_page[0])

3. Convert the rest from Markdown to HTML

As mentioned earlier, thanks to the great python-markdown2 library, this is simply a case of calling the “markdown” method, passing in the content to process:

post_content = str(markdown2.markdown(post_content,extras=["code-friendly"]))

I actually do a test to see if the markdown library can be imported first, then if it fails I don’t even try to convert from markdown to HTML:

can_markdown = False
try: 
    import markdown2 # markdown
    can_markdown = True
except ImportError:
    can_markdown = False

4. Post to metaweblog api

Build up the request using the blog details, post details, and HTML content:

content = self.BuildPostContent(self.view, {"content": post_content, "title": title, "tags": tags, "status": status})

def BuildPostContent(self, view, page_data):        
    return {"description": page_data["content"], "post_content": page_data["content"], "title": page_data["title"], "mt_keywords": page_data["tags"], "post_status": page_data["status"]}

Then submit it to the api:

proxy = xmlrpclib.ServerProxy(mbURL)

if post_id == None:
    post_id = proxy.metaWeblog.newPost(blog_id, mbUsername, mbPassword, content)
else:
    proxy.metaWeblog.editPost(post_id, mbUsername, mbPassword, content)

Extra bits and making it all work

To execute a command from a plugin within SublimeText, firstly you need to import the sublimetext library at the top:

import sublime, sublime_plugin # sublime

then name your class “something<command>” and have it take the “sublime_plugin.TextCommand” parameter:

class PublishCommand(sublime_plugin.TextCommand):

Then to run it you need to hit ctrl+’ to bring up the command window and type:

view.run_command("<name of the class minus the 'Command' suffix>")

e.g. for my plugin:

view.run_command("publish")

You can try this out with loads of the plugins included with a SublimeText install

That’s about it

All of this is in a small github repo. I’d appreciate it if you want to fork the repo and help show me how python should actually be structured. And written.

Known Issues

Categories

These need to be requested, looped through and matched against those associated with a post, added if those specified don’t exist, and the IDs associated with the post. Couldn’t be arsed.

As such, when you post to your blog you’ll see the entry is “uncategorised” and you’ll have to manually edit this.

Images

Since I’m just fooling around with a text editor, uploading images is still a little out of scope.

Random reference material

  • pyblog – for helping to work out the guts of how python interacts with the metaweblog api
  • I used Fiddler & Windows Live Writer for investigating traffic and finding out what the actual parameter being used to specify “tags” is within the metaweblog api: mt_keywords