Enable AMP Analytics using a custom WordPress plugin

I’ve recently enabled support for Facebook Instant Articles, Google AMP, and Apple News on this blog following this enlightening article.

It wasn’t exactly plain sailing; AMP needs a logo, and a featured image set for every article (both of which must be above a minimum size); the Instant Articles plugin has a feed url which my feedburner plugin breaks; Apple News needs some real tweaking, but still strips out code blocks from posts.

However, I also wanted to get my AMP plugin hooked up with my Google Analytics tracking. Luckily, the plugin from Automattic has support for this, but I needed to implement the analytics configuration using a custom theme or a custom plugin.

I’m not a PHP developer, let alone a WordPress developer, so this doesn’t come naturally to me! Please bear with me..

Continue reading

Chef for Developers: part 4 – WordPress, Backups, & Restoring

I’m continuing with my plan to create a series of articles for learning Chef from a developer perspective.

Part #1 gave an intro to Chef, Chef Solo, Vagrant, and Virtualbox. I also created my first Ubunutu VM running Apache and serving up the default website.

Part #2 got into creating a cookbook of my own, and evolved it whilst introducing PHP into the mix.

Part #3 wired in MySql and refactored things a bit.

WordPress Restore – Attempt #1: Hack It Together

Now that we’ve got a generic LAMP VM its time to evolve it a bit. In this post I’ll cover adding wordpress to your VM via Chef, scripting a backup of your current wordpress site, and finally creating a carbon copy of that backup on your new wordpress VM.

I’m still focussing on using Chef Solo with Vagrant and VirtualBox for the time being; I’m learning to walk before running!

Kicking off

Create a new directory for working in and create a cookbooks subdirectory; you don’t need to prep the directory with a vagrant init as I’ll add in a couple of clever lines at the top of my new Vagrantfile to initialise it straight from a vagrant up.

Installing WordPress

As in the previous articles, just pull down the wordpress recipe from the opscode repo into your cookbooks directory:

[bash]cd cookbooks
git clone https://github.com/opscode-cookbooks/wordpress.git
[/bash]

Looking at the top of the WordPress default.rb file you can see which other cookbooks it depends on:

[bash]include_recipe "apache2"
include_recipe "mysql::server"
include_recipe "mysql::ruby"
include_recipe "php"
include_recipe "php::module_mysql"
include_recipe "apache2::mod_php5"
[/bash]

From the last post we know that MySql also depends on OpenSSL, and MySql::Ruby depends on build-essentials. Go get those both in your cookbooks directory as well as the others mentioned above:

[bash]git clone https://github.com/opscode-cookbooks/apache2.git
git clone https://github.com/opscode-cookbooks/mysql.git
git clone https://github.com/opscode-cookbooks/openssl.git
git clone https://github.com/opscode-cookbooks/build-essential.git
git clone https://github.com/opscode-cookbooks/php.git
[/bash]

Replace the default Vagrantfile with the one below to reference the wordpress cookbook, and configure the database, username, and password for wordpress to use; I’m basing this one on the Vagrantfile from my last post but have removed everything to do with the “mysite” cookbook:

Vagrantfile

[ruby]Vagrant.configure("2") do |config|
config.vm.box = "precise32"
config.vm.box_url = "http://files.vagrantup.com/precise32.box"
config.vm.network :forwarded_port, guest: 80, host: 8080

config.vm.provision :shell, :inline => "apt-get clean; apt-get update"

config.vm.provision :chef_solo do |chef|

chef.json = {
"mysql" => {
"server_root_password" => "myrootpwd",
"server_repl_password" => "myrootpwd",
"server_debian_password" => "myrootpwd"
},
"wordpress" => {
"db" => {
"database" => "wordpress",
"user" => "wordpress",
"password" => "mywppassword"
}
}
}

chef.cookbooks_path = ["cookbooks"]
chef.add_recipe "wordpress"
end
end
[/ruby]

The lines

[ruby] config.vm.box = "precise32"
config.vm.box_url = "http://files.vagrantup.com/precise32.box"
[/ruby]

mean you can skip the vagrant init stage as we’re defining the same information here instead.

You don’t need to reference the dependant recipes directly since the WordPress one has references to it already.

You also don’t need to disable the default site since the wordpress recipe does this anyway. As such, remove this from the json area:

[ruby] "apache" => {
"default_site_enabled" => false
},
[/ruby]

Note: An issue I’ve found with the current release of the WordPress cookbook

I had to comment out the last line of execution which just displays a message to you saying

[ruby]Navigate to ‘http://#{server_fqdn}/wp-admin/install.php’ to complete wordpress installation.
[/ruby]

For some reason the method “message” on “log” appears to be invalid. You don’t need it though, so if you get the same problem you can just comment it out yourself for now.

To do this, head to line 116 in cookbooks/wordpress/recipes/default.rb and add a # at the start, e.g.:

[ruby]log "wordpress_install_message" do
action :nothing
# message "Navigate to ‘http://#{server_fqdn}/wp-admin/install.php’ to complete wordpress installation"
end
[/ruby]

Give that a

[bash]vagrant up
[/bash]

Then browse to localhost:8080/wp-admin/install.php and you should see:

wordpress inital screen 8080

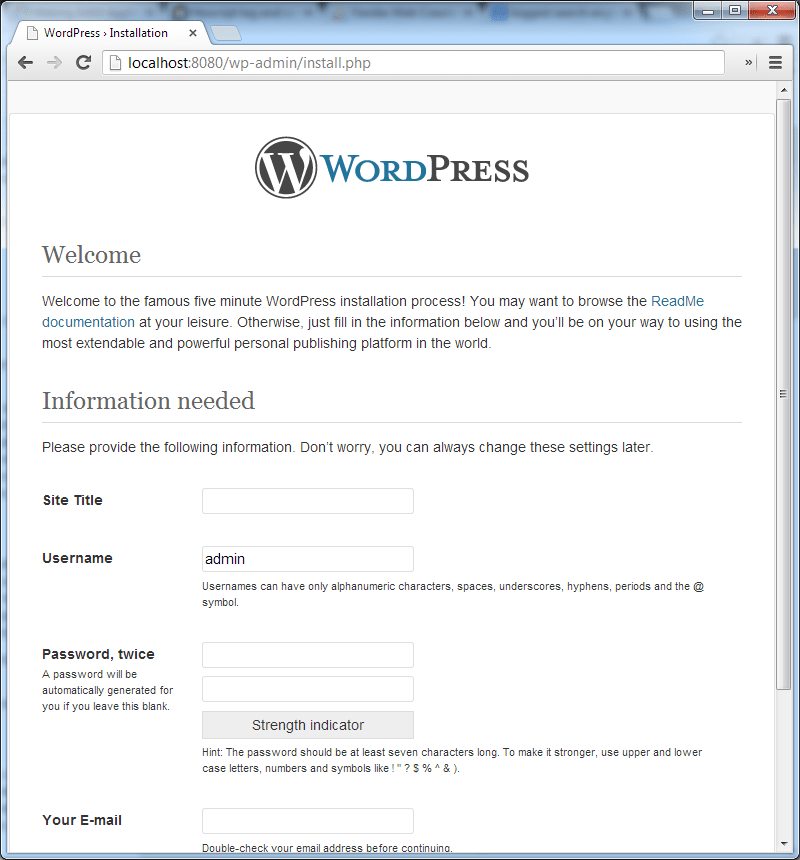
From here you could quite happily set up your wordpress site on a local VM, but I’m going to move on to the next phase in my cunning plan.

Restore a WordPress Backup

I’ve previously blogged about backing a wordpress blog, the output of which was a gziped tar of the entire wordpress directory and the wordpress database tables. I’m now going to restore it to this VM so that I have a functioning copy of my backed up blog.

I’d suggest you head over and read the backup post I link to above, or you can just use the resulting script:

backup_blog.sh

[bash]#!/bin/bash

# Set the date format, filename and the directories where your backup files will be placed and which directory will be archived.
NOW=$(date +"%Y-%m-%d-%H%M")
FILE="rposbowordpressrestoredemo.$NOW.tar"
BACKUP_DIR="/home/<user>/_backup"
WWW_DIR="/var/www"

# MySQL database credentials
DB_USER="root"
DB_PASS="myrootpwd"
DB_NAME="wordpress"
DB_FILE="rposbowordpressrestoredemo.$NOW.sql"

# dump the wordpress dbs
mysql -u$DB_USER -p$DB_PASS –skip-column-names -e "select table_name from information_schema.TABLES where TABLE_NAME like ‘wp_%’;" | xargs mysqldump –add-drop-table -u$DB_USER -p$DB_PASS $DB_NAME > $BACKUP_DIR/$DB_FILE

# archive the website files
tar -cvf $BACKUP_DIR/$FILE $WWW_DIR

# append the db backup to the archive
tar –append –file=$BACKUP_DIR/$FILE $BACKUP_DIR/$DB_FILE

# remove the db backup
rm $BACKUP_DIR/$DB_FILE

# compress the archive
gzip -9 $BACKUP_DIR/$FILE
[/bash]

That results in a gzipped tarball of the entire wordpress directory and the wordpress database dumped to a sql file, all saved in the directory specified at the top – BACKUP_DIR=”/home/<user>/_backup”

First Restore Attempt – HACK-O-RAMA!

For the initial attempt I’m just going to brute-force it, to validate the actual importing and restoring of the backup. The steps are:

  1. copy an archive of the backup over to the VM (or in my case I’ll just set up a shared directory)
  2. uncompress the archive into a temp dir
  3. copy the wordpress files into a website directory
  4. import the mysql dump
  5. update some site specific items in mysql to enable local browsing

You can skip that last one if you want to just add some HOSTS entries to direct calls to the actual wordpress backed up site over to your VM.

Prerequisite

Create a backup of a wordpress site using the script above (or similar) and download the archive to your host machine.

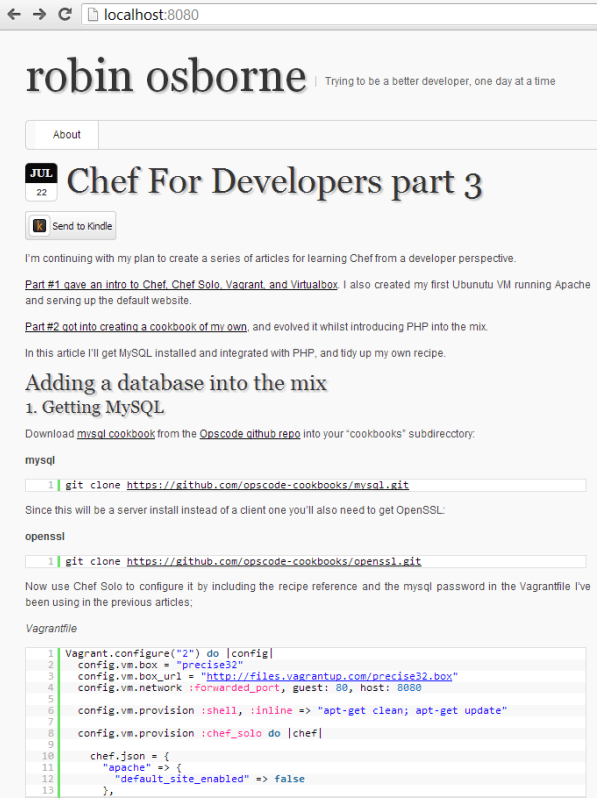
I’ve actually done this using another little vagrant box with a base wordpress install for you to create a quick blog to play around with backing up and restoring – repo is over on github.

For restoring

Since this is the HACK-O-RAMA version, just create a bash script in that same directory called restore_backup.sh into which you’ll be pasting the chunks of code from below to execute the restore.

We can then call this script from the Vagrantfile directly. Haaacckkyyyy…

Exposing the archive to the VM

I’m saving the wordpress archive in a directory called “blog_backup” which is a subdirectory of the project dir on the host machine; I’ll share that directory with the VM using this line somewhere in the Vagrantfile:

[ruby]config.vm.synced_folder "blog_backup/", "/var/blog_backup/"
[/ruby]

if you’re using Vagrant v1 then the syntax would be:

[ruby]config.vm.share_folder "blog", "/var/blog_backup/", "blog_backup/"
[/ruby]

Uncompress the archive into the VM

This can be done using the commands below, pasted into that restore_backup.sh

[bash]# pull in the backup to a temp dir
mkdir /tmp/restore

# untar and expand it
cd /tmp/restore
tar -zxvf /var/blog_backup/<yoursite>.*.tar.gz
[/bash]

Copy the wordpress files over

[bash]# copy the website files to the wordpress site root
sudo cp -Rf /tmp/restore/var/www/wordpress/* /var/www/wordpress/
[/bash]

Import the MySQL dump

[bash]# import the db
mysql -uroot -p<dbpassword> wordpress < /tmp/restore/home/<user>/_backup/<yoursite>.*.sql
[/bash]

Update some site-specific settings to enable browsing

Running these db updates will allow you to browse both the wordpress blog locally and also the admin pages:

[bash]# set the default site to locahost for testage
mysql -uroot -p<dbpassword> wordpress -e "UPDATE wp_options SET option_value=’http://localhost:8080′ WHERE wp_options.option_name=’siteurl’"
mysql -uroot -p<dbpassword> wordpress -e "UPDATE wp_options SET option_value=’http://localhost:8080′ WHERE wp_options.option_name=’home’"
[/bash]

Note: Pretty Permalinks

If you’re using pretty permalinks – i.e., robinosborne.co.uk/2013/07/02/chef-for-developers/ instead of http://robinosborne.co.uk/?p=1418 – then you’ll need to both install the apache::mod_rewrite recipe and configure your .htaccess to allow mod_rewrite to do its thing. Create the .htaccess below to enable rewrites and save it in the same dir as your restore script.

.htaccess

[bash]<IfModule mod_rewrite.c>
RewriteEngine On
RewriteBase /
RewriteRule ^index\.php$ – [L]
RewriteCond %{REQUEST_FILENAME} !-f
RewriteCond %{REQUEST_FILENAME} !-d
RewriteRule . /index.php [L]
</IfModule>
[/bash]

restore_backup.sh

[bash]# copy over the .htaccess to support mod_rewrite for pretty permalinks
sudo cp /var/blog_backup/.htaccess /var/www/wordpress/
sudo chmod 644 /var/www/wordpress/.htaccess
[/bash]

Also add this to your Vagrantfile:

[ruby]chef.add_recipe "apache2::mod_rewrite"
[/ruby]

The final set up and scripts

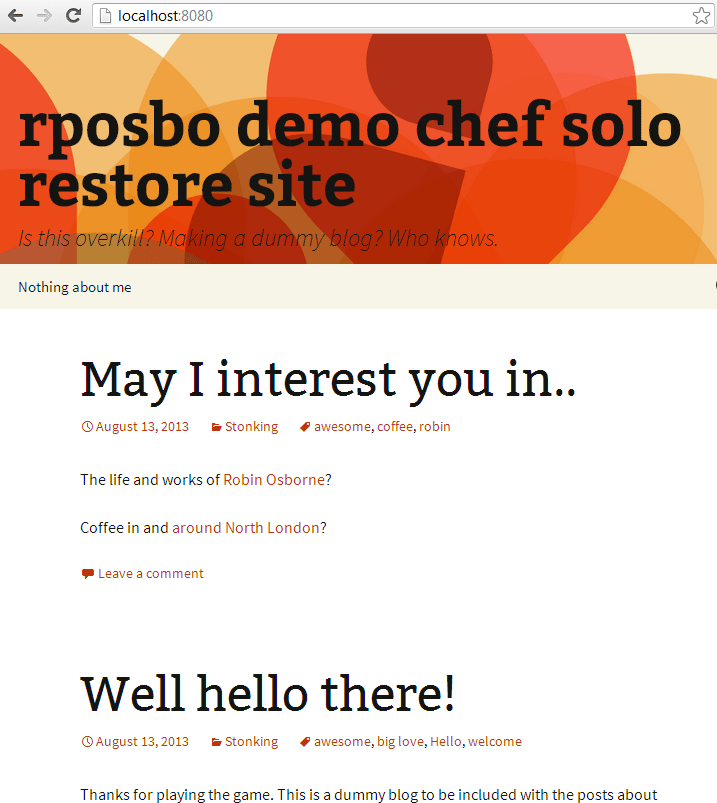
Bringing this all together we now have a backed up wordpress blog, restored and running as a local VM:

wordpress restore 1

The files needed to achieve this feat are:

Backup script

To be saved on your blog host, executed on demand, and the resulting archive file manually downloaded (probably SCPed). I have mine saved in a shared directory – /var/vagrant/blog_backup.sh:

blog_backup.sh

[bash]#!/bin/bash

# Set the date format, filename and the directories where your backup files will be placed and which directory will be archived.
NOW=$(date +"%Y-%m-%d-%H%M")
FILE="rposbowordpressrestoredemo.$NOW.tar"
BACKUP_DIR="/home/vagrant"
WWW_DIR="/var/www"

# MySQL database credentials
DB_USER="root"
DB_PASS="myrootpwd"
DB_NAME="wordpress"
DB_FILE="rposbowordpressrestoredemo.$NOW.sql"

# dump the wordpress dbs
mysql -u$DB_USER -p$DB_PASS –skip-column-names -e "select table_name from information_schema.TABLES where TABLE_NAME like ‘wp_%’;" | xargs mysqldump –add-drop-table -u$DB_USER -p$DB_PASS $DB_NAME > $BACKUP_DIR/$DB_FILE

# archive the website files
tar -cvf $BACKUP_DIR/$FILE $WWW_DIR

# append the db backup to the archive
tar –append –file=$BACKUP_DIR/$FILE $BACKUP_DIR/$DB_FILE

# remove the db backup
rm $BACKUP_DIR/$DB_FILE

# compress the archive
gzip -9 $BACKUP_DIR/$FILE
[/bash]

Restore script

To be saved in a directory on the host to be shared with the VM, along with your blog archive.

restore_backup.sh

[bash]# pull in the backup, untar and expand it, copy the website files, import the db
mkdir /tmp/restore
cd /tmp/restore
tar -zxvf /var/blog_backup/rposbowordpressrestoredemo.*.tar.gz
sudo cp -Rf /tmp/restore/var/www/wordpress/* /var/www/wordpress/
mysql -uroot -pmyrootpwd wordpress < /tmp/restore/home/vagrant/_backup/rposbowordpressrestoredemo.*.sql

# create the .htaccess to support mod_rewrite for pretty permalinks
sudo cp /var/blog_backup/.htaccess /var/www/wordpress/
sudo chmod 644 /var/www/wordpress/.htaccess

# set the default site to locahost for testage
mysql -uroot -pmyrootpwd wordpress -e "UPDATE wp_options SET option_value=’http://localhost:8080′ WHERE wp_options.option_name=’siteurl’"
mysql -uroot -pmyrootpwd wordpress -e "UPDATE wp_options SET option_value=’http://localhost:8080′ WHERE wp_options.option_name=’home’"
[/bash]

.htaccess

[bash]<IfModule mod_rewrite.c>
RewriteEngine On
RewriteBase /
RewriteRule ^index\.php$ – [L]
RewriteCond %{REQUEST_FILENAME} !-f
RewriteCond %{REQUEST_FILENAME} !-d
RewriteRule . /index.php [L]
</IfModule>
[/bash]

Vagrantfile

[ruby]Vagrant.configure("2") do |config|
config.vm.box = "precise32"
config.vm.box_url = "http://files.vagrantup.com/precise32.box"
config.vm.network :forwarded_port, guest: 80, host: 8080
config.vm.synced_folder "blog_backup/", "/var/blog_backup/"

config.vm.provision :shell, :inline => "apt-get clean; apt-get update"

config.vm.provision :chef_solo do |chef|

chef.json = {
"mysql" => {
"server_root_password" => "myrootpwd",
"server_repl_password" => "myrootpwd",
"server_debian_password" => "myrootpwd"
},
"wordpress" => {
"db" => {
"database" => "wordpress",
"user" => "wordpress",
"password" => "mywppassword"
}
}
}

chef.cookbooks_path = ["cookbooks"]
chef.add_recipe "wordpress"
chef.add_recipe "apache2::mod_rewrite"
end

# hacky first attempt at restoring the blog from a script on a share
config.vm.provision :shell, :path => "blog_backup/restore_backup.sh"
end
[/ruby]

myrootpwd

The password used to set up the mysql instance; it needs to be consistent in your Vagrantfile and your restore_backup.sh script

mywppassword

if you can’t remember your current wordpress user’s password, look in the /wp-config.php file in the backed up archive.

Go get it

I’ve created a fully working setup for your perusal over on github. This repo, combined with the base wordpress install one will give you a couple of fully functional VMs to play with.

If you pull down the restore repo you’ll just need to run setup_cookbooks.sh to pull down the prerequisite cookbooks, then edit the wordpress default recipe to comment out that damned message line.

Once that’s all done, just run

[bash]vagrant up[/bash]

and watch everything tick over until you get your prompt back. At this point you can open a browser and hit http://localhost:8080/ to see:

restored blog from github

Next up

I’ll be trying to move all of this hacky cleverness into a Chef recipe or two. Stay tuned.

Aside #10 – Send To Kindle WordPress plugin

Whilst uber geeking it up (streaming a HD Wired.com video podcast to my TV via a raspberry pi with the world’s teeniest usb wifi and a USB battery pack – my next RPi post will cover this!) I learned that WordPress has a new plugin for sending posts straight to your Kindle!

Great idea, since I’m always wanting to read some long post but don’t have the time, so would love a “read it later” button to push it to another device.

Installing the plugin

Here’s all it took to install on this blog:

Search for "Send to Kindle” from the plugin page on your wordpress install/site.

Send To Kindle - finding plugin 1

Find the “Send To Kindle” plugin from “Amazon Inc” and click “install”

Send To Kindle - finding plugin 2

Once installed you have a couple of options

Send To Kindle - plugin installed

You can configure the basics, such as where to display it, what font to use, what text to display (you’re limited to “Kindle”, “Send to Kindle”, or nothing..), which colour scheme to use, what size icon and of which colour, what colour background, and whether to display a border or not.

Send To Kindle - plugin setup - basic

If you want to mess around with the display yourself then the Advanced controls allow this, as well as some default settings of where to pull the post details from.

Send To Kindle - plugin setup - advanced

Then this will appear wherever you’ve chosen.

Button in action

Here it is on a post

Send To Kindle - button appearing

Clicking that  button pops up a window to get you to log in to your Amazon account …

Send To Kindle - Log In

and choose which device you send it to…

Send To Kindle - Configure Settings

Then content will be loaded and processed for Kindle viewing:

Send To Kindle - Awaiting Content  

Which means it ends up looking like this:

Send To Kindle - Content Loaded

Clicking the “Send” button first gives you a quick thinky thinky image:

Send To Kindle - Uploading

Before shortly letting you know it’s all ok

Send To Kindle - Upload Complete 


Viewing the post on your Kindle

You can then see this post on your Kindle the next time you turn it on in a Wifi (or 3G if your Kindle has Whispernet and you selected that as the delivery mechanism) area:

Here I have a couple of posts sent to my Kindle displaying on the home screen:

Send To Kindle - Viewing post content on Kindle - Listing

Selecting the RaspberryPi Part #2 post (which you can’t tell from the two on the home screen at the moment – I can probably sort this by changing the selectors in the advanced settings on the plugin page) here we have some basic text content:

Send To Kindle - Viewing post content on Kindle

Some image content:

Send To Kindle - Viewing post content on Kindle - Image

And some code example content:

Send To Kindle - Viewing post content on Kindle - Code

The code example is rendered via the wonderful SyntaxHighlighter plugin, hence the weird “view sourceprint?” link at the top of each one.

Summary

Pretty cool concept, huh? No idea if my posts are worth doing this to, but I like the idea of it. And it’s easy too; once installed you can either say “put this everywhere on every post” or just use the [sendToKindle] smart code.

Creating a SublimeText plugin to publish markdown to WordPress

I’ve been using SublimeText for a while now as a no-frills text editor; it has a nice Zen mode which hides all of the tabs and menus and pushes it to full screen which I’ve found perfect for taking notes during seminars:

SublimeText2 Zen mode

I have been trying to take notes using the markdown sytnax, but have found the process between taking the notes in markdown, converting them to HTML, and publishing the HTML to a blog a bit of a pain.

Given that SublimeText supports extension via plugin scripts written in Python, I’ve knocked together an extension which will

  1. convert the markdown to html
  2. push the html directly to wordpress

Before I get into the details of the script, maybe a little background would be useful:

What’s Markdown?

A lightweight markup language for writing human-readable content which can be compiled into HTML. Being able to write a lovely HTML blog post in a very basic text editor instead of the bloated Windows Live Writer is extremely refreshing.

For example, to make a line a <h1> header, prefix it with a #. For <h2>, use ##. For <h3> ###. Easy.

Want a link? Try surrounding it with square brackets and putting the url just after it in round brackets: [Something like this](which links here). It’s a really easy “language” and actually looks decent enough to just read on its own.

To include an image you just need to write ![alt text](image url)

A syntax reference page can be found here.

One problem I do have is the basic support for code highlighting within markdown is poor, obviously, since HTML only has a single <code> block. The Markdown generated HTML conflicts with my wordpress Syntaxhighlighter plugin, hence the ugly clode blocks in this post.

There is support for “fenced-code-blocks” wihtin many implementations of markdown, and with the library that I’m also using, but this is still not playing nicely with Syntaxhighlighter. I’m sure I’ll figure something out eventually – please bear with me until then.

I use the fantastic python-markdown2 library to convert markdown to HTML on the fly; I just had to copy the lib/markdown2.py file from the github repo into the sublimetext “plugins” directory – I created a Markdown subdirectory for it – and reference it from my script. i.e.,

post_content = str(markdown2.markdown(post_content,extras=["code-friendly"]))

What’s Python?

Python

A functional scripting language. I found it really quite tricky to work with and had to install PythonShell as a powershell-ish window for testing out python commands before putting them to work in the plugin script. What’s not great fun is that SublimeText2 installs a different version of Python to PythonShell to version 1 of SublimeText to any version you explicitly install yourself.

Some commands and syntax will work in one version of python and not others

One great example is setting up a proxy; the syntax for this is completely different between versions of python and whatever example code you’re reading might be using the syntax that your version of python doesn’t support.

Working with a functional language took a lot of getting used to; I’d want to return an object from a method but had to instead return a comma delimited list of base types. It’s all a little odd to me, and my messy code shows that!

What’s WordPress?

Wordpress

A popular free blog engine that’s used as a CMS for some small businesses. It has an XML RPC API which conforms to the MetaWeblog spec, and you can really dig into this by looking through the php files that make up a WordPress installation.

Since I’m using Amazon EC2 as my wordpress host I can use Kitty to SSH in and browse to /var/www/html/xmlrpc.php to see the metaweblog service api itself. That file references wp-includes/class-wp-xmlrpc-server.php which contains all of the underlying functionality for the api implementation. This is great reference material to make sure you’re passing the correct values of the correct types to the correct endpoints.

Details

The sublimemarkpress plugin is intended to:

  1. check the contents of a config file for your blog access details
  2. scan the contents of the active window to get the posts details, such as post ID (to make it an Update instead of a Create), tags, and status
  3. convert the text from Markdown to HTML
  4. Push the HTML to the metaweblog endpoint with the correct blog/post details

1. Getting the Blog setup details from a config file

The plugin relies on a settings file called “sublimemarkpress.sublime-settings” using the structure:

{
    "xmlrpcurl": <URL to xml rpc endpoint>,
    "username": <username>,
    "password": <password>
}

to read it:

s = sublime.load_settings("sublimemarkpress.sublime-settings")
mbURL = s.get("xmlrpcurl")
mbUsername = s.get("username")
mbPassword = s.get("password")

2. Get the text and strip out the blog post data

The plugin expects the top of your text file/active window to have optional tags to define blog post details:

<!-- 
#post_id:<id of existing post - optional>
#tags:<comma delimited list of post tags - optional>
#status:<draft or publish - optional>
-->

To get the entire contents of the active window:

all_lines_in_page = self.view.lines(sublime.Region(0, self.view.size()))

Then to extract the header details:

post_id, tags, status, has_header_content = self.GetHeaderContent(all_lines_in_page, header_lines)

where GetHeaderContent is the hack-y:

def GetHeaderContent(self, all_lines_in_page, header_lines):
    page_info = {"has_header_content":False,"post_id":None, "tags":"", "status":""}

    if self.view.substr(all_lines_in_page[0]).startswith("<!--"):
        page_info["has_header_content"] = True
        self.MoveCurrentLineToHeader(header_lines, all_lines_in_page)

        # post_id
        if self.view.substr(all_lines_in_page[0]).startswith("#post_id"):
            page_info["post_id"] = self.view.substr(all_lines_in_page[0]).split(":")[1]
            self.MoveCurrentLineToHeader(header_lines, all_lines_in_page)

        #post tags
        if self.view.substr(all_lines_in_page[0]).startswith("#tags"):
            page_info["tags"] = self.view.substr(all_lines_in_page[0]).split(":")[1]
            self.MoveCurrentLineToHeader(header_lines, all_lines_in_page)

        #post status
        if self.view.substr(all_lines_in_page[0]).startswith("#status"):
            page_info["status"] = self.view.substr(all_lines_in_page[0]).split(":")[1]
            self.MoveCurrentLineToHeader(header_lines, all_lines_in_page)

        self.MoveCurrentLineToHeader(header_lines, all_lines_in_page) # removes the closing comment tag
    return page_info["post_id"],page_info["tags"],page_info["status"],page_info["has_header_content"]

def MoveCurrentLineToHeader(self, header_lines, all_lines_in_page):
        header_lines.insert(len(header_lines),all_lines_in_page[0])
        all_lines_in_page.remove(all_lines_in_page[0])

3. Convert the rest from Markdown to HTML

As mentioned earlier, thanks to the great python-markdown2 library, this is simply a case of calling the “markdown” method, passing in the content to process:

post_content = str(markdown2.markdown(post_content,extras=["code-friendly"]))

I actually do a test to see if the markdown library can be imported first, then if it fails I don’t even try to convert from markdown to HTML:

can_markdown = False
try: 
    import markdown2 # markdown
    can_markdown = True
except ImportError:
    can_markdown = False

4. Post to metaweblog api

Build up the request using the blog details, post details, and HTML content:

content = self.BuildPostContent(self.view, {"content": post_content, "title": title, "tags": tags, "status": status})

def BuildPostContent(self, view, page_data):        
    return {"description": page_data["content"], "post_content": page_data["content"], "title": page_data["title"], "mt_keywords": page_data["tags"], "post_status": page_data["status"]}

Then submit it to the api:

proxy = xmlrpclib.ServerProxy(mbURL)

if post_id == None:
    post_id = proxy.metaWeblog.newPost(blog_id, mbUsername, mbPassword, content)
else:
    proxy.metaWeblog.editPost(post_id, mbUsername, mbPassword, content)

Extra bits and making it all work

To execute a command from a plugin within SublimeText, firstly you need to import the sublimetext library at the top:

import sublime, sublime_plugin # sublime

then name your class “something<command>” and have it take the “sublime_plugin.TextCommand” parameter:

class PublishCommand(sublime_plugin.TextCommand):

Then to run it you need to hit ctrl+’ to bring up the command window and type:

view.run_command("<name of the class minus the 'Command' suffix>")

e.g. for my plugin:

view.run_command("publish")

You can try this out with loads of the plugins included with a SublimeText install

That’s about it

All of this is in a small github repo. I’d appreciate it if you want to fork the repo and help show me how python should actually be structured. And written.

Known Issues

Categories

These need to be requested, looped through and matched against those associated with a post, added if those specified don’t exist, and the IDs associated with the post. Couldn’t be arsed.

As such, when you post to your blog you’ll see the entry is “uncategorised” and you’ll have to manually edit this.

Images

Since I’m just fooling around with a text editor, uploading images is still a little out of scope.

Random reference material

  • pyblog – for helping to work out the guts of how python interacts with the metaweblog api
  • I used Fiddler & Windows Live Writer for investigating traffic and finding out what the actual parameter being used to specify “tags” is within the metaweblog api: mt_keywords

EC2 Micro Instance Instability

It’s getting a bit daft now – the EC2 microinstance this blog is hosted on seems to keep restarting. When it comes back up, Apache and mysql are stopped, so the site is down.

As such, I’ve just logged in via SSH and fired off the command below to edit the startup script:

sudo nano /etc/rc.d/rc.local

Then added in the lines:

sudo /etc/init.d/httpd start
sudo /etc/init.d/mysqld start

Now whenever the microinstance restarts it will automatically restart Apache and mysql. I hope.

Just for good measure I also added in a line for logging so I have some idea of how often the instance restarts:

date >> /home/ec2-user/restartlog

I’ll add in an email alert or maybe just make it tweet the restart event as well.

EC2 MicroInstance: The WordPress Hosting Wonder

I managed to not notice that my blog had gone down after the EC2 outage earlier this year. So when I popped back on one day to find it wasn’t there any more I was a little concerned.

Popped over to PuTTY, opened up my EC2 connection to be presented with a login screen. So I tried the old usual login: “root”

EC2 Login

Ok, let’s  try that then:

EC2 Welcome

BRILLIANT!!

Uh..

Now what?

Crap. I can’t remember.

I faffed around for ages with “ls”, checking out what’s in “/opt/” and “/etc/” and getting a bit lost. How do I restart the damned web server?! Which web server did I install? Why do I not remember how to use linux?! ARGH!!

Oh, hey. Look – I just tapped “PgUp” and saw this:

EC2 PgUp

Hello. That’s a command to see what ports are open, as far as I remember. That’s the first command from 2bitcoder‘s EC2 WordPress tutorial.

Pressing the down key resulted in listing every command I’d ever entered:

login as: ec2-user
Authenticating with public key "imported-openssh-key"
Last login: Thu Sep  8 20:27:22 2011 from blah--blah-blah-blah.blah.blah.com

       __|  __|_  )  Amazon Linux AMI
       _|  (     /     Beta
      ___|\___|___|

See /etc/image-release-notes for latest release notes. :-)
[ec2-user@ip-12-345-67-890 ~]$ apt-get install lighttpd
[ec2-user@ip-12-345-67-890 ~]$ ipkg install lighttpd
[ec2-user@ip-12-345-67-890 ~]$ yum install lighttpd
[ec2-user@ip-12-345-67-890 ~]$ sudo yum -y install lighttpd
[ec2-user@ip-12-345-67-890 ~]$ ls
[ec2-user@ip-12-345-67-890 ~]$ ls /
[ec2-user@ip-12-345-67-890 ~]$ ls /opt/
[ec2-user@ip-12-345-67-890 ~]$ ls /etc/
[ec2-user@ip-12-345-67-890 ~]$ ls /etc/httpd/
[ec2-user@ip-12-345-67-890 ~]$ ls /etc/httpd/run/
[ec2-user@ip-12-345-67-890 ~]$ sudo ls /etc/httpd/run/
[ec2-user@ip-12-345-67-890 ~]$ service httpd start
[ec2-user@ip-12-345-67-890 ~]$ httpd start
[ec2-user@ip-12-345-67-890 ~]$ sudo /etc/init.d/httpd start

I just had to hit “enter” a couple of times to replay some ancient commands to restart Apache and mysql and the site was back up and running! Phew!

So – if you’re using EC2 for hosting something and you can’t remember the very basic linux commands you fired off to get it working in the first place, fear not! PgUp is your friend!

WordPress (free) on an Amazon EC2 Micro Instance (free – for now)

This first post is about how it came to be. A bit philosophical, I know, but that’s the nature of tech sometimes..

This is a version of wordpress (free blog engine) installed in Amazon’s EC2 (Elastic Cloud Computing – or Elastic Computing Cloud – or something like that, starting with Elastic and then another two “C” words) (free). Which I think is both thrifty, and tekky geeky, and therefore pretty awesome.

Inspired by Jaimal’s post over on 2bit-coder and an email from Amazon about a free tier, I set about having a go.

The only things needed to change from Jaimal’s tutorial, are that the current free versions of the AWS Linux VM are not quite Fedora; although you do install using yum, you need to log in as “ec2-user” instead of “root”, you always have to whack a “sudo” in front of any command that needs any real privileges, and you can’t use “phpmyadmin” to set up your mysql instance for wordpress, so you have to go old skool and do it by hand.

Anyhoo. Introductions over, next up – more on random web-related tech to follow.

Semi-related references:

How to run WordPress on the NSLU2 (“hacked” router I own that I based some of the wordpress install and setup on)

Mercurial how-to (since I’ve also installed that on my EC2 instance and will follow up on that at some point)