Azure Image Proxy

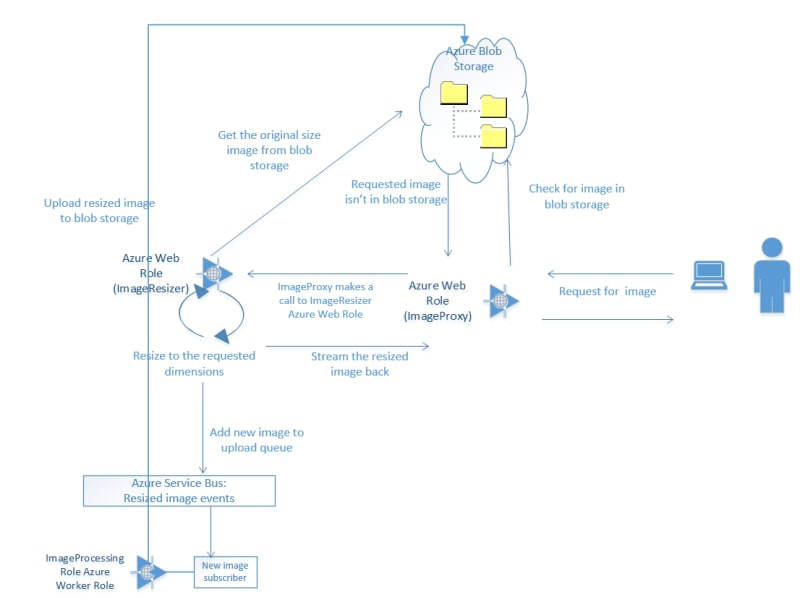
The previous couple of articles configured an image resizing Azure Web Role, plopped those resized images on an Azure Service Bus, picked them up with a Worker Role and saved them into Blob Storage.

This one will click in the last missing piece; the proxy at the front to initially attempt to get the pregenerated image from blob storage and failover to requesting a dynamically resized image.

New Web Role

Add a new web role to your cloud project – I’ve called mine “ImagesProxy” – and make it an empty MVC4 Web API project. This is the easiest of the projects, so you can just crack right on and create a new controller – I called mine “Image” (not the best name, but it’ll do).

Retrieve

This whole project will consist of one controller with one action – Retrieve – which does three things;

  1. attempt to retrieve the resized image directly from blob storage
  2. if that fails, go and have it dynamically resized
  3. if that fails, send a 404 image and the correct http header

Your main method/action should look something like this:

[csharp][HttpGet]
public HttpResponseMessage Retrieve(int height, int width, string source)
{
try
{
var resizedFilename = BuildResizedFilenameFromParams(height, width, source);
var imageBytes = GetFromCdn("resized", resizedFilename);
return BuildImageResponse(imageBytes, "CDN", false);
}
catch (StorageException)
{
try
{
var imageBytes = RequestResizedImage(height, width, source);
return BuildImageResponse(imageBytes, "Resizer", false);
}
catch (WebException)
{
var imageBytes = GetFromCdn("origin", "404.jpg");
return BuildImageResponse(imageBytes, "CDN-Error", true);
}
}
}
[/csharp]

Feel free to alt-enter and clean up the red squiggles by creating stubs and referencing the necessary assemblies.

You should be able to see the three sections mentioned above within the nested try-catch blocks.

  1. attempt to retrieve the resized image directly from blob storage

    [csharp]var resizedFilename = BuildResizedFilenameFromParams(height, width, source);
    var imageBytes = GetFromCdn("resized", resizedFilename);
    return BuildImageResponse(imageBytes, "CDN", false);
    [/csharp]

  2. if that fails, go and have it dynamically resized

    [csharp]var imageBytes = RequestResizedImage(height, width, source);
    return BuildImageResponse(imageBytes, "Resizer", false)
    [/csharp]

  3. if that fails, send a 404 image and the correct http header

    [csharp]var imageBytes = GetFromCdn("origin", "404.jpg");
    return BuildImageResponse(imageBytes, "CDN-Error", true);
    [/csharp]

So let’s build up those stubs.

BuildResizedFilenameFromParams

Just a little duplication of code to get the common name of the resized image (yes, yes, this logic should have been abstracted out into a common library for all projects to reference, I know, I know..)

[csharp]private static string BuildResizedFilenameFromParams(int height, int width, string source)
{
return string.Format("{0}_{1}-{2}", height, width, source.Replace("/", string.Empty));
}
[/csharp]

GetFromCDN

We’ve seen this one before too; just connecting into blob storage (within these projects blob storage is synonymous with CDN) to pull out the pregenerated/pre-reseized image:

[csharp]private static byte[] GetFromCdn(string path, string filename)
{
var connectionString = CloudConfigurationManager.GetSetting("Microsoft.Storage.ConnectionString");
var account = CloudStorageAccount.Parse(connectionString);
var cloudBlobClient = account.CreateCloudBlobClient();
var cloudBlobContainer = cloudBlobClient.GetContainerReference(path);
var blob = cloudBlobContainer.GetBlockBlobReference(filename);

var m = new MemoryStream();
blob.DownloadToStream(m);

return m.ToArray();
}
[/csharp]

BuildImageResponse

Yes, yes, I know – more duplication.. almost. The method to create an HTTP response message from before, but this time with extras params to set a header saying where the image came from, and allow to set the HTTP status code correctly. We’re just taking the image bytes and putting them in the message content, whilst setting the headers and status code appropriately.

[csharp]private static HttpResponseMessage BuildImageResponse(byte[] imageBytes, string whereFrom, bool error)
{
var httpResponseMessage = new HttpResponseMessage { Content = new ByteArrayContent(imageBytes) };
httpResponseMessage.Content.Headers.ContentType = new MediaTypeHeaderValue("image/jpeg");
httpResponseMessage.Content.Headers.Add("WhereFrom", whereFrom);
httpResponseMessage.StatusCode = error ? HttpStatusCode.NotFound : HttpStatusCode.OK;

return httpResponseMessage;
}
[/csharp]

RequestResizedImage

Build up a request to our pre-existing image resizing service via a cloud config setting and the necessary dimensions and filename, and return the response:

[csharp]private static byte[] RequestResizedImage(int height, int width, string source)
{
byte[] imageBytes;
using (var wc = new WebClient())
{
imageBytes = wc.DownloadData(
string.Format("{0}?height={1}&width={2}&source={3}",
CloudConfigurationManager.GetSetting("Resizer_Endpoint"),
height, width, source));
}
return imageBytes;
}
[/csharp]

And that’s all there is to it! A couple of other changes to make within your project in order to allow pretty URLs:

  1. Create the necessary route:

    [csharp]config.Routes.MapHttpRoute(
    name: "Retrieve",
    routeTemplate: "{height}/{width}/{source}",
    defaults: new { controller = "Image", action = "Retrieve" }
    );
    [/csharp]

  2. Be a moron:

    [xml] <system.webServer>
    <modules runAllManagedModulesForAllRequests="true" />
    </system.webServer>
    [/xml]

That last one is dangerous; I’m using it here as a quick hack to ensure that URLs ending with known file extensions (e.g., /600/200/image1.jpg) are still processed by the MVC app instead of assuming they’re static files on the filesystem. However, this setting is not advised since it means that every request will be picked up by your .Net app; don’t use it in regular web apps which also host images, js, css, etc!

If you don’t use this setting then you’ll go crazy trying to debug your routes, wondering why nothing is being hit even after you install Glimpse..

In action

First request

Hit your proxy with a request for an image that exists within your blob storage “origin” folder; this will raise a storage exception when attempting to retrieve from blob storage and drop into the resizer code chunk e.g.:
image proxy, calling the resizer
Notice the new HTTP header that tells us the request was fulfilled via the Resizer service, and we got an HTTP 200 status code. The resizer web role will have also added a message to the service bus awaiting pick up.

Second request

By the time you refresh that page (if you’re not too trigger happy) the uploader worker role should have picked up the message from the service bus and saved the image data into blob storage, such that subsequent requests should end up with a response similar to:
image proxy, getting it from cdn
Notice the HTTP header tells us the request was fulfilled straight from blob storage (CDN), and the request was successful (HTTP 200 response code).

Failed request

If we request an image that doesn’t exist within the “origin” folder, then execution drops into the final code chunk where we return a default image and set an error status code:
image proxy, failed request

So..

This is the last bit of the original plan:

Azure Image Resizing - Conceptual Architecture

Please grab the source from github, add in your own settings to the cloud config files, and have a go. It’s pretty cool being able to just upload one image and have other dimension images autogenerated upon demand!

AppHarbor, Heroku, Git, and the Sweet, Sweet CI Process

The background: I thought that my Mobile TFL Bus Countdown site might be suddenly very popular for a very short time (for about a weekend perhaps) and didn’t want to pay for the potential sudden jolt in hosting costs from my own servers. As such, I developed it locally using git as VCS, pushed it to my newly acquired Appharbor account, and just saw it suddenly available to browse at rposbo.apphb.com

The pitch: For your own small website/app you probably edit it locally on your PC, maybe you even have source control like a good dev, you’ll compile the code and then you’ll copy it to your hosting provider, probably using FTP/ via a web interface/ SCP/ SSH.

Then at work you’re probably shouting about how awesome CI builds are and how to introduce continuous deployment as part of a branching and build strategy.

You might even use Azure or EC2 at work, maybe for your own little home projects too. Maybe you’ve learned a bit of git but your office uses TFS (ugh) or SVN (meh).

So why not do this for your own stuff? For free? In the cloud?

Imagine the ideal workflow: make some code changes –> commit them to (D)VCS –> push them to a (remote) repo –> the push kicks off a build the committed project (git hook) –> run any associated tests, then if they pass –> deploy the app to the cloud.

That’s exactly what Appharbor and Heroku do! Let’s start with the pretty one:

Heroku

Heroku says it’s a “cloud application platform” for running scalable Ruby, Node.js, Clojure, and Java sites/apps. To create and deploy a new site is, apparently, as easy as:

[code gutter=”off”]$ heroku create
Created sushi.herokuapp.com | [email protected]:sushi.git

$ git push heroku master
—–&gt; Heroku receiving push
—–&gt; Rails app detected
—–&gt; Compiled slug size is 8.0MB
—–&gt; Launching… done, v1
http://sushi.herokuapp.com deployed to Heroku[/code]

So here the flow is: write some code –> commit to git –> push to Heroku –> code is built –> code is deployed. Done.

heroku homepage

The Heroku website is fantastically full of all the information you’d want to get started, and their pictorial representation of how their solution works and the various levels of databases you can buy are geek-awesome:

heroku databases

“This app needs a BAKU DATABASE!! GRRAARRRR!!” Go and have a look and bask in the beautiful piccies and animations. No wonder this is (apparently) the place to go to write and deploy cloud hosted Facebook apps.

Thanks to Heroku I’m finally beaing pushed to learn Ruby, but haven’t managed anything quite yet, hence no demo of the Heroku flow – wait a few more posts and I’ll have something Ruby-fied and certainly some Node.js as I’ve been meaning to get into that for a while, possibly even Clojure (sounds fun) and Java (old school!).

Next up is one for the .net crowd:

appharbor

Appharbor sells itself as “Azure done right” which confused me. The website itself is verrrry low on information so I just assumed it would deploy my app to Azure. Turns out I was wrong:

appharbor chat on twitter

Despite my being pedantic over their homepage tagline I took the dive and just signed up. Only once you’ve done this do you get to see the money shot – the intro video; a new MVC app in Visual Studio to EC2 cloud via git + appharbor in a matter of minutes:

Now I have my account and I have a great intro vid I just hop into my code directory;

[code gutter=”off”]git init
git add .
git commit –m "init"
git remote add appharbor <git repo url appharbor gave me>
git push appharbor master[/code]

And that’s it. Committed code is checked out on their servers, built, any associated tests are executed, if everything passes then it gets deployed – and you can see all this from your Appharbor account:

appharbor deployment

(mine didn’t actually have anything to build, as it was a single html page and that really basic asmx web proxy I wrote).

In conclusion; you now have absolutely no excuse to not write and deploy whatever applications you feel like writing. There is no hosting to worry about, no build server – it just works. Use Appharbor for your .Net and use Heroku as an excuse to look at their pretty pictures and learn something that’s not .Net.

I know I will.

Comments appreciated.

Sending Tweets from Amazon EC2

Given how unstable the EC2 microinstance I use is, I wanted to be able to automatically restart the blog related services and alert me that a restart had occurred.

I decided to try and get the alert via a tweet and doing this is actually pretty easy. All it consists of doing is:

1) Register a Twitter app at dev.twitter.com

2) Set up a new Twitter account  for your tweets to come from

3) Authenticate your new account with your new app

4) Configure something to use your app to send tweets from your new account

Luckily, this has all already been done by someone much cleverer than me, so I copied them! Have a look at this blog post by Jeff Miller explaining how to use the python Twitter API script Tweepy.

My EC2 instance already had python installed so all I needed to do was install git, get the tweepy code from the github repo here (the location of the github repo in the article is incorrect, so a little googling helped me find the correct location), and follow the instructions exactly!

Essentially this consisted of:

sudo yum -y install git
sudo git clone git://github.com/tweepy/tweepy.git
cd tweepy
sudo python setup.py install

Then follows some copying and pasting of auth keys and urls to end up with a nice script on the EC2 instance which was authorised to send tweets from my new twitter account, @rposboEC2.

All that was left was to link this into the startup script:

sudo nano /etc/rc.d/rc.local

by adding in a new line at the end and set the status to include my own twitter account so I see it as a mention and will therefore also receive an email alert automatically:

sudo python /home/ec2-user/tweepy/ec2Event.py '@rposbo EC2 microinstance event raised: Restarted'

Done! Firing off this script now restarts Apache and mysql and sends the tweet below:

EC2 Micro Instance Instability

It’s getting a bit daft now – the EC2 microinstance this blog is hosted on seems to keep restarting. When it comes back up, Apache and mysql are stopped, so the site is down.

As such, I’ve just logged in via SSH and fired off the command below to edit the startup script:

sudo nano /etc/rc.d/rc.local

Then added in the lines:

sudo /etc/init.d/httpd start
sudo /etc/init.d/mysqld start

Now whenever the microinstance restarts it will automatically restart Apache and mysql. I hope.

Just for good measure I also added in a line for logging so I have some idea of how often the instance restarts:

date >> /home/ec2-user/restartlog

I’ll add in an email alert or maybe just make it tweet the restart event as well.

Pretty Permalinks

Oh, one more on the EC2 Word press thing; if you want pretty permalinks (i.e., http://robinosborne.co.uk/2011/09/08/pretty-permalinks/ ‎ instead of http://robinosborne.co.uk/?p=85), and you’re running WordPress on an EC2 installation, before you select it in your WordPress “settings” section be sure to edit your Apache config first:

Pop open PuTTY (or whatever terminal you use), log in, run

sudo nano /etc/httpd/conf/httpd.conf

hit ctrl+W and type “override”, do it again until you see:

#
# AllowOverride controls what directives may be placed in .htaccess files.
# It can be "All", "None", or any combination of the keywords:
#   Options FileInfo AuthConfig Limit
#
    AllowOverride None

Change the None to FileInfo, hit ctrl+X to save and exit. Then restart apache with:

sudo /etc/init.d/httpd restart

Done. Hopefully. YMMV 😉

EC2 MicroInstance: The WordPress Hosting Wonder

I managed to not notice that my blog had gone down after the EC2 outage earlier this year. So when I popped back on one day to find it wasn’t there any more I was a little concerned.

Popped over to PuTTY, opened up my EC2 connection to be presented with a login screen. So I tried the old usual login: “root”

EC2 Login

Ok, let’s  try that then:

EC2 Welcome

BRILLIANT!!

Uh..

Now what?

Crap. I can’t remember.

I faffed around for ages with “ls”, checking out what’s in “/opt/” and “/etc/” and getting a bit lost. How do I restart the damned web server?! Which web server did I install? Why do I not remember how to use linux?! ARGH!!

Oh, hey. Look – I just tapped “PgUp” and saw this:

EC2 PgUp

Hello. That’s a command to see what ports are open, as far as I remember. That’s the first command from 2bitcoder‘s EC2 WordPress tutorial.

Pressing the down key resulted in listing every command I’d ever entered:

login as: ec2-user
Authenticating with public key "imported-openssh-key"
Last login: Thu Sep  8 20:27:22 2011 from blah--blah-blah-blah.blah.blah.com

       __|  __|_  )  Amazon Linux AMI
       _|  (     /     Beta
      ___|\___|___|

See /etc/image-release-notes for latest release notes. :-)
[ec2-user@ip-12-345-67-890 ~]$ apt-get install lighttpd
[ec2-user@ip-12-345-67-890 ~]$ ipkg install lighttpd
[ec2-user@ip-12-345-67-890 ~]$ yum install lighttpd
[ec2-user@ip-12-345-67-890 ~]$ sudo yum -y install lighttpd
[ec2-user@ip-12-345-67-890 ~]$ ls
[ec2-user@ip-12-345-67-890 ~]$ ls /
[ec2-user@ip-12-345-67-890 ~]$ ls /opt/
[ec2-user@ip-12-345-67-890 ~]$ ls /etc/
[ec2-user@ip-12-345-67-890 ~]$ ls /etc/httpd/
[ec2-user@ip-12-345-67-890 ~]$ ls /etc/httpd/run/
[ec2-user@ip-12-345-67-890 ~]$ sudo ls /etc/httpd/run/
[ec2-user@ip-12-345-67-890 ~]$ service httpd start
[ec2-user@ip-12-345-67-890 ~]$ httpd start
[ec2-user@ip-12-345-67-890 ~]$ sudo /etc/init.d/httpd start

I just had to hit “enter” a couple of times to replay some ancient commands to restart Apache and mysql and the site was back up and running! Phew!

So – if you’re using EC2 for hosting something and you can’t remember the very basic linux commands you fired off to get it working in the first place, fear not! PgUp is your friend!

WordPress (free) on an Amazon EC2 Micro Instance (free – for now)

This first post is about how it came to be. A bit philosophical, I know, but that’s the nature of tech sometimes..

This is a version of wordpress (free blog engine) installed in Amazon’s EC2 (Elastic Cloud Computing – or Elastic Computing Cloud – or something like that, starting with Elastic and then another two “C” words) (free). Which I think is both thrifty, and tekky geeky, and therefore pretty awesome.

Inspired by Jaimal’s post over on 2bit-coder and an email from Amazon about a free tier, I set about having a go.

The only things needed to change from Jaimal’s tutorial, are that the current free versions of the AWS Linux VM are not quite Fedora; although you do install using yum, you need to log in as “ec2-user” instead of “root”, you always have to whack a “sudo” in front of any command that needs any real privileges, and you can’t use “phpmyadmin” to set up your mysql instance for wordpress, so you have to go old skool and do it by hand.

Anyhoo. Introductions over, next up – more on random web-related tech to follow.

Semi-related references:

How to run WordPress on the NSLU2 (“hacked” router I own that I based some of the wordpress install and setup on)

Mercurial how-to (since I’ve also installed that on my EC2 instance and will follow up on that at some point)