Upload to Azure Blob Storage using Powershell

I needed to automate the process of uploading images to Azure blob storage recently, and found that using something like the excellent Azure Storage Explorer would not set the Content Type correctly (defaulting to “application/octetstream”). As such, here’s a little script to loop through a directory and do a basic check on extensions to set the content type for PNG or JPEG:

The magic is in Set-AzureStorageBlobContent.

Don’t forget to do the usual dance of calling the following!

These select your publish settings file, and set which subscription is the currently active one:

  • Import-AzurePublishSettingsFile
  • Set-AzureSubscription
  • Select-AzureSubscription

Update

Actually, the Aug 2014 version of Azure Storage Explorer already sets the content type correctly upon upload. Oh well. Still a handy automation script though!

Generate a Blob Storage Web Site using RazorEngine

Last episode I introduced the concept of utilising RazorEngine and RazorMachine to generate html files from cshtml Razor view files and json data files, without needing a hosted ASP.Net MVC website.

We ended up with a teeny ikkle console app which could reference a few directories and spew out some resulting html.

This post will build on that concept and use Azure Blob Storage with a worker role.

File System

We already have a basic RazorEngine implementation via the RenderHtmlPage class, and that class uses some basic dependency injection/poor man’s IoC to abstract the functionality to pass in the Razor view, the json data, and the output location.

IContentRepository

The preview implementation of the IContentRepository interface merely read from the filesystem:

namespace CreateFlatFileWebsiteFromRazor
{
    internal class FileSystemContentRepository : IContentRepository
    {
        private readonly string _rootDirectory;
        private const string Extension = ".cshtml";

        public FileSystemContentRepository(string rootDirectory)
        {
            _rootDirectory = rootDirectory;
        }

        public string GetContent(string id)
        {
            var result = 
                File.ReadAllText(string.Format("{0}/{1}{2}", _rootDirectory, id, Extension));
            return result;
        }
    }
}

IDataRepository

A similar story for the IDataRepository file system implementation:

namespace CreateFlatFileWebsiteFromRazor
{
    internal class FileSystemDataRepository : IDataRepository
    {
        private readonly string _rootDirectory;
        private const string Extension = ".json";

        public FileSystemDataRepository(string rootDirectory)
        {
            _rootDirectory = rootDirectory;
        }

        public string GetData(string id)
        {
            var results = 
                File.ReadAllText(string.Format("{0}/{1}{2}", _rootDirectory, id, Extension));
            return results;
        }
    }
}

IUploader

Likewise for the file system implemention of IUploader:

namespace CreateFlatFileWebsiteFromRazor
{
    internal class FileSystemUploader : IUploader
    {
        private readonly string _rootDirectory;
        private const string Extension = ".html";

        public FileSystemUploader(string rootDirectory)
        {
            _rootDirectory = rootDirectory;
        }

        public void SaveContentToLocation(string content, string location)
        {
            File.WriteAllText(
                string.Format("{0}/{1}{2}", _rootDirectory, location, Extension), content);
        }
    }
}

All pretty simple stuff.

Blob Storage

All I’m doing here is changing those implementations to use blob storage instead. In order to do this it’s worth having a class to wrap up the common functions such as getting references to your storage account. I’ve given mine the ingenious title of BlobUtil:

class BlobUtil
{
    public BlobUtil(string cloudConnectionString)
    {
        _cloudConnectionString = cloudConnectionString;
    }

    private readonly string _cloudConnectionString;

    public void SaveToLocation(string content, string path, string filename)
    {
        var cloudBlobContainer = GetCloudBlobContainer(path);
        var blob = cloudBlobContainer.GetBlockBlobReference(filename);
        blob.Properties.ContentType = "text/html";

        using (var ms = new MemoryStream(Encoding.UTF8.GetBytes(content)))
        {
            blob.UploadFromStream(ms);
        }
    }

    public string ReadFromLocation(string path, string filename)
    {
        var blob = GetBlobReference(path, filename);

        string text;
        using (var memoryStream = new MemoryStream())
        {
            blob.DownloadToStream(memoryStream);
            text = Encoding.UTF8.GetString(memoryStream.ToArray());
        }
        return text;
    }

    private CloudBlockBlob GetBlobReference(string path, string filename)
    {
        var cloudBlobContainer = GetCloudBlobContainer(path);
        var blob = cloudBlobContainer.GetBlockBlobReference(filename);
        return blob;
    }

    private CloudBlobContainer GetCloudBlobContainer(string path){
        var account = CloudStorageAccount.Parse(_cloudConnectionString);
        var cloudBlobClient = account.CreateCloudBlobClient();
        var cloudBlobContainer = cloudBlobClient.GetContainerReference(path);
        return cloudBlobContainer;
    }
}

This means that the blob implementations can be just as simple.

IContentRepository – Blob Style

Just connect to the configured storage account, and read form the specified location to get the Razor view:

class BlobStorageContentRepository : IContentRepository
{
    private readonly BlobUtil _blobUtil;
    private readonly string _contentRoot;

    public BlobStorageContentRepository(string connectionString, string contentRoot)
    {
        _blobUtil = new BlobUtil(connectionString);
        _contentRoot = contentRoot;
    }

    public string GetContent(string id)
    {
        return _blobUtil.ReadFromLocation(_contentRoot, id + ".cshtml");
    }
}

IDataRepository – Blob style

Pretty much the same as above, except with a different “file” extension. Blobs don’t need file extensions, but I’m just reusing the same files from before.

public class BlobStorageDataRespository : IDataRepository
{
    private readonly BlobUtil _blobUtil;
    private readonly string _dataRoot;

    public BlobStorageDataRespository(string connectionString, string dataRoot)
    {
        _blobUtil = new BlobUtil(connectionString);
        _dataRoot = dataRoot;
    }

    public string GetData(string id)
    {
        return _blobUtil.ReadFromLocation(_dataRoot, id + ".json");
    }
}

IUploader – Blob style

The equivalent for saving it is similar:

class BlobStorageUploader : IUploader
{
    private readonly BlobUtil _blobUtil;
    private readonly string _outputRoot;

    public BlobStorageUploader(string cloudConnectionString , string outputRoot)
    {
        _blobUtil = new BlobUtil(cloudConnectionString);
        _outputRoot = outputRoot;
    }
    public void SaveContentToLocation(string content, string location)
    {
        _blobUtil.SaveToLocation(content, _outputRoot, location + ".html");
    }
}

Worker Role

And tying this together is a basic worker role which looks all but identical to the console app:

public override void Run()
{
    var cloudConnectionString = 
        CloudConfigurationManager.GetSetting("Microsoft.Storage.ConnectionString");

    IContentRepository content = 
        new BlobStorageContentRepository(cloudConnectionString, "content");

    IDataRepository data = 
        new BlobStorageDataRespository(cloudConnectionString, "data");

    IUploader uploader = 
        new BlobStorageUploader(cloudConnectionString, "output");

    var productIds = new[] { "1", "2", "3", "4", "5" };
    var renderer = new RenderHtmlPage(content, data);

    foreach (var productId in productIds)
    {
        var result = renderer.BuildContentResult("product", productId);
        uploader.SaveContentToLocation(result, productId);
    }
}

The Point?

By setting the output container to be public, the html files can be browsed to directly; we’ve just created an auto-generated flat file website. You could have the repository implementations access the local file system and the console app access blob storage; generate the html locally but store it remotely where it can be served from directly!

Given that we’ve already created the RazorEngine logic, the implementations of content location are bound to be simple. Swapping file system for blob storage is a snap. Check out the example code over on github

Next up

There’s a few more stages in this master plan, and following those I’ll swap some stuff out to extend this some more.

Azure Image Proxy

The previous couple of articles configured an image resizing Azure Web Role, plopped those resized images on an Azure Service Bus, picked them up with a Worker Role and saved them into Blob Storage.

This one will click in the last missing piece; the proxy at the front to initially attempt to get the pregenerated image from blob storage and failover to requesting a dynamically resized image.

New Web Role

Add a new web role to your cloud project – I’ve called mine “ImagesProxy” – and make it an empty MVC4 Web API project. This is the easiest of the projects, so you can just crack right on and create a new controller – I called mine “Image” (not the best name, but it’ll do).

Retrieve

This whole project will consist of one controller with one action – Retrieve – which does three things;

  1. attempt to retrieve the resized image directly from blob storage
  2. if that fails, go and have it dynamically resized
  3. if that fails, send a 404 image and the correct http header

Your main method/action should look something like this:

[HttpGet]
public HttpResponseMessage Retrieve(int height, int width, string source)
{
    try
    {
        var resizedFilename = BuildResizedFilenameFromParams(height, width, source);
        var imageBytes = GetFromCdn("resized", resizedFilename);
        return BuildImageResponse(imageBytes, "CDN", false);
    }
    catch (StorageException)
    {
        try
        {
            var imageBytes = RequestResizedImage(height, width, source);
            return BuildImageResponse(imageBytes, "Resizer", false);
        }
        catch (WebException)
        {
            var imageBytes = GetFromCdn("origin", "404.jpg");
            return BuildImageResponse(imageBytes, "CDN-Error", true);
        }
    }
}

Feel free to alt-enter and clean up the red squiggles by creating stubs and referencing the necessary assemblies.

You should be able to see the three sections mentioned above within the nested try-catch blocks.

  1. attempt to retrieve the resized image directly from blob storage

    var resizedFilename = BuildResizedFilenameFromParams(height, width, source);
    var imageBytes = GetFromCdn("resized", resizedFilename);
    return BuildImageResponse(imageBytes, "CDN", false);
    
  2. if that fails, go and have it dynamically resized

    var imageBytes = RequestResizedImage(height, width, source);
    return BuildImageResponse(imageBytes, "Resizer", false)
    
  3. if that fails, send a 404 image and the correct http header

    var imageBytes = GetFromCdn("origin", "404.jpg");
    return BuildImageResponse(imageBytes, "CDN-Error", true);
    

So let’s build up those stubs.

BuildResizedFilenameFromParams

Just a little duplication of code to get the common name of the resized image (yes, yes, this logic should have been abstracted out into a common library for all projects to reference, I know, I know..)

private static string BuildResizedFilenameFromParams(int height, int width, string source)
{
    return string.Format("{0}_{1}-{2}", height, width, source.Replace("/", string.Empty));
}

GetFromCDN

We’ve seen this one before too; just connecting into blob storage (within these projects blob storage is synonymous with CDN) to pull out the pregenerated/pre-reseized image:

private static byte[] GetFromCdn(string path, string filename)
{
    var connectionString = CloudConfigurationManager.GetSetting("Microsoft.Storage.ConnectionString");
    var account = CloudStorageAccount.Parse(connectionString);
    var cloudBlobClient = account.CreateCloudBlobClient();
    var cloudBlobContainer = cloudBlobClient.GetContainerReference(path);
    var blob = cloudBlobContainer.GetBlockBlobReference(filename);

    var m = new MemoryStream();
    blob.DownloadToStream(m);

    return m.ToArray();
}

BuildImageResponse

Yes, yes, I know – more duplication.. almost. The method to create an HTTP response message from before, but this time with extras params to set a header saying where the image came from, and allow to set the HTTP status code correctly. We’re just taking the image bytes and putting them in the message content, whilst setting the headers and status code appropriately.

private static HttpResponseMessage BuildImageResponse(byte[] imageBytes, string whereFrom, bool error)
{
    var httpResponseMessage = new HttpResponseMessage { Content = new ByteArrayContent(imageBytes) };
    httpResponseMessage.Content.Headers.ContentType = new MediaTypeHeaderValue("image/jpeg");
    httpResponseMessage.Content.Headers.Add("WhereFrom", whereFrom);
    httpResponseMessage.StatusCode = error ? HttpStatusCode.NotFound : HttpStatusCode.OK;

    return httpResponseMessage;
}

RequestResizedImage

Build up a request to our pre-existing image resizing service via a cloud config setting and the necessary dimensions and filename, and return the response:

private static byte[] RequestResizedImage(int height, int width, string source)
{
    byte[] imageBytes;
    using (var wc = new WebClient())
    {
        imageBytes = wc.DownloadData(
            string.Format("{0}?height={1}&width={2}&source={3}",
                          CloudConfigurationManager.GetSetting("Resizer_Endpoint"), 
                          height, width, source));
    }
    return imageBytes;
}

And that’s all there is to it! A couple of other changes to make within your project in order to allow pretty URLs:

  1. Create the necessary route:

    config.Routes.MapHttpRoute(
        name: "Retrieve",
        routeTemplate: "{height}/{width}/{source}",
        defaults: new { controller = "Image", action = "Retrieve" }
    );
    
  2. Be a moron:

      <system.webServer>
        <modules runAllManagedModulesForAllRequests="true" />
      </system.webServer>
    

That last one is dangerous; I’m using it here as a quick hack to ensure that URLs ending with known file extensions (e.g., /600/200/image1.jpg) are still processed by the MVC app instead of assuming they’re static files on the filesystem. However, this setting is not advised since it means that every request will be picked up by your .Net app; don’t use it in regular web apps which also host images, js, css, etc!

If you don’t use this setting then you’ll go crazy trying to debug your routes, wondering why nothing is being hit even after you install Glimpse..

In action

First request

Hit your proxy with a request for an image that exists within your blob storage “origin” folder; this will raise a storage exception when attempting to retrieve from blob storage and drop into the resizer code chunk e.g.:
image proxy, calling the resizer
Notice the new HTTP header that tells us the request was fulfilled via the Resizer service, and we got an HTTP 200 status code. The resizer web role will have also added a message to the service bus awaiting pick up.

Second request

By the time you refresh that page (if you’re not too trigger happy) the uploader worker role should have picked up the message from the service bus and saved the image data into blob storage, such that subsequent requests should end up with a response similar to:
image proxy, getting it from cdn
Notice the HTTP header tells us the request was fulfilled straight from blob storage (CDN), and the request was successful (HTTP 200 response code).

Failed request

If we request an image that doesn’t exist within the “origin” folder, then execution drops into the final code chunk where we return a default image and set an error status code:
image proxy, failed request

So..

This is the last bit of the original plan:

Azure Image Resizing - Conceptual Architecture

Please grab the source from github, add in your own settings to the cloud config files, and have a go. It’s pretty cool being able to just upload one image and have other dimension images autogenerated upon demand!

Automated Image Resizing and Hosting in Azure #2

Saving the resized images

Last article concluded with us creating a web role that will retrieve an image from blob storage, resize it, raise an event, and stream the result back.

This article is about the worker role to handle those raised events.

Simply enough, all we’ll be doing is creating a worker role, hooking into the same azure service bus queue, picking up each message, pulling out the relevant data within, and uploading that to blob storage.

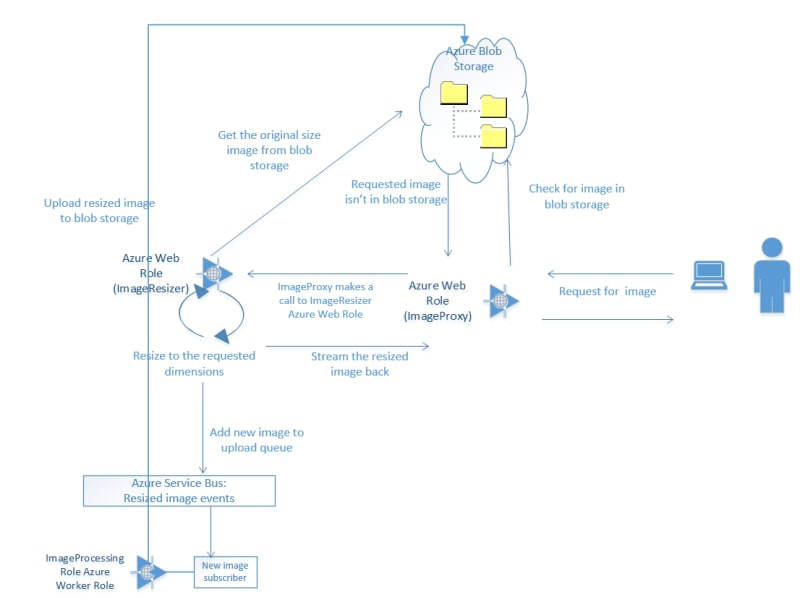
Overall Process

A reminder of the overall process:
Azure Image Resizing Conceptual Architecture

The Worker Role

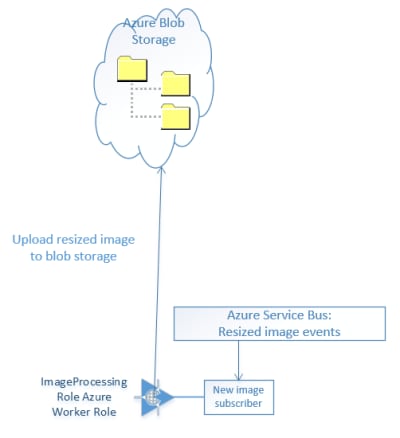
The section of that which the worker role is responsible for is as below:

Azure-Image-Resizing-Uploader-Achitecture

Add a new worker role to the Cloud project within the solution from last time (or a new one if you like). This one consists of four little methods; Run, OnStart, and OnEnd, where Run will call an UploadBlob method.

Run

This method will pick up any messages appearing on the queue, deserialize the contents of the message to a known structure, and pass them to an uploading method.

Kick off by pasting over the Run method with this one, including the definitions at the top – set the QueueName to the same queue you configured for the resize notification from the last post:

    const string QueueName = "azureimages";
    QueueClient _client;
    readonly ManualResetEvent _completedEvent = new ManualResetEvent(false);

    public override void Run()
    {
        _client.OnMessage(receivedMessage =>
        {
            try
            {
                // Process the message
                var receivedImage = receivedMessage.GetBody<ImageData>();
                UploadBlob("resized", receivedImage);
            }
            catch (Exception e)
            {
                Trace.WriteLine("Exception:" + e.Message);
            }
        }, new OnMessageOptions
        {
            AutoComplete = true,
            MaxConcurrentCalls = 1
        });

        _completedEvent.WaitOne();
    }

Yes, I’m not doing anything with exceptions; that’s an exercise for the reader.. ahem… (Me? Lazy? Never..happypathhappypathhappypath)

Naturally you’ll get a few squiggles and highlights to fix; Install-Package Microsoft.ServiceBus.NamespaceManager will help with some, as will creating the stub UploadBlob.

Now, to tidy up the reference to ImageData you could do a few things:

  1. Copy the ImageData.cs over from the previous project into this one
  2. Create a reference to the previous project and add in a using to this file
  3. Extract ImageData from the previous project into a common referenced project for them both to share.

I can live with my own conscience, so am just whacking in a reference to the previous project. Don’t hate me.

OnStart and OnStop

   public override bool OnStart()
    {
        // Set the maximum number of concurrent connections 
        ServicePointManager.DefaultConnectionLimit = 2;

        // Create the queue if it does not exist already
        var connectionString = CloudConfigurationManager.GetSetting("Microsoft.ServiceBus.ConnectionString");
        var namespaceManager = NamespaceManager.CreateFromConnectionString(connectionString);
        if (!namespaceManager.QueueExists(QueueName))
        {
            namespaceManager.CreateQueue(QueueName);
        }

        // Initialize the connection to Service Bus Queue
        _client = QueueClient.CreateFromConnectionString(connectionString, QueueName);
        return base.OnStart();
    }

    public override void OnStop()
    {
        // Close the connection to Service Bus Queue
        _client.Close();
        _completedEvent.Set();
        base.OnStop();
    }

OnStart gets a connection to the service bus, creates the named queue if necessary, and creates a queue client referencing that queue within that service bus.

OnStop kills everything off.

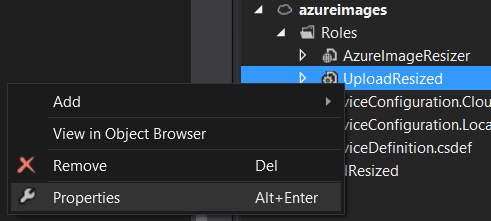
So, off you pop and add the requisite service connection string details; right click the role within the cloud project, properties:

Cloud-Service-Role-Properties

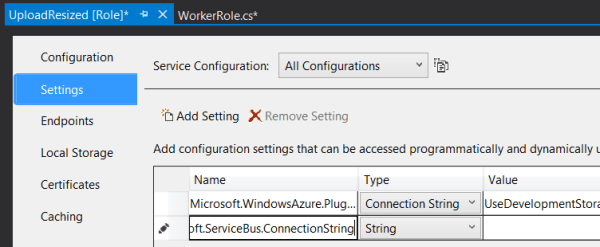
Click settings, add setting “Microsoft.ServiceBus.ConnectionString” with the value you used previously.

Role-Settings

Lastly:

UploadBlob

    public void UploadBlob(string path, ImageData image)
    {
        var connectionString = CloudConfigurationManager.GetSetting("Microsoft.Storage.ConnectionString");
        var account = CloudStorageAccount.Parse(connectionString);
        var cloudBlobClient = account.CreateCloudBlobClient();
        var cloudBlobContainer = cloudBlobClient.GetContainerReference(path);

        cloudBlobContainer.CreateIfNotExists();

        var blockref = image.FormattedName ?? Guid.NewGuid().ToString();
        var blob = cloudBlobContainer.GetBlockBlobReference(blockref);

        if (!blob.Exists())
            blob.UploadFromStream(new MemoryStream(image.Data));
    }

Pretty self explanatory, isn’t it? Get a reference to an area of blob storage within a container associated with an account, and stream some data to it if it doesn’t already exist (you might actually want to overwrite it so could remove that check). Bosch. Done. Handsome.

Notice we’re using the FormattedName property on ImageData to get a blob name which includes the requested dimensions; this will be used in the next article where we create the image proxy.

This means that for a request like:

http://127.0.0.1/api/Image/Resize?height=600&width=400&source=image1.jpg

The formatted name will be set to:

600_400-image1.jpg

You shouldn’t get any compile errors here but you’ll need to add in the setting for your storage account (“Microsoft.Storage.ConnectionString”).

Kick it off

To run that you’ll need VS to be running as admin (right click VS, run as admin):

run-as-admin

After you’ve got it running, fire off a request within the resizing web api (if it’s not the same solution/cloud service) for something like:

http://127.0.0.1/api/Image/Resize?height=600&width=400&source=image1.jpg

Resulting in:
Resized-Image

Then open up your Azure storage explorer to see something similar to the below within the “resized” blob container:

Resized-Blob

What happened?

  1. The ImageController on your Resizer Web API web role did the hard work and popped a message on an Azure Service Bus queue containing the image data
  2. The new Uploader worker role is subscribed to the same Azure Service Bus queue
    1. it picks up the message
    2. pulls out the image data
    3. generates an image name based on the image dimensions and origin
    4. streams the image data into a blob block with the generated name

Cool, huh?

The code for this series is up on GitHub

Next up

One more web role to act as a proxy for checking blob storage first before firing off the resize request. Another easy one. Azure is easy. Everyone should be doing this. You should wait and see what else I’ll write about Azure.. it’s awesome.. and easy..!

Node.js @ UKWAUG: MS Cloud Day – Windows Azure Spring Release

The fourth session I attended was the highly energetic and speedy introduction to writing node.js and running it on Azure, presented by the author of Simple.Data and Simple.Web, and one of those voices of the developer community with a great JFDI attitude, Mark Rendle (@markrendle).

I’ve just recently got into node.js development myself and have been very much enjoying node, npm, express, stylus, and nib; there is a fantastic community and expanse of modules already and that can be a bit daunting.

During the session Mark’s short code example shows just how simple it can be to get up and running with node, and also how easy it is to deploy to Azure.

A nice comment was that we are on the road to “ecmascript harmony”! And that “Javascript is a great language so long as you ignore the 90% of it which coffeescript doens’t compile to.”

It was a very fast-paced session; hopefully my notes still make sense though..

What the various aspects of Azure do

  • compute – web, worker, vm
  • websites – .net, node, php
  • storage – blob, tables (distributed nosql, like cassandra), queues
  • sql – sql azure, reporting
  • services – servicebus, caching, acs

What are the Cloud Service types used for

  • web roles – iis, for apps
  • worker – no iis, for running anything

How to peruse the contents of blob or table

General tips for developing sites for use in Azure

  • keep static content in blob storage
  • websites commit and deploy much faster than cloud serviecs commit and deploy process
  • azure/iis needs server.js, not app.js

How to run RavenDB in Azure

  • Spin up a vm and install it!! (this used to be a much trickier process, but the recent Azure update meant that the VM support is mature enough to allow the simpler solution)

Developing node.js

Use jetbrains webstorm for debugging/ or the wonderful online editor, Cloud9IDE. Sublime Text 2 is a great editor for simple code requirements, and has great plugins for Javascript support. I also used this for taking all of the seminar notes as it has a simple “zen” zero-distractions interface

Next up – Hadoop and High Performance Computing