$’\r’: command not found

Working between Windows and Linux machines can be liberating, but a bit of a pain at times. One of these times is when creating scripts on a Windows PC and copying them over to a Linux box only to receive “$’\r’: command not found” when attempting to execute them.

This is due to the files being saved in DOS format where new lines are delimited with \r\n as opposed to the *nix \n format.

You can either ensure the files are saved in Unix format in your Win text editor, or even use this extremely easy method to process them on the Linux box:

[shell]
sudo apt-get install dos2unix
….
sudo dos2unix <your filename here>
[/shell]

Easy.

RaspberryPi 101: Part #2 – Setup

So part 1 was a quick intro to what a pi is and what it can do. This post is about getting and setting yours up.

Installation

1. Get a raspberryPi

You can get one from a few places these days, but the big UK reseller is element14/Farnell
element14 farnell

2. Get a linux distro

As mentioned in the last post, you can get a few different operating systems to run and the recommended ones to start with are on the raspberrypi website

3. Put the distro on a suitable SD card

3.1 Writing the image to the SD card

The methods for doing this differ depending on your dekstop OS;

  • Mac and Linux you can use the existing “dd” and “df” commands to check and write the image to the SD card
  • For Windows you need to use the Win32DiskImager “used for writing images to USB sticks or SD/CF cards on Windows”

3.2 BerryBoot

Steps 2 and 3 can actually be shortcut by either buying an SD card with a distro already installed, or installing BerryBoot bootloader which bootstraps your installation to give you the easiest possible route to installation:
berryboot

Berryboot is OSS and you can even dig into the source over on github

Random tangent #1: HDMI CEC
BerryBoot supports the fantastic HDMI CEC which “is an HDMI feature designed to allow the user to command and control up-to ten CEC-enabled devices, that are connected through HDMI, by using only one of their remote controls”; this means that you don’t even need to connect a keyboard for most of the berryboot setup process and can just use your tv remote.

There’s more info over on elinux about just how important CEC is for HDMI capable devices and writing software for these devices.

Want to start understanding the CEC messages? Check cec-o-matic

This is the same feature that XBMC uses to allow full and simple navigation of the media centre features just using your remote control – more on XBMC later.

Checkpoint! Base Installation Complete

You’ll now have a version of linux (or RISC OS) running on your pi. If you’ve chosen RISC then I can’t really help you, since the last time I used it was playing games on my uncle’s computer as a young lad (check out those vids – classic 90s gaming at its “best”).

Anyway. From here on in I’ll assume you’ve gone with Raspbian. Wheezy should be pretty much the same I think.

Starting it all up #1: Raspbian

Plug it all in

Put the SD card in, the HDMI cable to your tv/monitor, the network cable in, your USB keyboard which you’ll need for the initial installation (unless you’re berrybooting with it’s CEC awesomeness), and finally the power cable; there is no power switch on the pi so once the cable is plugged in you’re running.

You should see the initial configuration screen where you can setup the locale and turn on SSH (do so).

Then you can choose to get to a terminal or boot into a desktop environment.

SSH

With raspbian this is just a case of enabling ssh from the config menu; after that you can ssh in from another machine on the same network. If you don’t know the IP address of your pi, either plug it in to an HDMI capable display and execute “ifconfig” or just check the devices attached to your router from the router admin screen.

more info on pi ssh

Bluetooth

Setting up a bluetooth keyboard may not be much use if you’ve already got ssh running and want to access the terminal only, however if you’re accessing the pi directly you will either need to plug in a USB HCI device (keyboard/mouse) or set up bluetooth.

1. Get a supported device

There’s a list of confirmed working devices over on elinux.

I went for the dinky little TOPDIGI UA01 Bluetooth USB Dongle from Amazon
TOPDIGI UA01 Bluetooth USB Dongle from Amazon

2. Setup bluetooth on the pi

2.1 install bluetooth software

[code]pi@raspberrypi ~ $ sudo -s
root@raspberrypi:/home/pi# apt-get install bluez[/code]

2.2 scan for nearby devices

[code]root@raspberrypi:/home/pi# hcitool scan[/code]
Your device should appear in those found; use the MAC in the following steps.

2.3 pair your pi to the device

[code]root@raspberrypi:/home/pi# bluez-simple-agent hci0 00:11:22:33:44:55
RequestPinCode: 0000
Enter PIN Code: Release
New device (/org/bluez/3964/hci0/dev_00_11_22_33_44_55)[/code]

Obviously your MAC will be different to the dummy one I’ve used..

2.4 trust the paired device so it’ll auto connect in future

[code]root@raspberrypi:/home/pi# bluez-test-device trusted 00:11:22:33:44:55 yes[/code]

WiFi

Since I’m bored with swapping the ethernet cable from my tv to get this on the network (the switch has no spare ports.. too much living room tech..), I’ve just ordered an Edimax EW-7811UN 150Mbps Wireless Nano USB Adapter
Edimax TEEEENY TINY wifi adapter

Portable Power

Since I’m bored with swapping my phone charger over to power the pi, I’ve just ordered a PowerGen 5200mAh External Battery Pack High Capacity Power Bank Charger
Powergen

I’ll report back on how they work out for me soon. I should find that having a fully portable pi will allow me to mess around with it even more!

Summary

That’s it for this one! You’re now set up with a Linux computer, bluetooth keyboard, and ssh. You can do with this whatever you would do with a normal low power distro (Puppy, DSL, #!.. or is it !#.. hmm..), but you can also interact wiht the outside world via GPIO.

Next Up

I’ll be installing XBMC and having a play. I play, so you don’t have to. See? I care.

EC2 WinSCP /var/www file upload

Since I use an Amazon EC2 Microinstance to host this blog and I noticed I had no favicon appearing (which is a bad thing) I thought I might as well make one and pop it up.

I took my usual avatar (Jiraya, the “Pervy Sage” from Naruto) and just let someone else do the hard work for me, uploading it to FavICO.com instead of even bothering to download an app to do it.

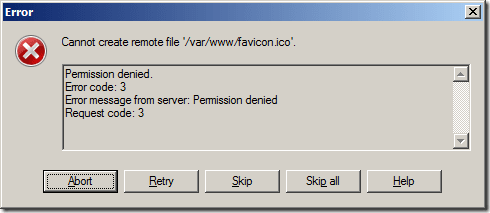
Then I opened up WinSCP and used my EC2 ppk to authenticate with my EC2 instance, took that favicon.ico file and tried to upload it to /var/www/html (the default website root if you install wordpress) only to receive the error:

ec2 var www upload permission error

Hmmm.

If you check the permissions on that folder (“stat /var/www” via SSH) you’ll see that it’s owned by the “root” group; since you’re logging on as ec2-user you’re not a member of that group.

Your options, according to the internet, appear to be;

The solution I found was much easier.

  • Upload the favicon to the ec2-user home directory via WinSCP
  • Move (mv) the favicon from the ec2-user directory to /var/www via SSH using “sudo” to get the necessary permissions

Easy.

Sending Tweets from Amazon EC2

Given how unstable the EC2 microinstance I use is, I wanted to be able to automatically restart the blog related services and alert me that a restart had occurred.

I decided to try and get the alert via a tweet and doing this is actually pretty easy. All it consists of doing is:

1) Register a Twitter app at dev.twitter.com

2) Set up a new Twitter account  for your tweets to come from

3) Authenticate your new account with your new app

4) Configure something to use your app to send tweets from your new account

Luckily, this has all already been done by someone much cleverer than me, so I copied them! Have a look at this blog post by Jeff Miller explaining how to use the python Twitter API script Tweepy.

My EC2 instance already had python installed so all I needed to do was install git, get the tweepy code from the github repo here (the location of the github repo in the article is incorrect, so a little googling helped me find the correct location), and follow the instructions exactly!

Essentially this consisted of:

sudo yum -y install git
sudo git clone git://github.com/tweepy/tweepy.git
cd tweepy
sudo python setup.py install

Then follows some copying and pasting of auth keys and urls to end up with a nice script on the EC2 instance which was authorised to send tweets from my new twitter account, @rposboEC2.

All that was left was to link this into the startup script:

sudo nano /etc/rc.d/rc.local

by adding in a new line at the end and set the status to include my own twitter account so I see it as a mention and will therefore also receive an email alert automatically:

sudo python /home/ec2-user/tweepy/ec2Event.py '@rposbo EC2 microinstance event raised: Restarted'

Done! Firing off this script now restarts Apache and mysql and sends the tweet below:

EC2 Micro Instance Instability

It’s getting a bit daft now – the EC2 microinstance this blog is hosted on seems to keep restarting. When it comes back up, Apache and mysql are stopped, so the site is down.

As such, I’ve just logged in via SSH and fired off the command below to edit the startup script:

sudo nano /etc/rc.d/rc.local

Then added in the lines:

sudo /etc/init.d/httpd start
sudo /etc/init.d/mysqld start

Now whenever the microinstance restarts it will automatically restart Apache and mysql. I hope.

Just for good measure I also added in a line for logging so I have some idea of how often the instance restarts:

date >> /home/ec2-user/restartlog

I’ll add in an email alert or maybe just make it tweet the restart event as well.

Pretty Permalinks

Oh, one more on the EC2 Word press thing; if you want pretty permalinks (i.e., http://robinosborne.co.uk/2011/09/08/pretty-permalinks/ ‎ instead of http://robinosborne.co.uk/?p=85), and you’re running WordPress on an EC2 installation, before you select it in your WordPress “settings” section be sure to edit your Apache config first:

Pop open PuTTY (or whatever terminal you use), log in, run

sudo nano /etc/httpd/conf/httpd.conf

hit ctrl+W and type “override”, do it again until you see:

#
# AllowOverride controls what directives may be placed in .htaccess files.
# It can be "All", "None", or any combination of the keywords:
#   Options FileInfo AuthConfig Limit
#
    AllowOverride None

Change the None to FileInfo, hit ctrl+X to save and exit. Then restart apache with:

sudo /etc/init.d/httpd restart

Done. Hopefully. YMMV 😉

EC2 MicroInstance: The WordPress Hosting Wonder

I managed to not notice that my blog had gone down after the EC2 outage earlier this year. So when I popped back on one day to find it wasn’t there any more I was a little concerned.

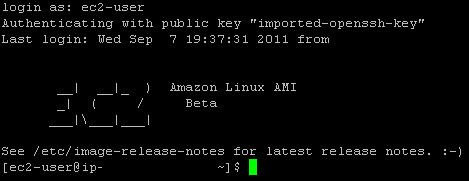
Popped over to PuTTY, opened up my EC2 connection to be presented with a login screen. So I tried the old usual login: “root”

EC2 Login

Ok, let’s  try that then:

EC2 Welcome

BRILLIANT!!

Uh..

Now what?

Crap. I can’t remember.

I faffed around for ages with “ls”, checking out what’s in “/opt/” and “/etc/” and getting a bit lost. How do I restart the damned web server?! Which web server did I install? Why do I not remember how to use linux?! ARGH!!

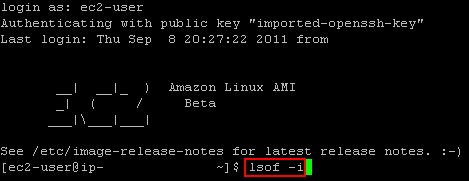
Oh, hey. Look – I just tapped “PgUp” and saw this:

EC2 PgUp

Hello. That’s a command to see what ports are open, as far as I remember. That’s the first command from 2bitcoder‘s EC2 WordPress tutorial.

Pressing the down key resulted in listing every command I’d ever entered:

login as: ec2-user
Authenticating with public key "imported-openssh-key"
Last login: Thu Sep  8 20:27:22 2011 from blah--blah-blah-blah.blah.blah.com

       __|  __|_  )  Amazon Linux AMI
       _|  (     /     Beta
      ___|\___|___|

See /etc/image-release-notes for latest release notes. :-)
[ec2-user@ip-12-345-67-890 ~]$ apt-get install lighttpd
[ec2-user@ip-12-345-67-890 ~]$ ipkg install lighttpd
[ec2-user@ip-12-345-67-890 ~]$ yum install lighttpd
[ec2-user@ip-12-345-67-890 ~]$ sudo yum -y install lighttpd
[ec2-user@ip-12-345-67-890 ~]$ ls
[ec2-user@ip-12-345-67-890 ~]$ ls /
[ec2-user@ip-12-345-67-890 ~]$ ls /opt/
[ec2-user@ip-12-345-67-890 ~]$ ls /etc/
[ec2-user@ip-12-345-67-890 ~]$ ls /etc/httpd/
[ec2-user@ip-12-345-67-890 ~]$ ls /etc/httpd/run/
[ec2-user@ip-12-345-67-890 ~]$ sudo ls /etc/httpd/run/
[ec2-user@ip-12-345-67-890 ~]$ service httpd start
[ec2-user@ip-12-345-67-890 ~]$ httpd start
[ec2-user@ip-12-345-67-890 ~]$ sudo /etc/init.d/httpd start

I just had to hit “enter” a couple of times to replay some ancient commands to restart Apache and mysql and the site was back up and running! Phew!

So – if you’re using EC2 for hosting something and you can’t remember the very basic linux commands you fired off to get it working in the first place, fear not! PgUp is your friend!

WordPress (free) on an Amazon EC2 Micro Instance (free – for now)

This first post is about how it came to be. A bit philosophical, I know, but that’s the nature of tech sometimes..

This is a version of wordpress (free blog engine) installed in Amazon’s EC2 (Elastic Cloud Computing – or Elastic Computing Cloud – or something like that, starting with Elastic and then another two “C” words) (free). Which I think is both thrifty, and tekky geeky, and therefore pretty awesome.

Inspired by Jaimal’s post over on 2bit-coder and an email from Amazon about a free tier, I set about having a go.

The only things needed to change from Jaimal’s tutorial, are that the current free versions of the AWS Linux VM are not quite Fedora; although you do install using yum, you need to log in as “ec2-user” instead of “root”, you always have to whack a “sudo” in front of any command that needs any real privileges, and you can’t use “phpmyadmin” to set up your mysql instance for wordpress, so you have to go old skool and do it by hand.

Anyhoo. Introductions over, next up – more on random web-related tech to follow.

Semi-related references:

How to run WordPress on the NSLU2 (“hacked” router I own that I based some of the wordpress install and setup on)

Mercurial how-to (since I’ve also installed that on my EC2 instance and will follow up on that at some point)