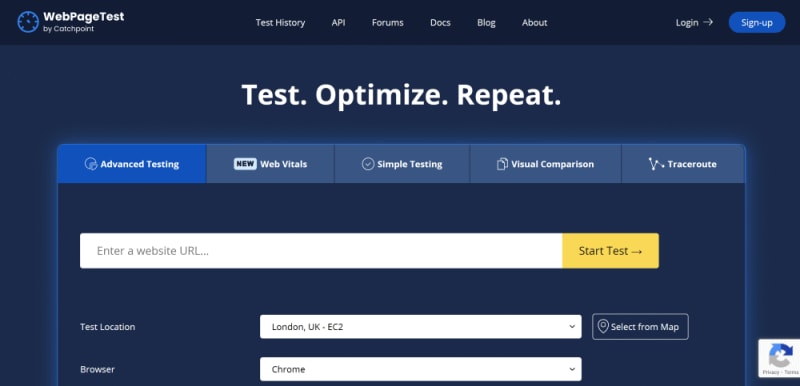
The fantastic WebPageTest, free to use and public, has been available to set up your own private instances for many years; I wrote this up a while back, and scripted a Terraform version to make this as easy and automated as possible.
For AWS it was just a case of creating an EC2 instance (other installation options are available) with a predefined WPT server AMI (amazon machine image), add in a few configuration options and boom – your very own, autoscaling, globally distributed, website performance testing solution! New test agents would spin up automatically in other AWS regions, all based on WebPageTest Agent AMIs.
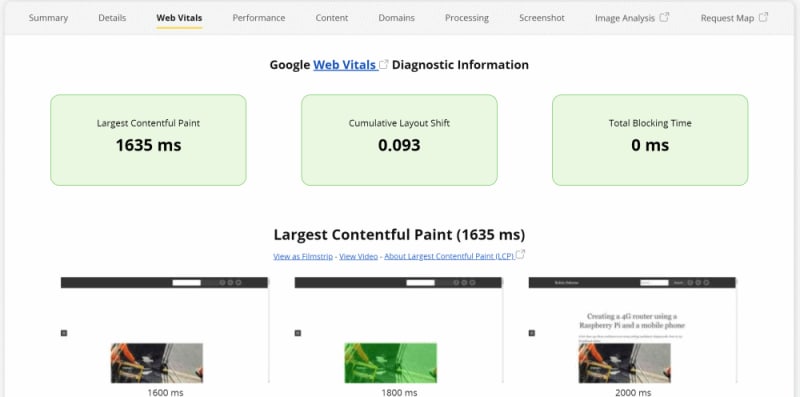
In 2020 WebPageTest was bought by Catchpoint and we finally saw improvements being made, pull requests being closed, and the WebPageTest UI getting a huge update; things were looking great for WebPageTest enthusiasts! If you havent heard of Catchpoint before, they are a company who are all about global network and web application monitoring, so a good match for WebPageTest.
Unfortunately, however, this resulted in the handy WebPageTest server EC2 AMIs no longer existing. If you want your own private installation you now need to build your own WebPageTest server from a base OS. It can be a bit tricky, though it gives you greater understanding of how it works under the hood, so hopefully you’ll feel more confident extending your installation in future.
In this article, I’ll show you how to create a WebPageTest private instance on AWS from scratch (no AMI), create your own private WebPageTest agents using the latest and greatest version of WebPageTest, and wire it all up.
Over the past few years I’ve been setting up, scripting, rebuilding, enhancing, tweaking, and hacking private WebPageTest installations. These have been configured to run hundreds of thousands of tests, globally, each day, pushing those stats into analytics platforms, data lakes, and/or databases, for monitoring, reporting, and alerting.
This latest version – a.k.a. "WebPageTest: Catchpoint 2021 Edition" (at least, that’s what I’m calling it) – needs a lot more work to set up (no predefined image you can use), but looks sooooo nice! The improvements to the UI were long overdue, and putting Core Web Vitals front and centre really speeds up investigations.
There’s a fair amount to get through, so I’ll break down what we’re going to do into the 3 main sections:
Main Sections
Part 1
💻 Setting up your WebPageTest Server:
- EC2
- Installation script
- IAM
tl;dr – start a VM, run the WPT Server install script, configure a service user with IAM permissions to start and stop EC2 instances.
Part 2
🤖 Custom Agents:
- EC2
- Installation Script
- AMI
- Copy AMI
tl;dr – start a VM, run the WPT Agent install script, create an AMI, copy AMI to other regions.
Part 3
🔌 Connect:
- Server location config
- Server settings
- Coffee
tl;dr – add the WPT agent AMI IDs to the WPT server config, party time! 🎉
The first two sections can be mostly summarised as "create an instance, run a setup script", so if you’re comfortable with that sort of thing on AWS, you could skim over, skip to the Agent AMI section, or even the final "Connect" section.
Don’t skip all the way to the end as there’s some cool stuff about easily overriding the installed WebPageTest config without changing the files from the github install script:
Ctrl+Ffor "common" to get straight to it! It’s really handy, trust me.
Let’s get started!
Part 1: 💻 Setting up your WebPageTest Server
Gone are the days when you could choose an AMI and have a fully functional WebPageTest private installation moments later. At time of writing we need to go through a few more steps to get the same result, but worry not – I’m here to lead you through them!
The main steps are:
- Launch Ubuntu EC2 instance 🚀
- Log in and run the WPT installation script 📜
- Grant permissions to create new WPT agent instances 👍🏻
Ready?.. Here we go!
Launch Ubuntu EC2 instance 🚀
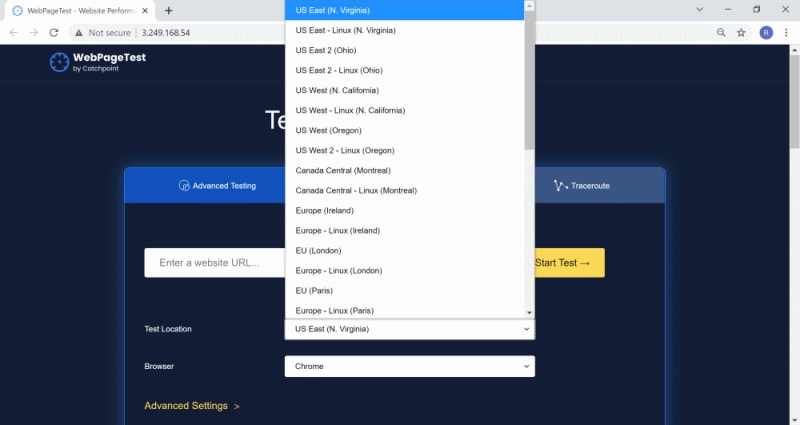
Head over to your AWS console and navigate to EC2. We can whizz through the next bit as it’s mostly defaults.
- Select Ubuntu 18.04/20.04 (or whatever is currently the latest supported version; I use 20.04 with no issues)

- Select size (t2.micro is fine for now; you can always scale up; my setups tend to use m4.large)
- I’d suggest you update the security group to only allow access from your own IP for SSH (HTTP needs to be open for now, else the agents can’t poll for work!)

- Confirm keypair so you can SSH in; create a new one, or use an existing one
I’ll cover the details about locking down HTTP also in a future post; it’s a cool problem to solve, but great once you’ve done it. 🔐
Log in and run the WPT installation script 📜
Once your server is running, ssh in using:
ssh -i "<path to your keypair>" ubuntu@<public IP or DNS of your WPT instance>Then run the command as specified on the WebPageTest installation repo:
bash <(curl -s https://raw.githubusercontent.com/WPO-Foundation/wptserver-install/master/ubuntu.sh)Give that a few minutes to process everything and it’ll eventually give you this message:
Setup is complete. System reboot is recommended.

The locations need to be configured manually in /var/www/webpagetest/www/settings/locations.ini

The settings can be tweaked in /var/www/webpagetest/www/settings/settings.ini

The location key to use when configuring agents is: blahblahlblah

An API key to use for automated testing is: blahblahlblah
Let’s reboot, then we can roll up our sleeves and get into the good stuff:
sudo rebootNext up is making sure the WPT server has permission to start WPT agents:
Grant permissions to create new WPT agents 👍🏻
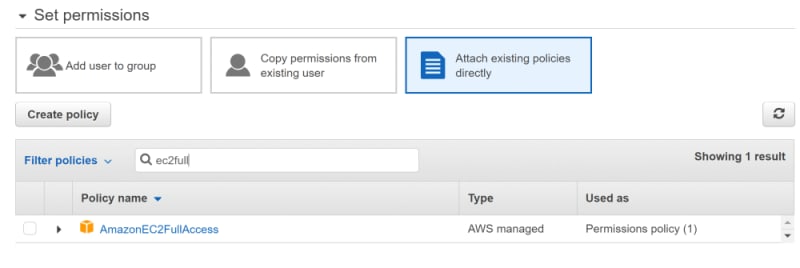
Since our new server will be creating WPT agents (EC2 instances) on our behalf, we’re going to need to set up a user with permissions to start new EC2 instances.
Head over to the IAM area in your AWS console and create a user (programatic access only), granting AmazonEC2FullAccess, noting down the user key and secret for use in a moment.
Now we need to add this new user’s information to the WPT server configuration; here comes a really handy tip about working with the WebPageTest configuration settings:
All the WPT configuration settings can be found in ini files in /var/www/webpagetest/www/settings/ – it can be a pain to try to edit these files since you could end up resetting them with an eroneous git pull; the best solution is to place your override files in a subdirectory called "common" – /var/www/webpagetest/www/settings/common/ – these override the values from the same files in the parent directory.
Make the override directory:
mkdir /var/www/webpagetest/www/settings/common/
Create a new file to add in our extra goodies:
sudo nano /var/www/webpagetest/www/settings/ common/settings.ini
(Yes I said
nano, alright? You canviyourself if you must, but I’ve been ananokinda guy since I stopped usingemacsin the late 90s. Leave me alone. Grr.)
Add this to your new settings/common/settings.ini file, putting in your own IAM details from the previous step:
; User to start/stop agents

; Access Key ID from IAM user setup
ec2_key=AKIATS67N7IMQ5HZJREQ

; Secret Access Key from IAM user setup
ec2_secret=kOyC+nxwVS7fXCgR4GcKpOB2Fj2kXSk8M+m5G65h

; enable ec2
ec2_locations=1
That last line means your server will look at the default settings/ec2_locations.ini file to populate the agent list.
You should now find loads of lovely test locations in your WPT server! Yay!
However, if you actually try to use one of those locations to kick off a test, you may find the agent AMIs no longer exist (as of Nov 2021 that is):
$ tail -f /var/www/webpagetest/www/log/error.log.*
20:29:45 - EC2:Launching EC2 instance. Region: eu-west-1, AMI: ami-03009a026570febbb, error: The image id '[ami-03009a026570febbb]' does not exist
20:31:07 - EC2:Launching EC2 instance. Region: us-east-1, AMI: ami-0ff1ec702aef8a505, error: The image id '[ami-0ff1ec702aef8a505]' does not exist
20:31:19 - EC2:Launching EC2 instance. Region: ca-central-1, AMI: ami-057a97e61c7780543, error: The image id '[ami-057a97e61c7780543]' does not exist
20:31:29 - EC2:Launching EC2 instance. Region: ap-northeast-1, AMI: ami-07a931524bd2cde14, error: The image id '[ami-07a931524bd2cde14]' does not exist
20:31:37 - EC2:Launching EC2 instance. Region: ap-south-1, AMI: ami-0307d8587d2ce3b95, error: The image id '[ami-0307d8587d2ce3b95]' does not exist
In case agent AMIs provided by the installation script exist by the time you’re reading this (I could easily be out of date, considering how quickly WPT development is now moving), you can consider your private installation complete at this point! The rest of the article can be for reference to set up your own customised agents and server configuration overrides.
Oh dear. Only one thing for it – we need to create our own WPT agents too!
May as well delete that ec2_locations=1 from common/settings.ini; we’re going to build our own list – change it back to:
; Access Key ID from IAM user setup
ec2_key=AKIATS67N7IMQ5HZJREQ

; Secret Access Key from IAM user setup
ec2_secret=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
Roll those sleeves up; we’re going to create our own WebPageTest Agent!
Part 2: 🤖 Custom Agents
Since the Amazon Machine Images (AMIs) in the default settings/ec2_locations.ini don’t exist, we need to create our own WPT Agent AMIs to populate our own locations override file in settings/common/locations.ini.
In order to do this, first we need to create one working WPT agent, and then use that as a template for the AMI.
Still with me? Sure you are! Let’s get cracking!
The main steps here are:
- Launch Ubuntu EC2 instance for the Agent 🚀
- Log in and run the WPT Agent installation script 📜
- Create AMI(s) 🤖🤖🤖
Let’s go!
Launch Ubuntu EC2 instance for the Agent 🚀
- Head over to AWS EC2
- Select Ubuntu 18.04/20.04 (or whatever is currently the latest supported WPT agent OS version; I use 20.04 without issue)
- Select size (c4.large is recommended, but is not free so be aware)
- Confirm keypair so you can SSH in; create a new one, or use an existing one
Log in and run the WPT Agent installation script 📜
Once your instance running, ssh in and paste the installation command below, changing the browsers you want to install in the options – be aware that this will mean only the browsers you choose will be installed in the AMI you create; the more browsers you choose, the slower the installation and the slower the startup time of any subsequent agent that uses this AMI, since it will automatically install browser updates upon EC2 launch before executing tests, unless you explicitly disable browser updates via the WPT_UPDATE_BROWSERS=n option.
I guess this gives some interesting possibilities for optimisation of the initial startup time of an agent; instead of having one agent with many browsers, maybe have one agent per browser. Hmm. I might test that out…
Be sure to include WPT_CLOUD=ec2 as this means the agent configuration will be passed in via user data automatically from your WPT server when it spins up an instance, instead of hard coding it in the agent.
This is an example agent installation config for just Chrome:
WPT_CHROME=y /
WPT_FIREFOX=n /
WPT_EDGE=n /
WPT_BRAVE=n /
WPT_EPIPHANY=n /
WPT_OPERA=n /
WPT_VIVALDI=n /
WPT_CLOUD=ec2 /
bash <(curl -s https://raw.githubusercontent.com/WPO-Foundation/wptagent-install/master/debian.sh)
Kick off your installation script, go have a walk, and eventually you’ll come back to a completed installation, suggesting you reboot. Instead of rebooting we’re going to shut it down so we can set the user data ourselves and test that it works before continuing.
Shut the instance down, then set the user data; only the wpt_server needs to be correct at the moment, but we will use the other values in a moment to test it.
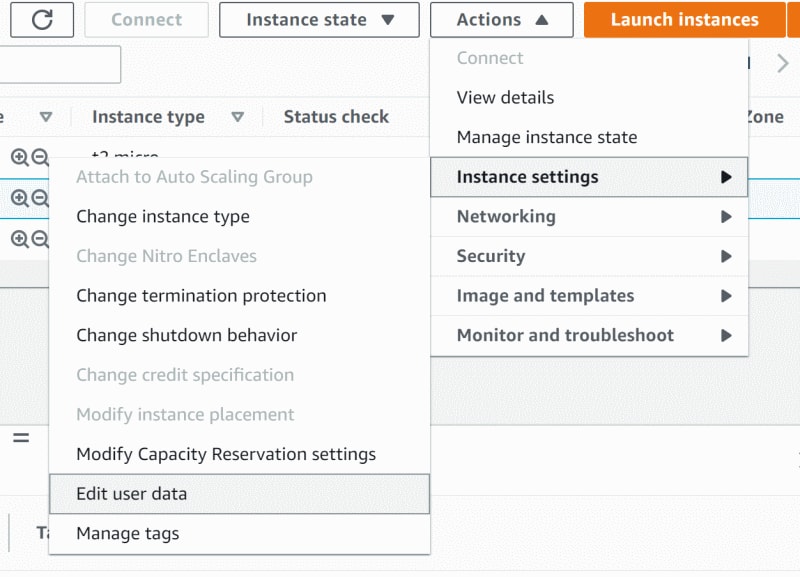
Select "Edit user data" for your shutdown Agent instance:
Set the user data:
wpt_server=<your WPT server's public IP>
wpt_location=<some value, e.g. Test>
wpt_key=<some value, e.g. 12341234123412341234>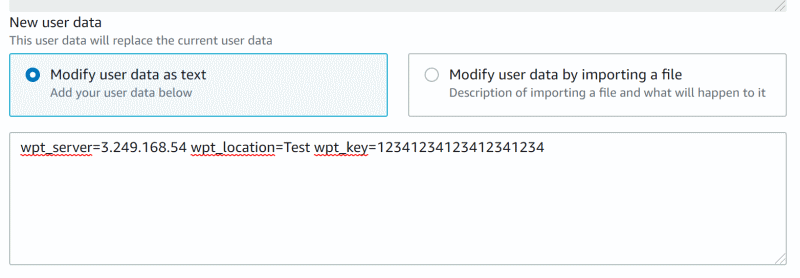
Start the agent back up, then log in to your WPT Server and check the agent is polling for work; this will take a few minutes since the agent will update both itself (OS) and the installed browsers upon startup – I use the following command for this check:
> tail -f /var/log/nginx/access.log
>
34.244.174.171 - - [15/Nov/2021:28:56:08 +8808] "GET /work/getwork.php?f=json&shards=1&reboot=1&servers=1&testinfo=1&location=Test&pc=1p-172-31-28-289-172.31.20.209&key=123412341234123412
348ec2-i-ec1b67169df4d868&ec2zone-eu-west-1a&version-211182.284522&dns-127.0.0.53&freedisk-3.466&pminutes-6 HTTP/1.1" 208 31 "--"wptagent"
34.244.174.171 - - [15/Nov/2021:20:56:00 +0000] "GET /work/getwork.php?f=json&shards-1&reboot-1&servers-1&testinfo-1&location-Test wptdriver&pc-ip-172-31-20-209-172.31.20.209&key-12341234
1234123412348ec2=i-Dec1b67169df4d868&ec2zone=eu-west-1a&version=211102.294522&dn=127.0.0.53&freedisk=3.466&upminutes=6 HTTP/1.1" 200 31 "-" 'wptagent"
34.244.174.171 - - [15/Nov/2021:28:56:05 +8808] "GET /work/getwork.php?f=json&shards=1&reboot=1&servers=1&testinfo=1&location=Test_wptdriver&pc=1p-172-31-20-289-172.31.20.209&key=12341234
123412341234&ec2-1-Dec1b67169df4d86&ec2zone-eu-west-1a&version-211182.284522&dns-127.0.0.53&freedisk-3.466&upminutes 6 HTTP/1.1" 200 31 "-" "wptagent"
34.244.174.171 - - (15/Nov/2021:20:56:05 +0808] "GET /work/getwork.php?f-json&shards=1&reboot-1&servers-1&testinfo=1&location-Test&pc-ip-172-31-20-289-172.31.20.289&key=123412341234123412
34&ec2=i-Dec1b67169df4d868&ec2zone=eu-west-1a&version=211182.284522&dn=127.0.0.53&freedisk=3.466&upminutes=6 HTTP/1.1" 200 31 ".- "wptagent"
34.244.174.171 - - [15/Nov/2021:20:56:18 +8808] "GET /work/getwork.php?f=json&shards=1&reboot=1&servers=1&testinfo=1&location=Test_wptdriver&pc=1p-172-31-20-289-172.31.20.209&key=12341234
123412341234&ec2-i-ec1b67169df4d868&ec2zone-eu-west-1a&version-211102.204522&dns-127.0.0.53&freedisk-3.4668 pminutes-6 HTTP/1.1" 200 31 "-" "wptagent"
34.244.174.171 - - [15/Nov/2021:20:56:10 +8808] "GET /work/getwork.php?f=json&shards=1&reboot-1&servers=1&testinfo=1&location=Test&pc-ip-172-31-20-209-172.31.20.209&key=123412341234123412
34&ec2=i-Dec1b67169df4d868&ec2zone=eu-west-1a&version=211182.284522&dn=127.0.0.53&freedisk=3.466&upninutes=6 HTTP/1.1" 200 31 ".- "wptagent"
Looks like it can connect, but it’s a good idea to test this agent works as expected before we create images from it, so let’s do that next.
Test your new WPT Agent
The new agent is polling for work, but your server doesn’t know about the agent yet ("Who are you? Stop calling me!"); we need to tell the server about this agent.
Back in your WPT server, create an override file settings/common/locations.ini (remember that files in settings/common override those in settings/ with the same name) and paste in the following:
[locations]
1=Test_Group ;this value must match the "group" section header below
default=Test_Group ;ditto

; agent group
[Test_Group]
1=Test ;this value must match the "agent" section header below
label="Test Group" ; this label value is what appears in the dropdown
default=Test ;this value must match the "agent" section header below

; agent
[Test] ;must match the value of wpt_location in the user data
browser=Chrome
label="Test"
key=12341234123412341234 ;must match the value of wpt_key in the user data
[Test] and the value for key must match whatever you used in the user data for wpt_location and wpt_key earlier, i.e.:
wpt_server=34.241.113.123
wpt_location=Test
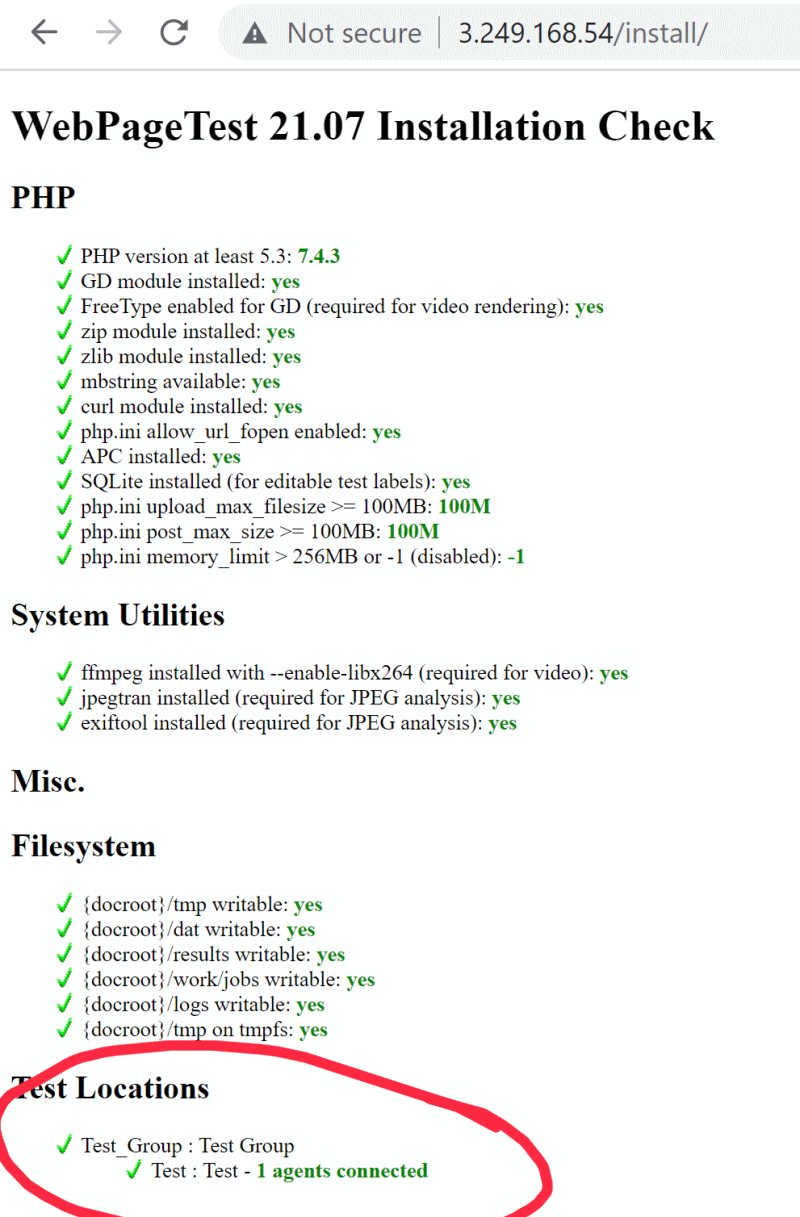
wpt_key=12341234123412341234Save that file and check that it’s connecting to the server ("Oh, it’s you! I know about you..") via http://your-wpt-server-ip/install
This should be pretty quick, since the agent is already up and polling for work.
Kick off a test from your WPT server and make sure it completes as expected.
All good? Alrighty, let’s continue!
Create AMI(s) 🤖🤖🤖
Now that we have a working agent, we need to create a machine image from it that will be used as the template when automatically spinning up agents on demand.
Select your WPT Agent and choose Actions -> Image and templates -> Create image
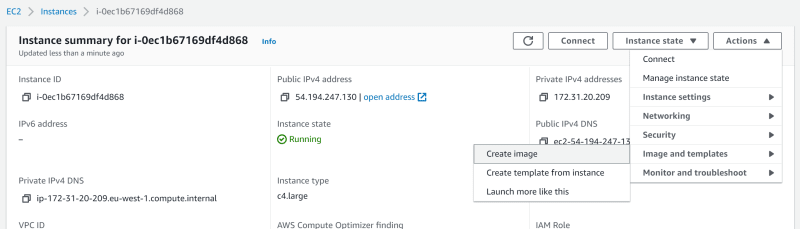
Be sure to note down the AMI id every time you create an AMI; you can easily find these again later if necessary, under EC2 -> Images -> My images (for each region).
Be sure to shut down any running WPT Agents before continuing to the next part, else it can get really confusing!
Part 3: 🔌 Connect
Now we can change the override file settings/common/locations.ini to use our new AMIs;
[locations]
1=AMI_Test_Group
default=AMI_Test_Group

[AMI_Test_Group]
1=AMI_Test
label="AMI Test Group"
default=AMI_Test

[AMI_Test]
browser=Chrome
label="AMI Test"
key=12341234123412341234
; watch out - extra stuff below!
ami=ami-blahblah
size=c4.large
region=eu-west-1
Adding the ami to an agent section means your WPT server will attempt to launch an instance of that ami of the specified size in the chosen region when a test is queued up.
Head back to your WPT server, kick off a test, and check that a new WPT Agent is created in the region you specified (check your AWS EC2 console); again, be patient!
Once that test succeeded with the AMI version, we can now add entries for all your other regional AMI locations; remember to add a new "group" at the top:
[locations]
1=AMI_Test_Group
2=Other_AMI_Test_Group
default=AMI_Test_Group
and then the details for that group futher down, with the appropriate region and ami:
....

[Other_AMI_Test_Group]
browser=Chrome
label="Other AMI Test"
key=12341234123412341234
ami=ami-blahblah ; different AMI ID for this region
size=c4.large
region=us-east-1 ; different region
Save that file and let’s finish up.
Kicking the tires
Let’s head back to your WPT server in a browser; see your locations in the dropdown?
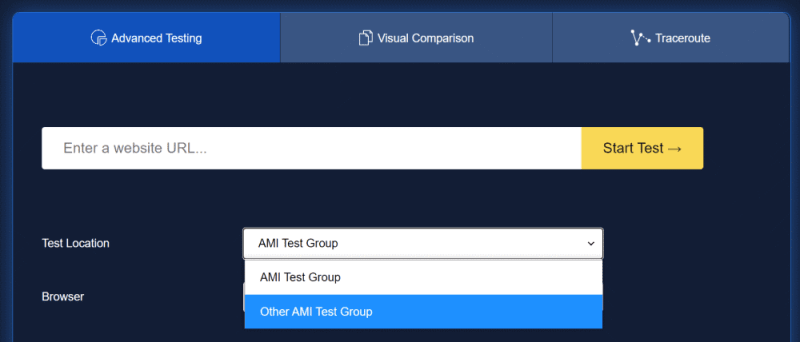
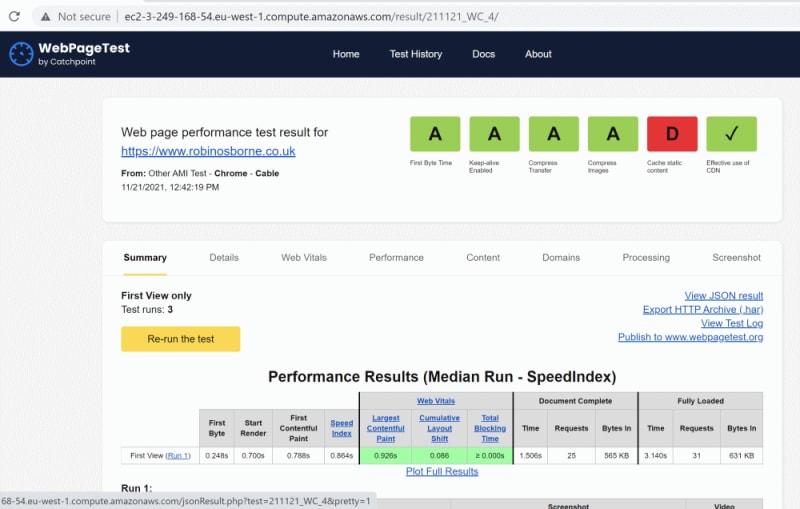
Select one and kick off a test; a new EC2 instance should appear, with your AMI details and WPT server user data, in the chosen region!


After a few minutes you should see this agent in the WPT UI, pick up the test, and give you a result.
The agent will automatically be terminated to save money.
Congratulations! You have a fully functional private WPT server with your own WPT agent AMIs! Go you! 🥳
A brief reminder
💻 SERVER:
Start a VM, run the WPT Server install script, configure a service user with IAM permissions to start and stop EC2 instances
🤖 AGENT:
Start a VM, run the WPT Agent install script, create an AMI, copy AMI to other regions
🔌 CONNECT:
Add the WPT agent AMI IDs to the WPT server config, party time! 🎉
Evolving your setup
You could customise this further: for example, I have a lighthouse extension installed on some of my agent AMIs that attempts to calculate the environmental impact of the website, and I have AWS Inspector installed on some of my agent images, for security compliance purposes.
There’s loads more we can do from here – keep an eye out for more articles here on WebPageTest ⚡
Troubleshooting 🎯
- Are your config changes not being picked up? They might be cached internally, so you might need to restart nginx (
sudo service nginx restart) or even the entire server (sudo reboot). - Are you trying to use HTTPS to access your server, even though you haven’t set this up? Make sure you’re using HTTP for now else the WPT instance will look like it doesn’t work.
- Did you restrict IP access when setting up the security group? You need to open up HTTP to all traffic (
0.0.0.0), else WPT agents can’t connect. - Pretty much anything else should be covered in my previous articles, where I list a bunch of troubleshooting usual suspects.
hi, robin,
can you help in archiving WPT data to s3 ?
i did all the settings in settings.ini
archive_s3_server=s3.amazonaws.com
archive_s3_key=my_key
archive_s3_secert=my_secert_key
archive_s3_bucket=arn:my_bucket
archive_days=0
cron_archive=1
and nothing seen in s3 bucket and i executed this command
php /cli.archive.php
then i got this
Arc:0, Del:0, Kept:0, Checking:something 1
Arc:0, Del:0, Kept:1, Checking:something 2
Arc:0, Del:0, Kept:2, Checking:something 3
Arc:0, Del:0, Kept:3, Checking:something 4
Arc:0, Del:0, Kept:4, Checking:something 5
Arc:0, Del:0, Kept:5, Checking:something 6
Arc:0, Del:0, Kept:6, Checking:something 7
Done
no files exist on s3
I think there was an update to the archive process a while back that did a “if” on the “archive_days” setting before using the value; as such, if you set the value to “0”, then it returns “false” and is treated as if it isn’t set!
Try changing this to “archive_days=0.2”; then it’s no 0 (i.e., false), but it’s still a very small duration before archiving.
hey Robin, any ideas why I get this error when trying to export to s3 running “php archive.php” from “/var/www/webpagetest/www/cli”:
PHP Warning: scandir(./results/relay): failed to open dir: No such file or directory in /var/www/webpagetest/www/cli/archive.php on line 148
PHP Warning: scandir(): (errno 2): No such file or directory in /var/www/webpagetest/www/cli/archive.php on line 148
PHP Warning: parse_ini_file(/var/www/webpagetest/www/cli/settings/keys.ini): failed to open stream: No such file or directory in /var/www/webpagetest/www/cli/archive.php on line 154
PHP Warning: Invalid argument supplied for foreach() in /var/www/webpagetest/www/cli/archive.php on line 155
Arc:0, Del:0, Kept:0, Checking:220813_6H_2 PHP Warning: S3::putObject(): [3] Port number ended with ‘a’ in /var/www/webpagetest/www/lib/S3.php on line 224
Arc:0, Del:0, Kept:1, Checking:220813_SY_1
Done
My s3 config looks like this:
archive_s3_server=s3.amazonaws.com
archive_s3_key=random_key
archive_s3_secret=random_secret
archive_s3_bucket=arn:aws:s3:::testwebpagetest
archive_days=0.2
cron_archive=1
Hey – you don’t need the full ARN for the archive_s3_bucket value, just the name of the bucket. It looks like it’s parsing the arn and getting confused.
Can you check that you used the bucket name, and not the arn for the bucket?
Thank you so much for this! ! It was helpful but I am running into an issue.
When attempting to test my WPT Agent, I added a test. I see the UI come up telling me the test is queued and then very shortly thereafter it says the test is running. These tests on the older WPT took 2 minutes or so total. This will run for an hour. I do not see WPT my site at all. I can see in the agent that there are now items in the /root/wptagent/work folder and I can see the jobs in $DATA_ROOT/www/work/jobs on the server. Do you have any advice?
I find that the current build of WPT agents can have startup issues; either access, downloading browser updates, certificate updates – several possible problems. Can you ssh to the agent and run `screen -r` to join the running process? That can help debug whatever is going on with the agent.
Have you run into a per-month test limit in private instances?
This recently came up for me:
“Oops!
There was a problem with the test.
You’ve reached the limit for logged-out tests this month, but don’t worry!
You can keep testing once you log in, which will give you access to other
nice features like:
• Access to 13 months of saved tests, making it easier to compare
tests and analyze trends.
Ability to contribute to the WebPageTest Forum.
Access to upcoming betas and new features”
I assume there’s no way to create accounts in private instances, but do you know a way around this per-month limit since we can’t create accounts?
I don’t think you should see this message for private instances; there is no limit, since you’re running on your own infrastructure. I’d suggest checking logs (on server and agent), and make sure you’re using the API key you defined if appropriate (i.e. for automated tests).
However, this might be a bug in the wpt code when changing from public open source to the catchpoint owned version – e.g., https://github.com/WPO-Foundation/webpagetest/issues?q=is%3Aopen+is%3Aissue+author%3Arposbo+label%3A%22private+instance%22
The WPT code is always changing, so they might have introduced a new path that breaks the private install; raise an issue if you can track it down!
I’m stuck here can you help me here.
Once I launch the Agent instance and enter the below command it is directly asking me the web_server. But as mentioned in the document we need to provide that in AWS under user data. Till I provide that data in the server it is not starting the installation process for Agent. Please help me with what inputs I need to provide after hitting the below command:
WPT_CHROME=y /
WPT_FIREFOX=n /
WPT_EDGE=n /
WPT_BRAVE=n /
WPT_EPIPHANY=n /
WPT_OPERA=n /
WPT_VIVALDI=n /
WPT_CLOUD=ec2 /
bash <(curl -s https://raw.githubusercontent.com/WPO-Foundation/wptagent-install/master/debian.sh)
Maybe try running this on one line, without the backslashes – so long as the WPT_CLOUD env variable is set to either “gce” or “ec2” then it won’t ask for the wpt server – you can see this in the debian.sh file, near the top of the “# Prompt for options” section.