
In my recent article Eco Worriers: Saving the Planet, One Unoptimized Website at a Time for the fantastic annual Perf Planet advent calendar, I mentioned how I created a Private WebPageTest setup to use my own custom test agents, which were configured to use an extra Lighthouse plugin (The Green Web Foundation’s "greenhouse").
In this article I’ll show how to create custom WebPageTest agents, and how to configure your Private WebPageTest instance to use these instead of the default test agents.
Why custom agents?
There are several scenarios where having custom WebPageTest agents can be beneficial; for a side project like GreenTree I need an extra lighthouse plugin; for my work setup I need to have extra security configuration including AWS Inspector installed to be compliant with the corporate AWS standards.
Greenhouse plugin
The scenario I’ll be using in this article is to utilise the greenhouse lighthouse plugin from The Green Web Foundation which checks every host used in a lighthouse result against the Green Web Foundation’s API to see if the host is known to be running on renewable energy or not. Using this info it can give a "Sustainable Web" score out of a hundred in the form of a lighthouse audit result.
This plugin is OSS and in development, so please help out if you can.

Building your own WebPageTest agent – Phase 1: Configuration
I started out on this journey thinking "Surely this is going to be ridiculously complicated, right? I mean, the test agent does so much!"
Luckily, the wonderful folks over at the WPO Foundation have a repo specifically for installing everything needed to create a fresh WPT agent. It’s meant for Ubuntu or RaspberryPi, and has scripts to install for AWS or GCE.
I’m going to demonstrate the AWS (EC2) Ubuntu route.
There are two key repos that we will use:
wptagent-install: a repo of bootstrap scripts to initialise the installationwptagent: the full codebase for running WPT tests as an agent
There are three key areas to change in order to create a test agent doing what we want it to:
- In
wptagent-installchange the refernce towptagent.git(we will use our own instead of the default one), - In
wptagentedit the lighthouse installation (we need to install an additional plugin), and - In
wptagentchange the lighthouse execution (we will need to enable our additional plugin)
If you don’t want to go through the hassle of making the code changes, you could skip to "Phase 2" and reference my own forks instead, over at
rposbo/wptagent-installandrposbo/wptagent.If you don’t want to go through the hassle of creating your own WPT agent AMI, you could use my one in eu-west-1 (
ami-028f6c4206edbebbd) to test with and skip ahead to "Configure the WebPageTest server to use our AMI".
1) The Setup repo location
There is an EC2 install script in the wptagent-install repo which does a lot of prep, so let’s start there.
Fork or clone WPO-Foundation/wptagent-install as we’ll be referring to the edited version later on.
Notice the wptagent-install/ec2_ubuntu.sh script references another WPO-Foundation repo and then executes ubuntu_install.sh from that repo:
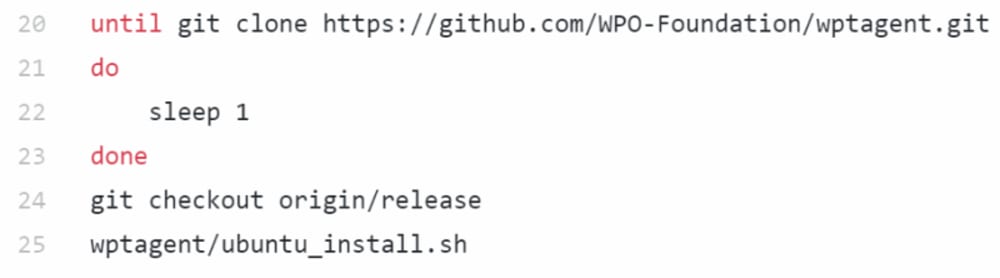
It is in this referenced repo (wptagent) that we will make the significant changes; fork or clone WPO-Foundation/wptagent so that you have your own hosted git repo for this, then change your wptagent-install/ec2_ubuntu.sh script to reference the new forked repo instead of the WPO-Foundation origin repo; e.g:
Change this line:
until git clone https://github.com/WPO-Foundation/wptagent.gitTo something like this (swapping "rposbo" for your own forked repo):
until git clone https://github.com/rposbo/wptagent.gitDoing this will mean that the subsequent lines will execute ubuntu_install.sh from your version of the wptagent repo instead of the WPO-Foundation one.
Save and push that change. We now have our own version of the ec2_ubuntu.sh WPT Agent bootstrap script that will call our own wptagent.git repo, so let’s make the remaining changes there.
2) Lighthouse installation
Now move over to your your wptagent repo: we can see that the ubuntu_install.sh file is responsible for installing lighthouse locally (around line 20; search for "lighthouse"):

In your fork of the wptagent repo change this to also install the greenhouse plugin by adding "lighthouse-plugin-greenhouse" to the end of the npm install command:
until sudo npm install -g lighthouse lighthouse-plugin-greenhouse3) Lighthouse execution
Again in the wptagent repo, if we look in internal/devtools_browser.py we can see the parameters passed to lighthouse when running a test (around line 490):
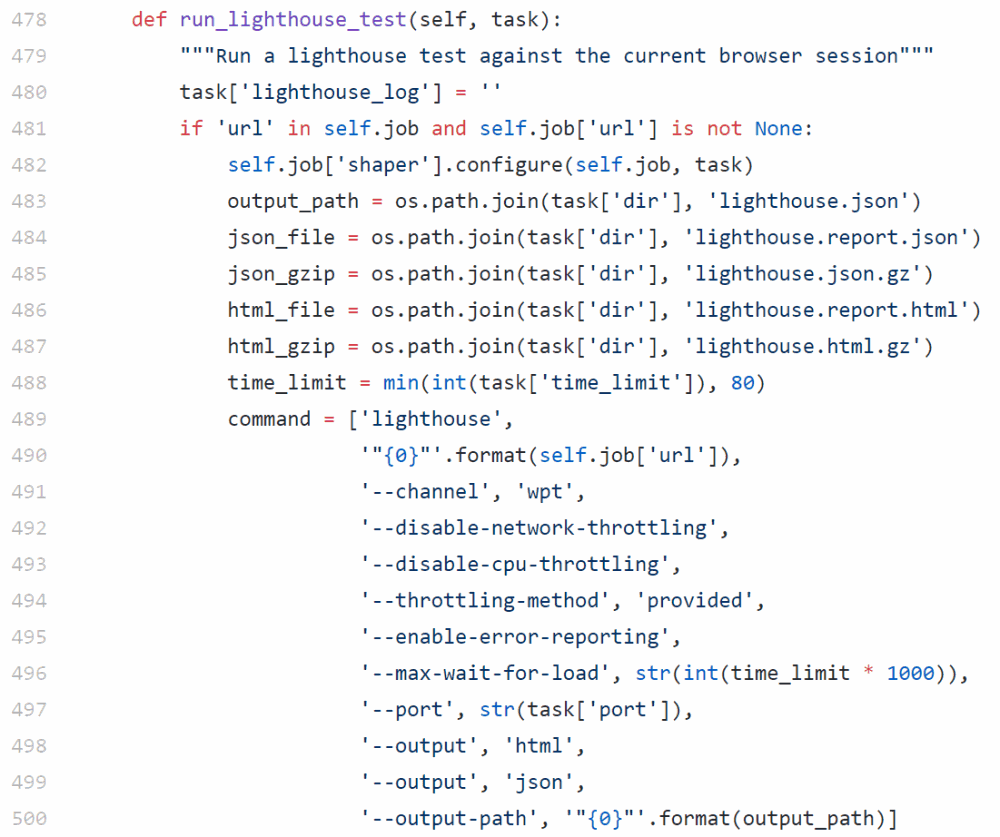
In your fork of wptagent change this section of internal/devtools_browser.py to pass in the extra plugin info by adding the line '--plugins','lighthouse-plugin-greenhouse' as below:
command = ['lighthouse',
    '"{0}"'.format(self.job['url']),
    '--channel', 'wpt',
    '--disable-network-throttling',
    '--disable-cpu-throttling',
    '--throttling-method', 'provided',
    '--enable-error-reporting',
    '--max-wait-for-load', str(int(time_limit * 1000)),
    '--port', str(task['port']),
    # Added line:
    '--plugins','lighthouse-plugin-greenhouse',
    '--output', 'html',
    '--output', 'json',
    '--output-path', '"{0}"'.format(output_path)]
That’s the completed code changes:
wptagent-installbootstrap repo changed with an updatedec2_ubuntu.shscriptwptagentrepo updated with two lighthouse changes; plugin installation inubuntu_install.shand lighthouse execution indevtools_browser.py
Be sure to save and push your changes to your forked wptagent and wptagent-install repos.
Checkpoint 1
- You should now have two repos:
wptagent-installandwptagent. - Your
wptagent-install‘sec2_ubuntu.shscript should reference yourwptagent.gitrepo. - Your
wptagentrepo should now install and execute thelighthouse-plugin-greenhouselighthouse plugin.
Building your own WebPageTest agent – Phase 2: Infrastructure
Now that the code changes are complete, we need to use them to replace the default WPT test agent with our own version. To do this we need to:
- Create a custom WPT agent using this new code,
- Create an AMI from our custom WPT agent,
- Configure the WebPageTest server to use our AMI
1) Create a custom WPT agent
The installation instructions for the WPO-Foundation/wptagent-install repo are very simple and will mention the latest supported version of Ubuntu:
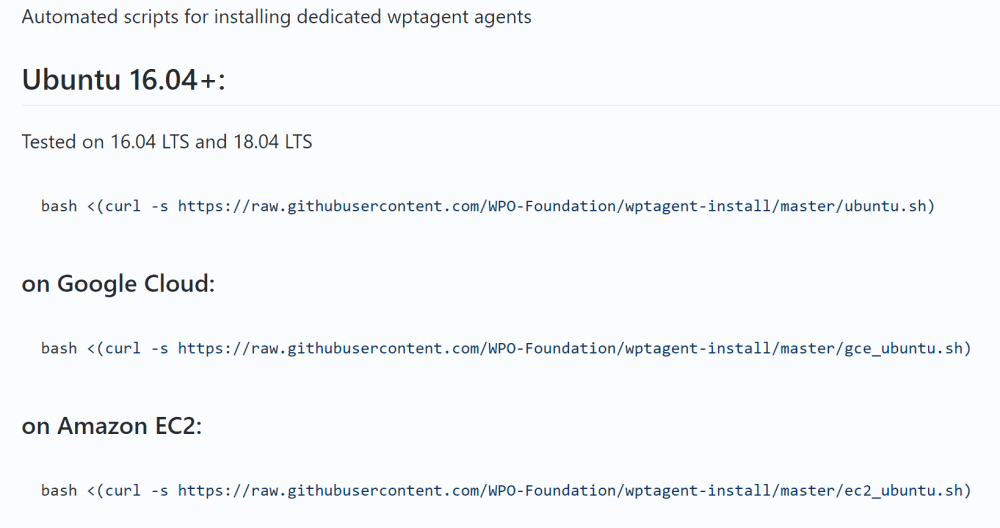
Create a new EC2 instance using the latest Ubuntu instance that’s supported by the WPO-Foundation/wptagent-install repo.

Let’s change the Amazon EC2 version of the command to use our own repo instead (and in doing so, change the repo it subsequently uses for installation). Log in to your fresh Ubuntu EC2 instance and run your equivalent setup command, for example:
# Installing the updated version
# Change "rposbo" to match your own repo

bash <(curl -s https://raw.githubusercontent.com/rposbo/wptagent-install/master/ec2_ubuntu.sh)
This can take a while, so I’d suggest using
screento have it run in the background in case you lose connectivity.
Once this completes (it can take a few minutes and will restart the EC2 instance near the end), we can change the instance’s user data to connect to our private WebPageTest instance and check it works. Exciting!
Don’t have a private WebPageTest instance? I can help you out with that!
Stop the new WPT agent instance and change the User Data to something like this:
wpt_location=eu-west-1-linux
wpt_key=locationKey
wpt_server=wpt.mysite.com
Where:
- wpt_location is a valid existing entry in the
ec2_locations.inifile, such as "eu-west-1-linux" or "us-east-1-linux" - wpt_key is either the value you set for the global "location_key" in your WPT server’s
settings.inifile, or the value for "key" in yourec2_locations.inifile for the referenced location – this is not the API key! You can log in to your WPT server and check the value set at the end ofsettings.inito get the default value - wpt_server is your private instance’s address, e.g. "wpt.my-site.com"
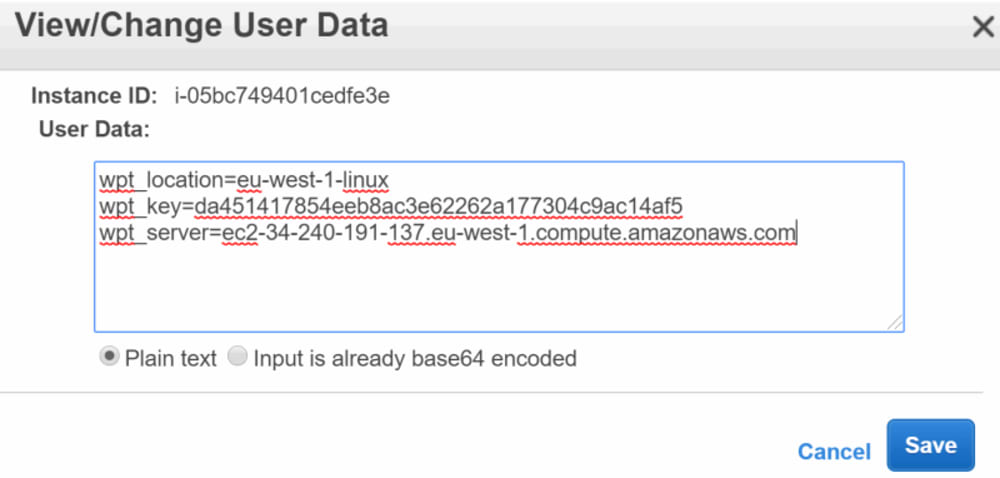
You only need to set these values to test that the WPT agent works; once you have an AMI and have configured your WPT server to use this AMI, then the user data will be set for you for each instance that is created.
Start the agent back up and be patient… pop over to your private instance’s "tester listing" page (i.e., your private instance’s version of this) and wait for it to appear under "Idle Testers".
If it’s not appearing after ten minutes, there are some debugging steps you can take mentioned at the end of this article.

If all goes well then you should have a new Idle Tester appearing. Kick off a test for that location, ensuring you’ve requested lighthouse test results, and you should see an extra audit and score appearing!

Debugging
-
Have you assigned the correct location key in your user data? The value in user data and the value in your
settings.ini‘s "location_key" value must be the same. -
Is the new agent even attempting to connect? Log in to your WPT server and check the access log using
tail -f /var/log/nginx/access.log | grep getwork -
Did the wptagent install work and did it complete? If you’re not sure you can easily terminate that instance and create a new one.
-
Did the agent connect, but the test fail? Try terminating and recreating the agent, and check that you’re using a
c4.largeinstance size.
2) Create an AMI
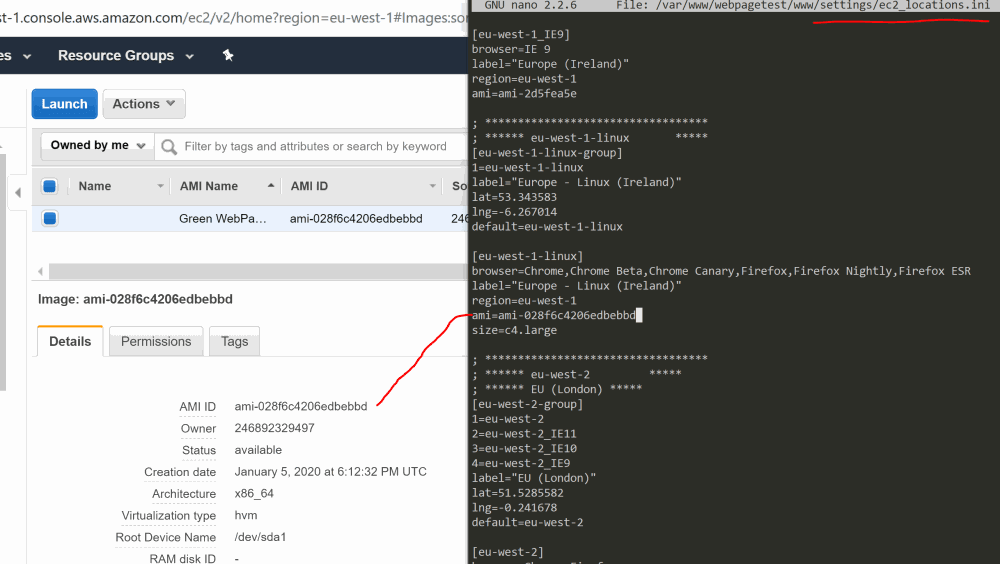
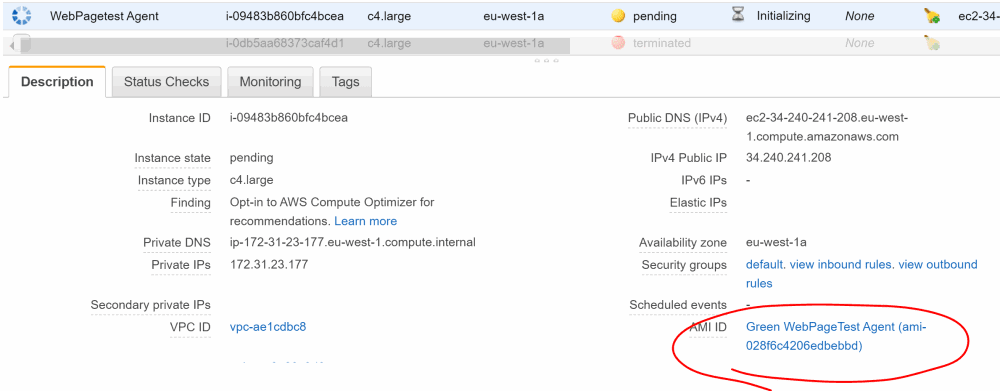
If you don’t want to go through the hassle of creating your own WPT agent AMI, you could use my one in eu-west-1 (
ami-028f6c4206edbebbd) to test with, and skip ahead to "Configure the WebPageTest server to use our AMI".
Now that we have a working custom WPT test agent, let’s make it the new standard autoscaling test agent, replacing the default one. To do this we need to create an AMI from our working instance.
This is relatively easy – just a case of selecting "Create Image" for that EC2 instance and following the steps until you end up with a private AMI with its own AMI ID.
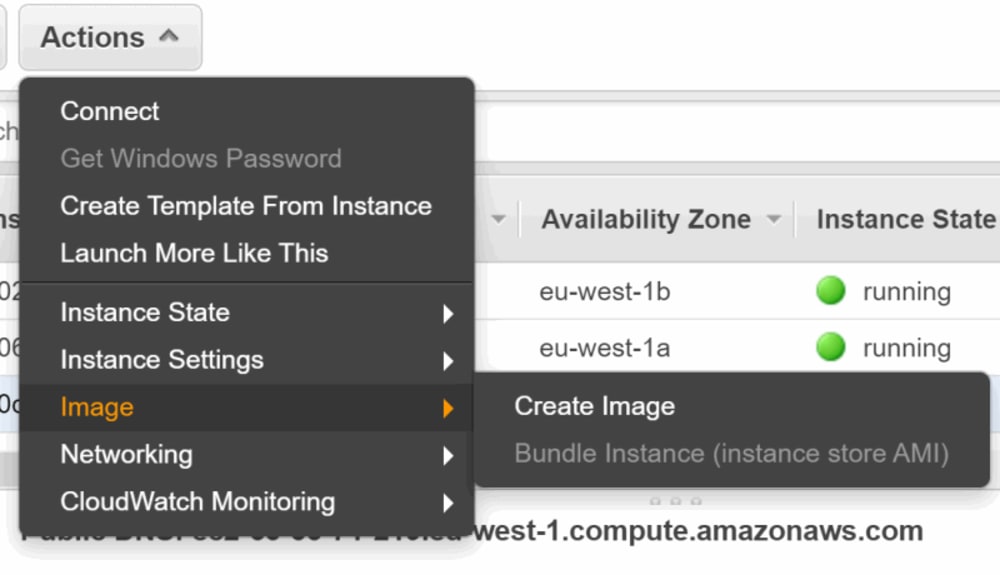
Select your WPT agent instance, then click Actions > Image > Create image:
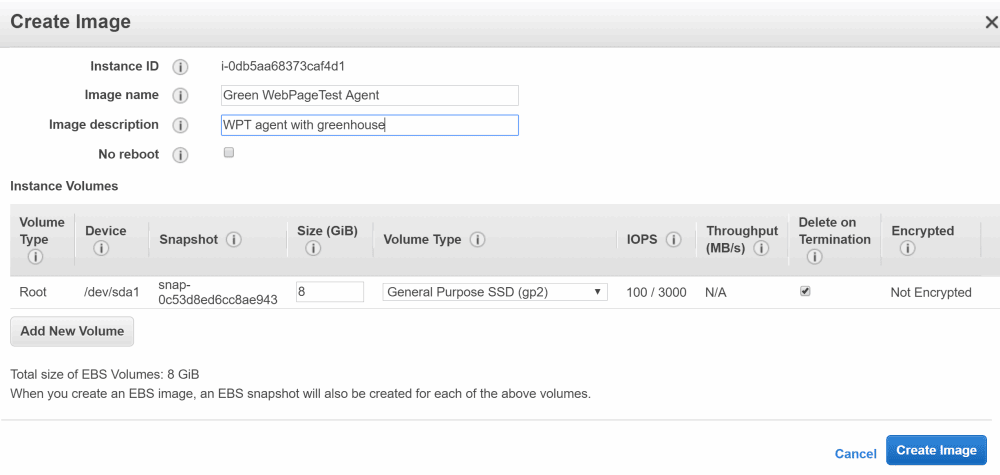
Fill in the details for your new AMI:
Patently wait for the AMI to be created!
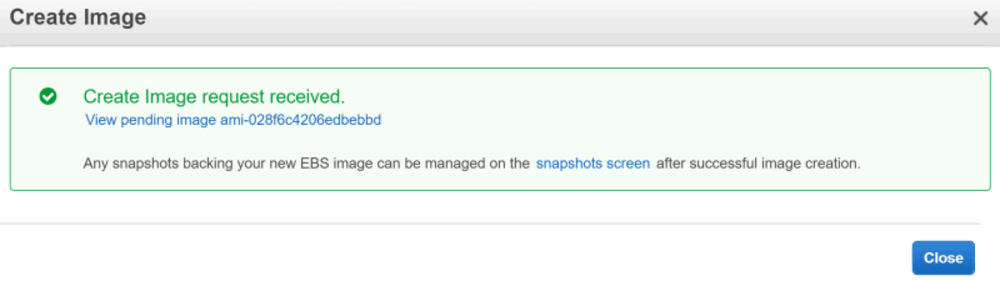
All done! AMI is now created in this region.
You can clone this to any other AWS regions using the "Copy AMI" menu option if you like.
3) Configure the WebPageTest server to use our AMI
Open up your private WebPageTest instance’s ec2_locations.ini and change the "ami" value for the region where you’ve created your AMI.
For example: if you created your AMI in eu-east-1, then find the eu-east-1-linux section of your settings/ec2_locations.ini file and change the value there for ami to your new AMI ID:
Make sure to at least "Stop" and ideally "Terminate" your initial custom WPT agent, waiting for it to dissappear from "Idle Testers" before continuing, else WPT gets confused and won’t spin up a new autoscaled instance from your AMI
Checkpoint 2
You should now have:
- An AMI for your custom WPT agent
- Updated WPT configuration to use this new AMI
- No WPT agents running in the region where you created the new AMI
Trying it out
Let’s kick off a test for the region where you created your AMI (make sure it is configured to run a lighthouse test); you should see a new EC2 instance appear reasonably quickly using your new AMI, though it can take some time to connect to your WPT instance.
Notice that when it is created it will be using your new AMI:
Once it connects to your WPT instance you should find your test gets picked up and processed, giving you an extended lighthouse audit once again!
Summary
You’ve now replaced the default autoscaling WPT agent for a single region with a custom one that runs an extra lighthouse audit, letting you know the score for Sustainability (based on hosts using renewable energy sources) for the tested site. Neat, huh?
Want to replace the default WPT agents for all AWS regions? You can clone your new AMI to any other AWS regions, replacing the default agent AMIs in each one you need to; just select your AMI and go to "Actions" > "Copy AMI".
Be sure to update your
ec2_locations.inifor each region!
If you want to have a custom test agent in AWS China, then you can just spin up an Ubuntu machine and run your customised wptagent-install/ec2_ubuntu.sh script as before to create a completely new instance – and optionally create a new AMI – there (assuming you have an AWS China account)!
I hope you found this useful; please have a go and let me know how you get on. If you don’t want to go through the hassle of making the code changes, you could reference my own forks instead, over at rposbo/wptagent-install (which references rposbo/wptagent). Feel free to help improve this repo, perhaps with an ini to list lighthouse plugins to install?
Let me know how you get on!
Shortcut
If you just want to skip to the end and already have your own private WebPageTest setup, you can log in to your WPT server and change the "ami" values in your
settings/settings.inito the ones below, which I’ve created for this article (but I wouldn’t trust me, so why should you?!):
- eu-west-1-linux: ami-028f6c4206edbebbd
- us-east-1-linux: ami-0cb3b9249246b7ab0
- us-west-1-linux: ami-03ff60d21467b07ec