I like tech books. I like tech ebooks. I especially like loads of them, DRM free.
Maybe you do too? Luckily, O’Reilly have a kickass Cyber Monday deal for just a few more hours! 50% off ebooks & videos, DRM free.
GO GO GO!!


I like tech books. I like tech ebooks. I especially like loads of them, DRM free.
Maybe you do too? Luckily, O’Reilly have a kickass Cyber Monday deal for just a few more hours! 50% off ebooks & videos, DRM free.
GO GO GO!!
The 3 day conference of web performance and operations & culture wrapped up recently, and having had the honour of presenting a session with my partner in crime Dean Hume called Getting The LEAST Out Of Your Images, and wandering around with the green underscored “Speaker” lanyard, here’s a brief summary of the event and some of my personal highlights.
First up, here are all of the keynote videos over on youtube; there were some really great keynotes including several from various sections of the BBC; some highlights for me were Addy Osmani’s UnCSS demo, Ilya Grigorik’s Big Query lightning demo, and the fantastic Code Club session from John Wards.
There were a large number of sessions across three streams (web perf, mobile, and devops) covering all manner of topics from extreme anomaly detection in a vast torrent of data, through to optimising animation within a browser.
Some of the stand out sessions for me were:
Jon Cowie gave a brain melting 90 minute session taking us through how Etsy make sense of all of their monitoring data; given that they graph everything possible, this is no easy task.
Tammy Everts not only gives us an insight into the poor aeroplane connectivity where she lives, but also how people react emotionally to a poor performing website.
Unfortunately this session clashed with the Etsy metrics one, but from what I heard it sounds like Addy Osmani had one of the best sessions at the whole conference.
Another brain-melt session; Ilya gave an incredible insight into the complexities of fine tuning performance when taking into account what HTTP over TCP (and also over 3G) actually does.
All of slide decks are here, all of the keynotes are here, and there’s even a free online version of Ilya Grigorik’s High Performance Browser Networking book.
I probably enjoyed the 90 minute tutorial session on Wednesday more than the rest of the conference, but the Thurs and Fri were really jam packed with excellent sessions and impressive keynotes.
I loved speaking there and will certainly be pitching for more such conferences next year!
Finally managed to complete a run through of our session within the 40 minute time limit! Nearly..
getting the least out of your images

Can’t wait for tomorrow!
An absolutely brain melting session from Ilya Grigorik , talking about the intricacies of tcp, http (0.9-1.1-2.0), the speed of light, how the internet instructure works, how mobile network browsing works, how http 1.1 doesn’t support the current use cases, and most fascinating for me: what mobile browsers actually do under the hood.
Amazing how an analytics beacon on a webpage or app could cause your entire battery to be zapped in a matter of hours.
It’s going to take me a few days to decompress this information in my fuzzy brain, so why not check the slides yourself here: http://bit.ly/hpbn-talk
Yoav Weiss did a great session on responsive images and techniques; this scared me a little as he’s covering a lot of content that could contradict the talk I’m doing later in the week!

He’s mentioned some great pertinent points that I’ll reference back to.
Other things he talked about:
LQIP, which sounds like a reintroduction of the ancient lowsrc attribute.
He’s really having a pop at Mobify and their image loading hack script, which he calls Bat-Shit-Loco-Insane ™. Nice. Explaining how it works feels like the whole room has just facepalmed.
He also talks about compressive images. Luckily nothing that completely ruins my stuff.. whew. I’ll just have to update my notes a little bit.
Each session I’m going to gives me ideas on changes I should make to our Friday session!
First session over, and my brain is already straining from Jon Cowie’s talk on how Etsy manage to make sense of a quarter of a million metric to understand anomalies in almost real time.
I also managed to have a full on geek moment when I rocked up to the speaker lounge and parked myself on the same table as Steve Souders and Yoav Weiss whilst they discussed CSS render times and blocking.
Plus I’m so dammed happy to be wearing the green emblazoned “speaker” lanyard!


This week is an amazing one for web performance & operations and culture professionals; Monday & Tuesday is Devopsdays and Weds to Fri is Velocity Conference EU. If you’re concerned with web performance and the devops process, tooling, and culture (and if not, why the heck not?!) then get along (or get your company to get you a ticket) to one or even both events!
This coming Friday 13th November I have the pleasure of co-presenting a session called Getting The LEAST Out Of Your Images with my cohort, Dean Hume at this years Velocity Conference EU!
Velocity Conference is three days of presentations, events, and discussions along Web Performance and Operation & Culture. It’s been going for several years already and sees such big names in the web perf field as John Allspaw and Steve Souders, Ilya Grigorik, Yoav Weiss, and Paul Lewis, as well as well known faces from the Ops world.
I’ve already chosen most of the sessions I’ll be attending and I’m really looking forwards to it.
If you’re attending and aren’t sure where to head on Friday afternoon, I recommend popping into the Palace Suite at 4.15pm to see some slick slides and almost as slick presenters (*ahem*) in our session:

Come say hi if you spot me! Let me know what concerns you have with image optimisation on your (or your company’s) site (and buy me an espresso :P) and we’ll have a chat.
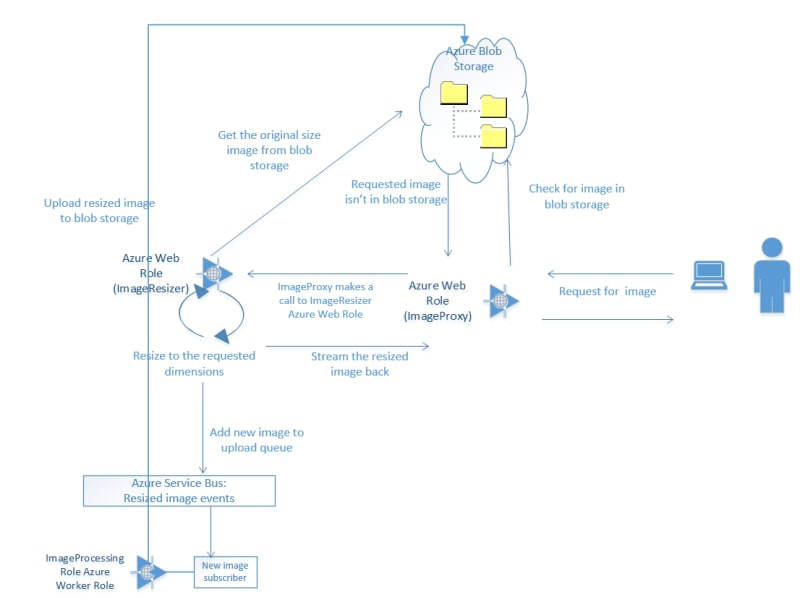
The previous couple of articles configured an image resizing Azure Web Role, plopped those resized images on an Azure Service Bus, picked them up with a Worker Role and saved them into Blob Storage.
This one will click in the last missing piece; the proxy at the front to initially attempt to get the pregenerated image from blob storage and failover to requesting a dynamically resized image.
Add a new web role to your cloud project – I’ve called mine “ImagesProxy” – and make it an empty MVC4 Web API project. This is the easiest of the projects, so you can just crack right on and create a new controller – I called mine “Image” (not the best name, but it’ll do).
This whole project will consist of one controller with one action – Retrieve – which does three things;
Your main method/action should look something like this:
[csharp][HttpGet]
public HttpResponseMessage Retrieve(int height, int width, string source)
{
try
{
var resizedFilename = BuildResizedFilenameFromParams(height, width, source);
var imageBytes = GetFromCdn("resized", resizedFilename);
return BuildImageResponse(imageBytes, "CDN", false);
}
catch (StorageException)
{
try
{
var imageBytes = RequestResizedImage(height, width, source);
return BuildImageResponse(imageBytes, "Resizer", false);
}
catch (WebException)
{
var imageBytes = GetFromCdn("origin", "404.jpg");
return BuildImageResponse(imageBytes, "CDN-Error", true);
}
}
}
[/csharp]
Feel free to alt-enter and clean up the red squiggles by creating stubs and referencing the necessary assemblies.
You should be able to see the three sections mentioned above within the nested try-catch blocks.
attempt to retrieve the resized image directly from blob storage
[csharp]var resizedFilename = BuildResizedFilenameFromParams(height, width, source);
var imageBytes = GetFromCdn("resized", resizedFilename);
return BuildImageResponse(imageBytes, "CDN", false);
[/csharp]
if that fails, go and have it dynamically resized
[csharp]var imageBytes = RequestResizedImage(height, width, source);
return BuildImageResponse(imageBytes, "Resizer", false)
[/csharp]
if that fails, send a 404 image and the correct http header
[csharp]var imageBytes = GetFromCdn("origin", "404.jpg");
return BuildImageResponse(imageBytes, "CDN-Error", true);
[/csharp]
So let’s build up those stubs.
Just a little duplication of code to get the common name of the resized image (yes, yes, this logic should have been abstracted out into a common library for all projects to reference, I know, I know..)
[csharp]private static string BuildResizedFilenameFromParams(int height, int width, string source)
{
return string.Format("{0}_{1}-{2}", height, width, source.Replace("/", string.Empty));
}
[/csharp]
We’ve seen this one before too; just connecting into blob storage (within these projects blob storage is synonymous with CDN) to pull out the pregenerated/pre-reseized image:
[csharp]private static byte[] GetFromCdn(string path, string filename)
{
var connectionString = CloudConfigurationManager.GetSetting("Microsoft.Storage.ConnectionString");
var account = CloudStorageAccount.Parse(connectionString);
var cloudBlobClient = account.CreateCloudBlobClient();
var cloudBlobContainer = cloudBlobClient.GetContainerReference(path);
var blob = cloudBlobContainer.GetBlockBlobReference(filename);
var m = new MemoryStream();
blob.DownloadToStream(m);
return m.ToArray();
}
[/csharp]
Yes, yes, I know – more duplication.. almost. The method to create an HTTP response message from before, but this time with extras params to set a header saying where the image came from, and allow to set the HTTP status code correctly. We’re just taking the image bytes and putting them in the message content, whilst setting the headers and status code appropriately.
[csharp]private static HttpResponseMessage BuildImageResponse(byte[] imageBytes, string whereFrom, bool error)
{
var httpResponseMessage = new HttpResponseMessage { Content = new ByteArrayContent(imageBytes) };
httpResponseMessage.Content.Headers.ContentType = new MediaTypeHeaderValue("image/jpeg");
httpResponseMessage.Content.Headers.Add("WhereFrom", whereFrom);
httpResponseMessage.StatusCode = error ? HttpStatusCode.NotFound : HttpStatusCode.OK;
return httpResponseMessage;
}
[/csharp]
Build up a request to our pre-existing image resizing service via a cloud config setting and the necessary dimensions and filename, and return the response:
[csharp]private static byte[] RequestResizedImage(int height, int width, string source)
{
byte[] imageBytes;
using (var wc = new WebClient())
{
imageBytes = wc.DownloadData(
string.Format("{0}?height={1}&width={2}&source={3}",
CloudConfigurationManager.GetSetting("Resizer_Endpoint"),
height, width, source));
}
return imageBytes;
}
[/csharp]
And that’s all there is to it! A couple of other changes to make within your project in order to allow pretty URLs:
Create the necessary route:
[csharp]config.Routes.MapHttpRoute(
name: "Retrieve",
routeTemplate: "{height}/{width}/{source}",
defaults: new { controller = "Image", action = "Retrieve" }
);
[/csharp]
Be a moron:
[xml] <system.webServer>
<modules runAllManagedModulesForAllRequests="true" />
</system.webServer>
[/xml]
That last one is dangerous; I’m using it here as a quick hack to ensure that URLs ending with known file extensions (e.g., /600/200/image1.jpg) are still processed by the MVC app instead of assuming they’re static files on the filesystem. However, this setting is not advised since it means that every request will be picked up by your .Net app; don’t use it in regular web apps which also host images, js, css, etc!
If you don’t use this setting then you’ll go crazy trying to debug your routes, wondering why nothing is being hit even after you install Glimpse..
Hit your proxy with a request for an image that exists within your blob storage “origin” folder; this will raise a storage exception when attempting to retrieve from blob storage and drop into the resizer code chunk e.g.:

Notice the new HTTP header that tells us the request was fulfilled via the Resizer service, and we got an HTTP 200 status code. The resizer web role will have also added a message to the service bus awaiting pick up.
By the time you refresh that page (if you’re not too trigger happy) the uploader worker role should have picked up the message from the service bus and saved the image data into blob storage, such that subsequent requests should end up with a response similar to:

Notice the HTTP header tells us the request was fulfilled straight from blob storage (CDN), and the request was successful (HTTP 200 response code).
If we request an image that doesn’t exist within the “origin” folder, then execution drops into the final code chunk where we return a default image and set an error status code:

This is the last bit of the original plan:
Please grab the source from github, add in your own settings to the cloud config files, and have a go. It’s pretty cool being able to just upload one image and have other dimension images autogenerated upon demand!
Last article concluded with us creating a web role that will retrieve an image from blob storage, resize it, raise an event, and stream the result back.
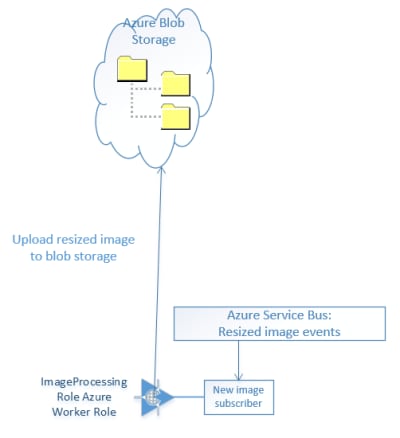
This article is about the worker role to handle those raised events.
Simply enough, all we’ll be doing is creating a worker role, hooking into the same azure service bus queue, picking up each message, pulling out the relevant data within, and uploading that to blob storage.
A reminder of the overall process:
The section of that which the worker role is responsible for is as below:
Add a new worker role to the Cloud project within the solution from last time (or a new one if you like). This one consists of four little methods; Run, OnStart, and OnEnd, where Run will call an UploadBlob method.
This method will pick up any messages appearing on the queue, deserialize the contents of the message to a known structure, and pass them to an uploading method.
Kick off by pasting over the Run method with this one, including the definitions at the top – set the QueueName to the same queue you configured for the resize notification from the last post:
[csharp] const string QueueName = "azureimages";
QueueClient _client;
readonly ManualResetEvent _completedEvent = new ManualResetEvent(false);
public override void Run()
{
_client.OnMessage(receivedMessage =>
{
try
{
// Process the message
var receivedImage = receivedMessage.GetBody<ImageData>();
UploadBlob("resized", receivedImage);
}
catch (Exception e)
{
Trace.WriteLine("Exception:" + e.Message);
}
}, new OnMessageOptions
{
AutoComplete = true,
MaxConcurrentCalls = 1
});
_completedEvent.WaitOne();
}
[/csharp]
Yes, I’m not doing anything with exceptions; that’s an exercise for the reader.. ahem… (Me? Lazy? Never..happypathhappypathhappypath)
Naturally you’ll get a few squiggles and highlights to fix; Install-Package Microsoft.ServiceBus.NamespaceManager will help with some, as will creating the stub UploadBlob.
Now, to tidy up the reference to ImageData you could do a few things:
Extract ImageData from the previous project into a common referenced project for them both to share.
I can live with my own conscience, so am just whacking in a reference to the previous project. Don’t hate me.
[csharp] public override bool OnStart()
{
// Set the maximum number of concurrent connections
ServicePointManager.DefaultConnectionLimit = 2;
// Create the queue if it does not exist already
var connectionString = CloudConfigurationManager.GetSetting("Microsoft.ServiceBus.ConnectionString");
var namespaceManager = NamespaceManager.CreateFromConnectionString(connectionString);
if (!namespaceManager.QueueExists(QueueName))
{
namespaceManager.CreateQueue(QueueName);
}
// Initialize the connection to Service Bus Queue
_client = QueueClient.CreateFromConnectionString(connectionString, QueueName);
return base.OnStart();
}
public override void OnStop()
{
// Close the connection to Service Bus Queue
_client.Close();
_completedEvent.Set();
base.OnStop();
}
[/csharp]
OnStart gets a connection to the service bus, creates the named queue if necessary, and creates a queue client referencing that queue within that service bus.
OnStop kills everything off.
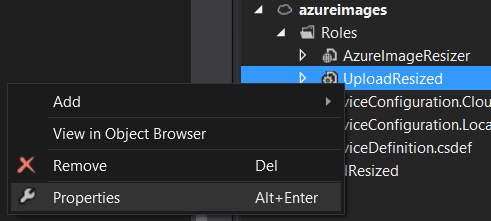
So, off you pop and add the requisite service connection string details; right click the role within the cloud project, properties:
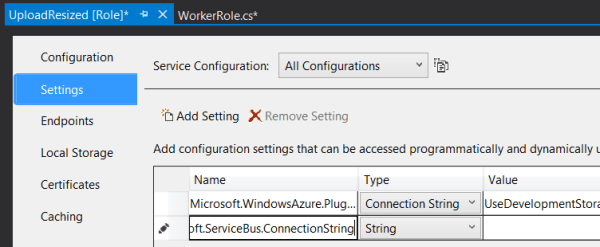
Click settings, add setting “Microsoft.ServiceBus.ConnectionString” with the value you used previously.
Lastly:
[csharp] public void UploadBlob(string path, ImageData image)
{
var connectionString = CloudConfigurationManager.GetSetting("Microsoft.Storage.ConnectionString");
var account = CloudStorageAccount.Parse(connectionString);
var cloudBlobClient = account.CreateCloudBlobClient();
var cloudBlobContainer = cloudBlobClient.GetContainerReference(path);
cloudBlobContainer.CreateIfNotExists();
var blockref = image.FormattedName ?? Guid.NewGuid().ToString();
var blob = cloudBlobContainer.GetBlockBlobReference(blockref);
if (!blob.Exists())
blob.UploadFromStream(new MemoryStream(image.Data));
}
[/csharp]
Pretty self explanatory, isn’t it? Get a reference to an area of blob storage within a container associated with an account, and stream some data to it if it doesn’t already exist (you might actually want to overwrite it so could remove that check). Bosch. Done. Handsome.
Notice we’re using the FormattedName property on ImageData to get a blob name which includes the requested dimensions; this will be used in the next article where we create the image proxy.
This means that for a request like:
[csharp]http://127.0.0.1/api/Image/Resize?height=600&width=400&source=image1.jpg
[/csharp]
The formatted name will be set to:
[csharp]600_400-image1.jpg
[/csharp]
You shouldn’t get any compile errors here but you’ll need to add in the setting for your storage account (“Microsoft.Storage.ConnectionString”).
To run that you’ll need VS to be running as admin (right click VS, run as admin):

After you’ve got it running, fire off a request within the resizing web api (if it’s not the same solution/cloud service) for something like:
[csharp]http://127.0.0.1/api/Image/Resize?height=600&width=400&source=image1.jpg
[/csharp]
Resulting in:

Then open up your Azure storage explorer to see something similar to the below within the “resized” blob container:
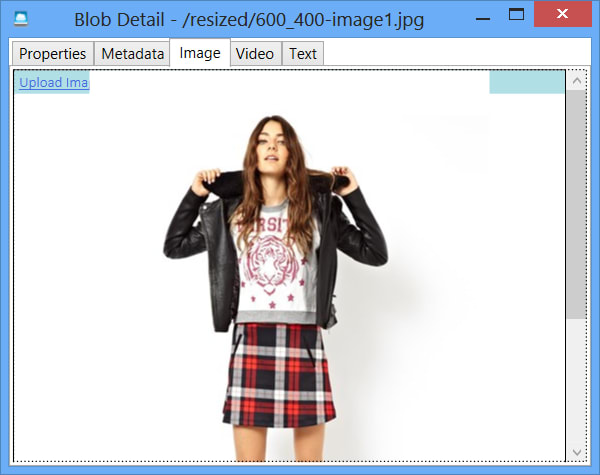
Cool, huh?
The code for this series is up on GitHub
One more web role to act as a proxy for checking blob storage first before firing off the resize request. Another easy one. Azure is easy. Everyone should be doing this. You should wait and see what else I’ll write about Azure.. it’s awesome.. and easy..!
I’m going to try to explain a proof of concept I’ve recently completed which is intended to automate the process of resizing, hosting, and serving images, taking the responsibility away from your own systems and data centre/ web host.
We’ll be using Windows Azure for all of the things;
The overall process looks a bit like this:
To start with you’ll need to:
We’re going to focus on the resizing web role next.

For this you need to set up blob storage by logging into your Azure portal and following these simple steps:


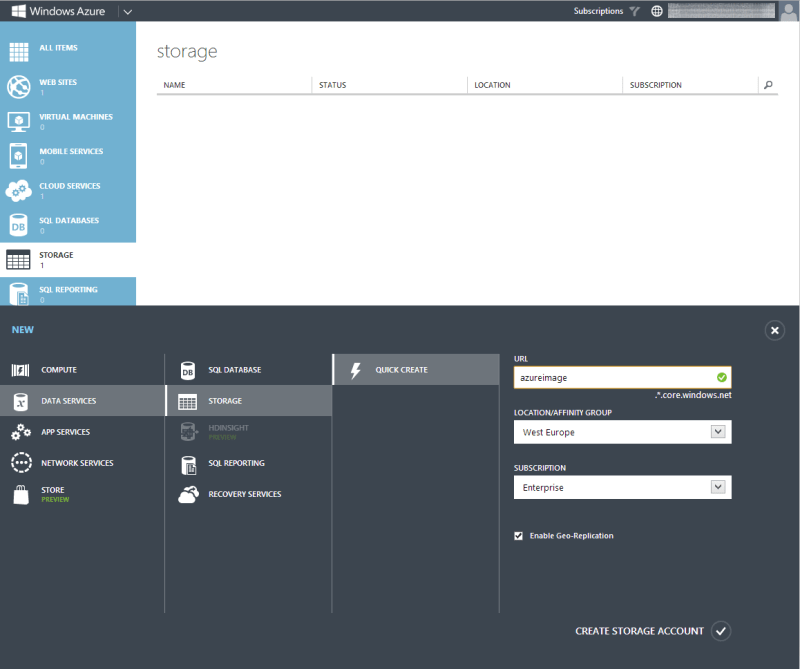

Click

and note your storage account name and one of the values in the popup:
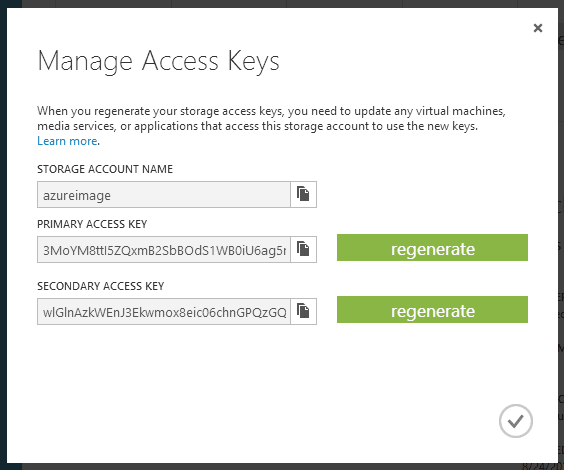
It doesn’t matter which one you use, but it means you can regenerate one key without killing a process that uses the other one. And yes, I’ve regenerated mine since I took the screenshot..
We can easily achieve this using the worker role we’re going to write and the service bus to which it subscribes to automate the process, but I’m just going to show off the nice little Azure Storage Explorer available over on CodePlex.
Go download and install it, then add a new account using the details you’ve just retrieved from your storage account
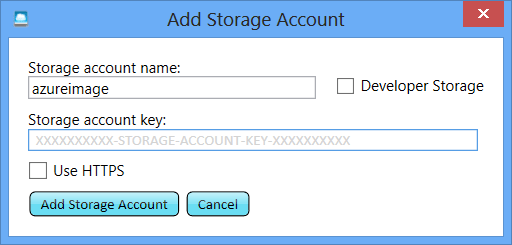
And initialise it with a couple of directories; origin and resized
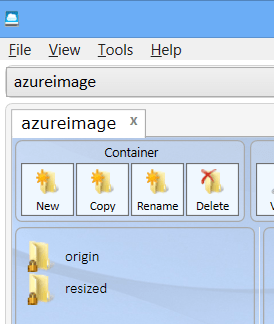
Then upload one or two base images of a reasonable size (dimension wise).
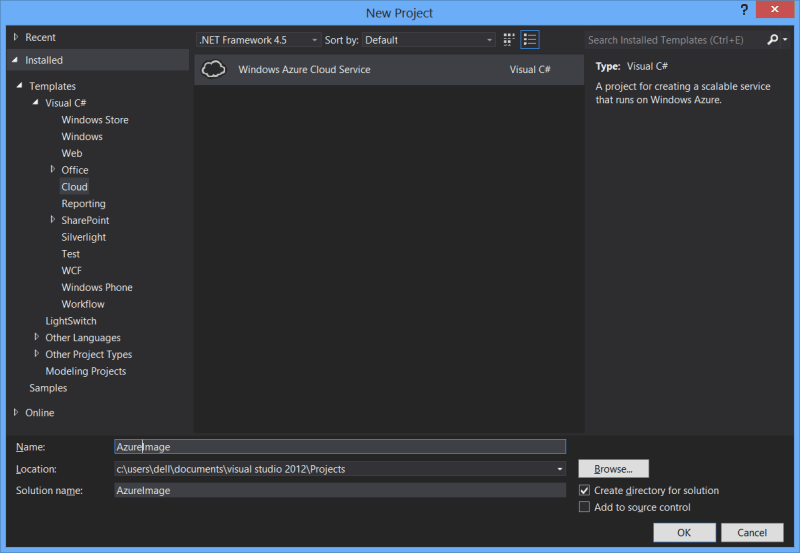
Bust open VS and start a new Cloud Services project
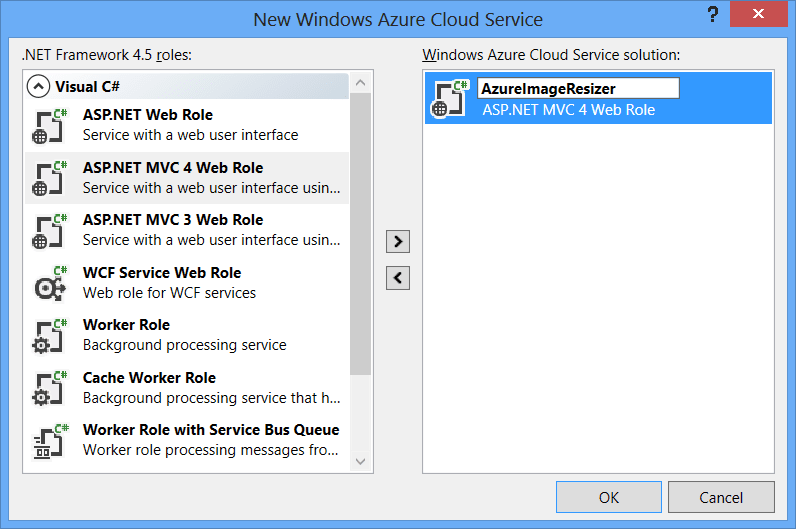
Select an MVC4 role
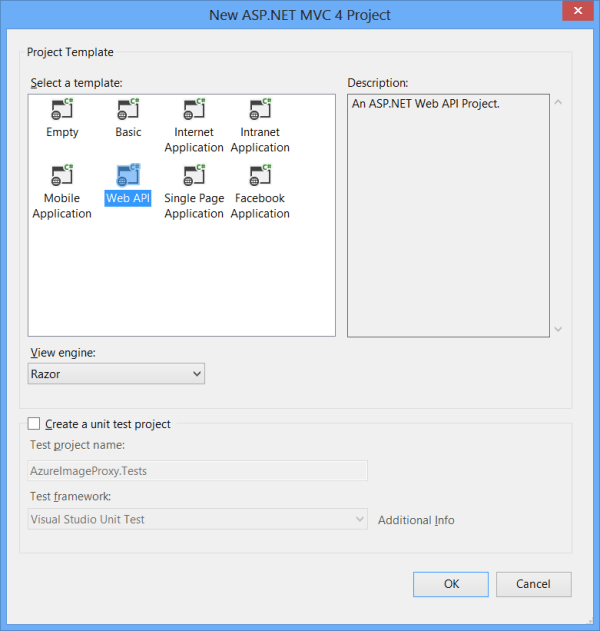
And Web API as the project type
At this point you could carry on but I prefer to take out the files and directories I don’t think I need (I may be wrong, but this is mild OCD talking..); I delete everything highlighted below:
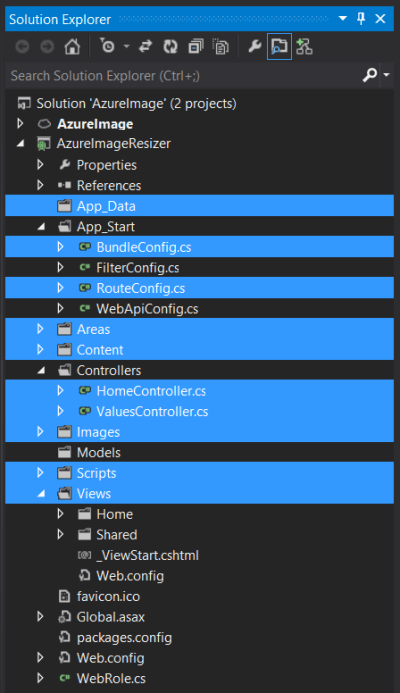
If you do this too, don’t forget to remove the references to the configs from global.asax.cs.
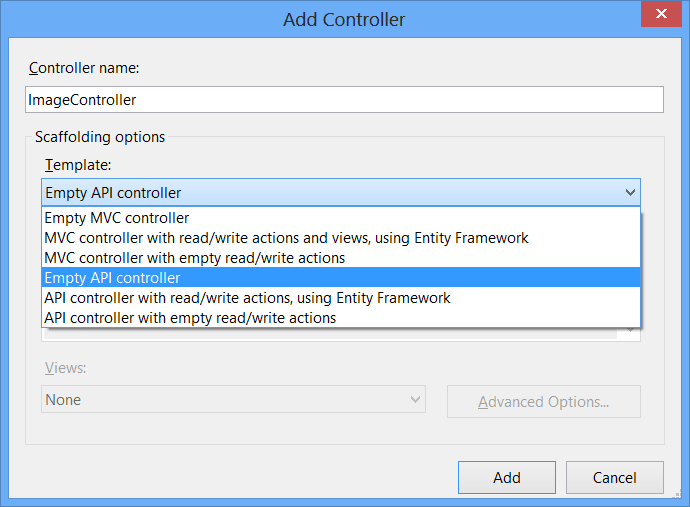
Create a new file called ImageController in your Controllers directory and use the Empty API controller template:
This is the main action that we’re going to be building up:
[csharp][HttpGet]
public HttpResponseMessage Resize(int width, int height, string source)
{
var imageBytes = GetFromCdn("origin", source);
var newImageStream = ResizeImage(imageBytes, width, height);
QueueNewImage(newImageStream, height, width, source);
return BuildImageResponse(newImageStream);
}
[/csharp]
Paste that in and then we’ll crack on with the methods it calls in the order they appear. To get rid of the red highlighting you can let VS create some stubs.
First up:
GetFromCdn
This method makes a connection to your blob storage, connects to a container (in this case “origin”), and pulls down the referenced blob (image), before returning it as a byte array. There is no error handling here, as it’s just a proof of concept!
Feel free to grab the code from github and add in these everso slightly important bits!
[csharp]private static byte[] GetFromCdn(string path, string filename)
{
var connectionString = CloudConfigurationManager.GetSetting("Microsoft.Storage.ConnectionString");
var account = CloudStorageAccount.Parse(connectionString);
var cloudBlobClient = account.CreateCloudBlobClient();
var cloudBlobContainer = cloudBlobClient.GetContainerReference(path);
var blob = cloudBlobContainer.GetBlockBlobReference(filename);
var m = new MemoryStream();
blob.DownloadToStream(m);
return m.ToArray();
}
[/csharp]
This will give you even more red highlighting and you’ll need to bring in a few new assemblies;
You’ll need to add in the setting value mentioned:
[csharp]CloudConfigurationManager.GetSetting("Microsoft.Storage.ConnectionString")
[/csharp]
These config settings aren’t held in a web.config or app.config; you need to right click the web role within your cloud project and click properties, then settings, and Add Setting. Enter the values below, referring back to the details you previously got for your Storage Account
ResizeImage
This method does the hard work; takes a byte array and image dimensions, then does the resizing using the awesome ImageResizer and spews the result back as a memorystream:
[csharp]private static MemoryStream ResizeImage(byte[] downloaded, int width, int height)
{
var inputStream = new MemoryStream(downloaded);
var memoryStream = new MemoryStream();
var settings = string.Format("width={0}&height={1}", width, height);
var i = new ImageJob(inputStream, memoryStream, new ResizeSettings(settings));
i.Build();
return memoryStream;
}
[/csharp]
In order to get rid of the red highlighting here you’ll need to nuget ImageResizer; open the VS Package Manager window and whack in:
[csharp]Install-Package ImageResizer
[/csharp]
And then bring in the missing assembly reference;
QueueNewImage
This method takes the generated image byte array and puts it on an Azure Service Bus instance. As such, we need to go and create a new Azure Service Bus within the Azure portal.

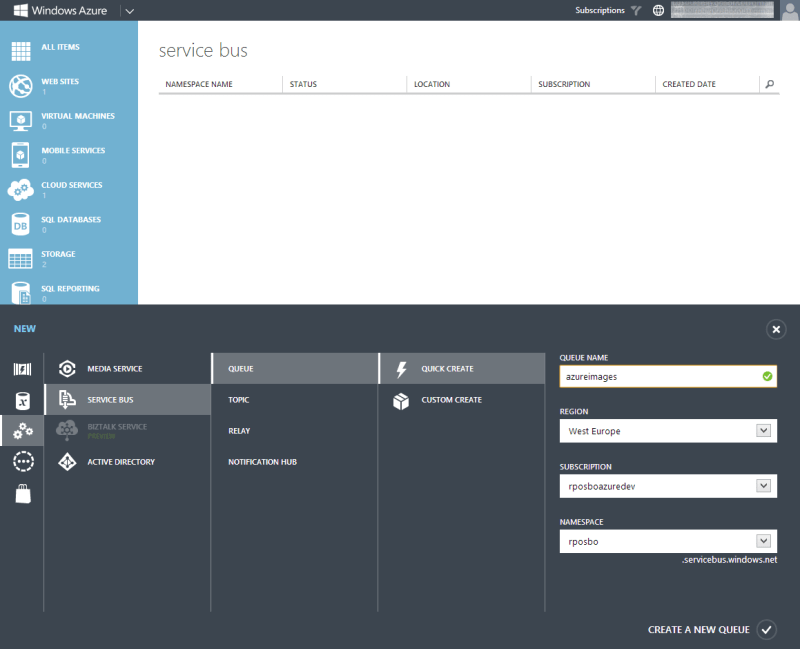

What you’ve done here is set up a namespace to which you have assigned a new queue. When using this service bus you’ll connect to the namespace within the connection string and then create a queue client connecting to a named queue in code.
At the service bus namespaces page click

and note your ACS connection string in the popup:

You’ll need to nuget the azure service bus package, so in your VS package manager run
[csharp]Install-Package WindowsAzure.ServiceBus
[/csharp]
And bring in the missing reference
Paste in the following methods:
[csharp]private static void QueueNewImage(MemoryStream memoryStream, int height, int width, string source)
{
var img = new ImageData
{
Name = source,
Data = memoryStream.ToArray(),
Height = height,
Width = width,
Timestamp = DateTime.UtcNow
};
var message = new BrokeredMessage(img);
QueueConnector.ImageQueueClient.BeginSend(message, SendComplete, img.Name);
}
private static void SendComplete(IAsyncResult ar)
{
// Log the send thing
}
[/csharp]
Now we need to define the ImageData and QueueConnector classes. Create these as new class files:
ImageData.cs
[csharp]public class ImageData
{
public string Name;
public byte[] Data;
public int Height;
public int Width;
public DateTime Timestamp;
public string FormattedName
{
get { return string.Format("{0}_{1}-{2}", Height, Width, Name.Replace("/", string.Empty)); }
}
}
[/csharp]
QueueConnector.cs
This class creates a connection to your service bus namespace using a connection string, creates a messaging client for the specified queue, and creates the queue if it doesn’t exist.
[csharp]public static class QueueConnector
{
public static QueueClient ImageQueueClient;
public const string QueueName = "azureimages";
public static void Initialize()
{
ServiceBusEnvironment.SystemConnectivity.Mode = ConnectivityMode.Http;
var connectionString = CloudConfigurationManager.GetSetting("Microsoft.ServiceBus.ConnectionString");
var namespaceManager = NamespaceManager.CreateFromConnectionString(connectionString);
if (!namespaceManager.QueueExists(QueueName))
{
namespaceManager.CreateQueue(QueueName);
}
var messagingFactory = MessagingFactory.Create(namespaceManager.Address, namespaceManager.Settings.TokenProvider);
ImageQueueClient = messagingFactory.CreateQueueClient(QueueName);
}
}
[/csharp]
To get rid of the red you’ll need to reference
As before, there now needs to be a cloud project setting for the following:
[csharp]CloudConfigurationManager.GetSetting("Microsoft.ServiceBus.ConnectionString");
[/csharp]
Right click your web role within the cloud project, and click properties, then settings, and Add Setting. Enter the values below, referring back to the details you previously got for your Service bus
In order for this initialisation to occur, you need to add a call to it in the global.asax.cs Application_Start method. Add the following line after the various route and filter registrations:
[csharp]QueueConnector.Initialize();
[/csharp]
Lastly BuildImageResponse
This method takes the image stream result, creates an Http response containing the data and the basic headers, and returns it:
[csharp]private static HttpResponseMessage BuildImageResponse(MemoryStream memoryStream)
{
var httpResponseMessage = new HttpResponseMessage {Content = new ByteArrayContent(memoryStream.ToArray())};
httpResponseMessage.Content.Headers.ContentType = new MediaTypeHeaderValue("image/jpeg");
httpResponseMessage.StatusCode = HttpStatusCode.OK;
return httpResponseMessage;
}
[/csharp]
This one requires a reference to
Hopefully you should have something you can now hit F5 in and spin up a locally hosted web role which accesses remotely (Azure) hosted storage and an Azure Service Bus.
To get the action to fire, send off a request to – for example:
http://127.0.0.1/api/Image/Resize?height=200&width=200&source=image1.jpg
You should see something like:

Change those height and width parameters and you’ll get a shiny new image back each time:


Passing in the value of 0 for either dimension parameter means it’s ignored and the aspect ratio is preserved/no padding added.
You’ll also notice that your queue is building up with messages of these lovely new images:

In the next post on this theme we’ll create a worker role to subscribe to the queue and upload the new images into blob storage.
I hope you’ve enjoyed this post; I certainly am loving working with Azure at the moment. It’s matured so much since I first tackled it several years ago.
The code for this post is available on GitHub; you’ll need to add in your own cloud settings though!
If you get the following error when hitting F5 –
[csharp]Not running in a hosted service or the Development Fabric
[/csharp]
Be sure to set the Cloud Project as the startup project in VS.