At //BUILD 2017 Microsoft announced support for Cortana Skills and connecting a Cortana Skill into a Bot Framework chatbot; given the number of chatbots out there using Microsoft Bot Framework, this is an extremely exciting move.
In this article I’ll show you how to create your first Cortana Skill from a Bot Framework chatbot and make it talk!
Cortana
If you’re not already familiar with Cortana, this is Microsoft’s “personal assistant” and is available on Windows 10 (version 1607 and above) and a couple of Windows phones (Lumia 950/950 XL), a standalone speaker – like an Amazon Echo – and a plethora of devices that can run the Cortana app, including iOS and Android and plenty of laptops.
You’re going to be seeing a lot more of this little box of tricks (“Bot” of tricks? Box of bots?.. hmm…), so you might as well get in on the act right now!
Bot Framework
I’m going to assume you have some knowledge of Microsoft’s Bot Framework for building multichannel chatbots. In case you’re not, then you should pop off now and familiarise yourself with these (but mainly just the first one):
- Create your first botframework bot in Azure!
- LUIS Natural Language Service for BotFramework
- Implementing LUIS Routing within BotFramework
Done that? Ok, great – now we can get started! I’m going to use the demo bot I created and have been using for most of my Bot Framework articles:
The Cortana channel
The first thing we’ll do is head over to the Bot Framework developer centre at dev.botframework.com. Log in, and choose the bot you want to power up with Cortana awesomeness!

Now scroll down to the list of available channels and you should find a shiny new one called Cortana:
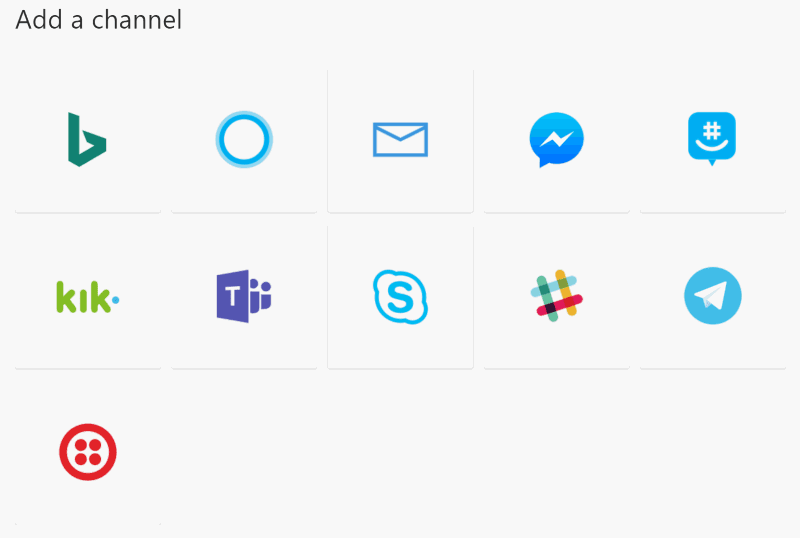
It’s the pretty blue circle, not the pretty blue envelope, pretty blue speech bubble, pretty blue square speech bubble smiley thing, or the other pretty blue things…
You’ll now be taken to the channel configuration screen; if you’ve set up a bot on many channels before, you probably know what to expect. Fortunately this is a very short setup screen, with only one section you really need to pay attention to:

This is what you’ll have to say in order to get Cortana to invoke your skill. Don’t make this something hard to say or hard to understand etc etc. I’ve gone for “demo bot”.
The rest of the form looks like this:

Notice “Request user profile data” at the end? This is kinda cool and I’ll get on to it in another article; it allows your bot to request permission to access certain information about the user, like when you do Google OAuth and see a prompt saying “this site is requesting access to: your email address”
Leave it blank for now, hit “Save” and it will appear in your list of connected channels for that bot:

Become an American!
If you’re already an American, then by now you should have achieved the bare minimum necessary to have your Bot Framework chatbot accessible through Cortana.
If, like me, you’re not so fortunate, then you need to pretend a bit. Cortana is currently limited to the en-US locale, so you may need to configure your pc to be U.S. friendly.
Tap the Windows key and type “Language” to open “Region and Language settings“:
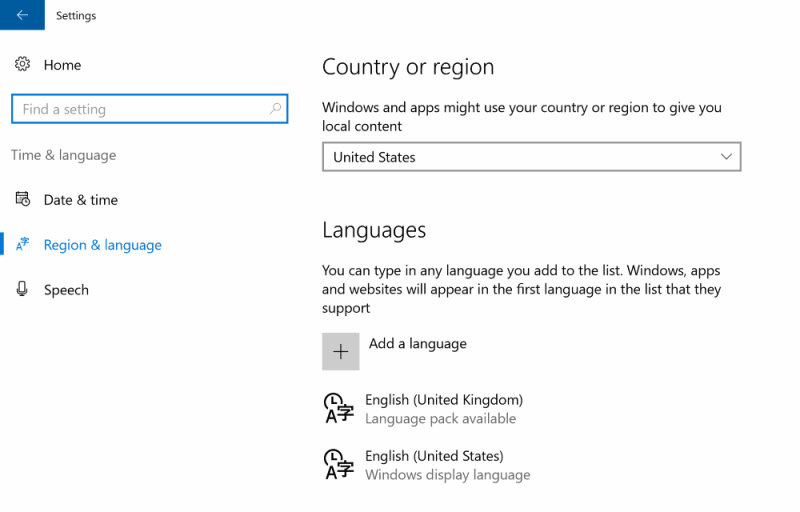
From here you’ll need to change your Region to “United States”, tap “Add a language” and search for “en-us” to add “English (United States)”.
You’ll need to restart and let your machine download the various updates and language packs necessary.
Hey Cortana!
Ok, now you should have done the bare minimum necessary to connect your bot to Cortana (at least for you).
Make sure you’re logged in to your pc using the same account that you use for your Bot Framework/Cortana dashboard configuration, otherwise your Cortana app won’t be able to find your skill.
Give it a go! In my case (because the invocation name for my bot is “demo bot”) I just say “Hey Cortana; ask demo bot hi”. Yeah, I know the structure doesn’t make sense, but Cortana seems to need you to say “ask” otherwise it thinks you’re sending a message to someone if you say “tell”.
Anyway, if it’s working you should see something like this:

Since this is the first time we’ve attempted to talk to the bot, we’re also given the permission prompt:
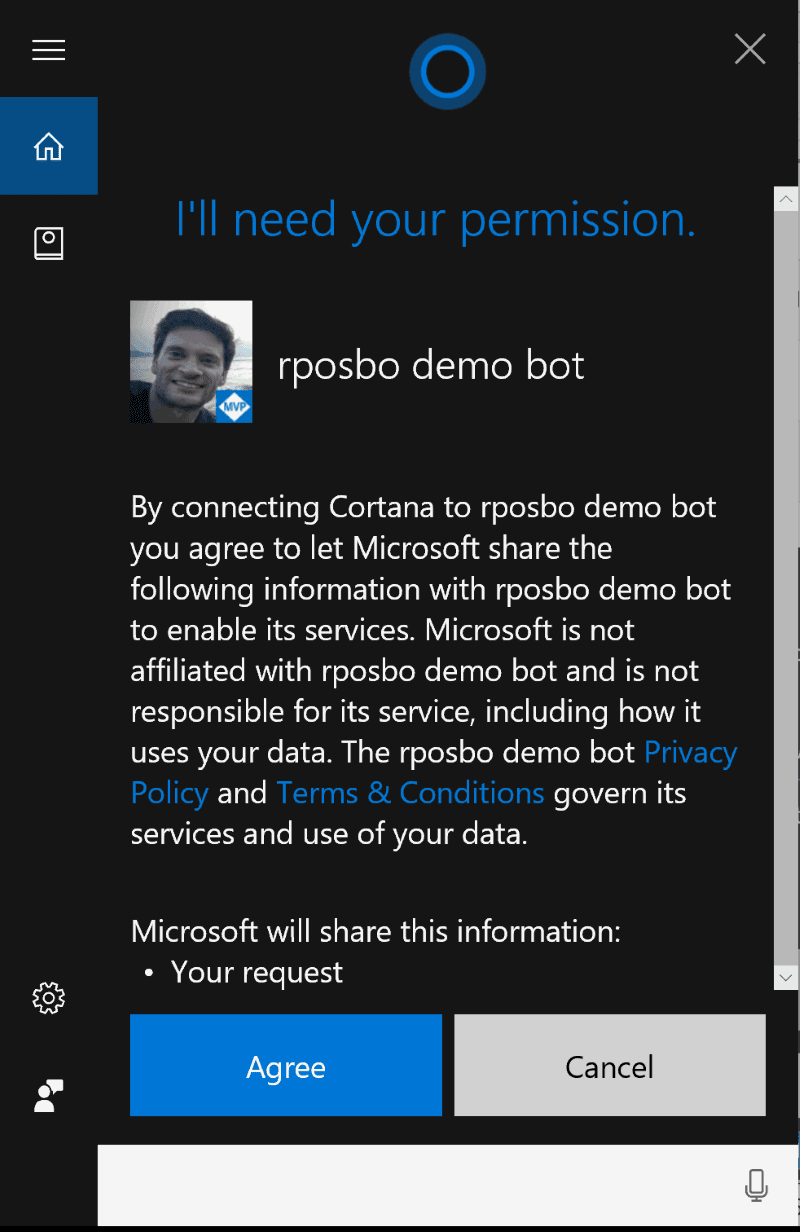
Since I didn’t request any extra information from the user, the permission is just for “your request”, i.e. “hi”. I’m ok with that, so I’ll tap “Agree”.
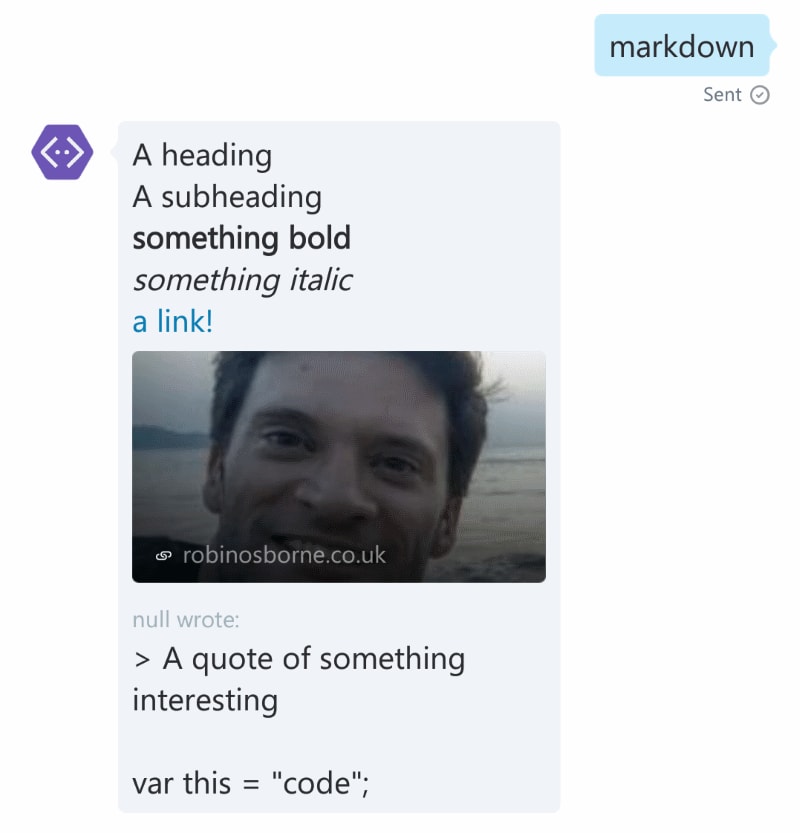
Now the request is passed to my bot, processed, and the response is sent back:

Wohoo! Now I’ll try one of the other commands my bot can handle – “markdown”:

Summary so far
Without much effort, we’ve taken an existing Bot Framework chatbot and exposed it via the Cortana channel. But it’s mute; no voice.
Before we make it talk, let’s investigate the Cortana dashboard a bit.
Cortana Dashboard
Go back to the Bot Framework dashboard and tap the “Manage in Cortana dash board” link to be taken to – surprisingly enough – the Cortana Dashboard:

Deployment Ring
We already have some interesting info here; Deployed to self and Deploy to group. Right now, the only person who can use your skill is you; more specifically, the same Microsoft sign in account that your bot belongs to. In order to use your skill with Cortana, you must be logged in to Cortana using the same account.
If you want to share this skill with someone else, you can just tap “Deploy to group”, add in their Microsoft sign in email address, and you’ll be given a URL to send them which will give them access to your skill! Cool, huh?
Here I’m sharing the skill with .. um.. me!

… Thinky thinky thinky…

Ooh! I haz access too!

Great for testing with a specific group of people.
Debug
Another point of interest is the “Debug” link; tap that and enable debug mode on the following page:

If you talk to your bot now you’ll see an extra section in the Cortana response:

This contains an awful lot of interesting info, such as the request containing whether the device has a screen:
    "entities": [
      {
        "type": "Intent",
        "name": "None",
        "entities": []
      },
      {
        "type": "DeviceInfo",
        "supportsDisplay": "true"
      }
    ]
That way, you can cater your bot response to be more audio based instead of visual, or vice versa.
What does your bot sound like?
Lastly, let’s make a couple of tiny changes to give our bot a voice. Right now you can talk to your bot, but you won’t hear anything in the response. Let’s fix that.
Open up your Bot Framework project and update to the latest version of Microsoft,Bot.Builder via Nuget:
> Update-Package Microsoft.Bot.Builder
Now wherever you bot returns a reponse you can either:
-
Use a new method
SayAsyncon thecontext:await context.SayAsync(text: "I'm text", speak: "I'm voice"); -
If you usually create a reply from the incoming message activity using
message.CreateReplythen you can explicitly set theSpeechproperty:var reply = message.CreateReply(); reply.Text = "This is text"; reply.Speak = "This is speech"; -
Or you could use this handy extension class:
public static class MessageActivityExtension
{
    public static void Say(
            this IMessageActivity activity,
            string text,
            string speech = null,
            string inputHint = InputHints.AcceptingInput)
    {
        activity.Text = text;
        activity.Speak = speech ?? text;
        activity.InputHint = inputHint;
    }
}
which allows you to do something like:
var reply =  message.CreateReply();
reply.Say("This is text", "This is speech");
I’ll return to
InputHints in a subsequent article
Go through your existing chatbot and add in a few Speech properties to the reponse, redeploy, and ask Cortana again; suddenly your bot will be able to speak! BOT EVOLUTION! Aw yeah!
Summary
In this article I’ve shown you how to connect your Bot Framework chatbot to the Cortana channel, how to set up your PC to set up Cortana and connect back to your bot, and how to give your bot a voice.
There’s still so much cool stuff to share, so stay tuned for more Cortana articles!
using your example above, how can you give the response and end the conversation? is there a method to add the end conversation to the public static class MessageActivityExtension ?
Hi Robin,
Thanks for the great article.
I am facing a strange issue, Cortana app in Android phone invoking my bot perfectly fine but the same is not working in Windows 10 laptop though I have logged in using the same Microsoft Id that I used to develop the bot and also laptop region and language set to United States and English(United States).
Please help me out.