Following along from my recent post about responsive images using pure HTML, this post is about the more server-centric option. It doesn’t answer the art direction question, but it can help reduce the amount of HTML required to implement fully responsive images.

If you are aware of responsive images and the <picture> element, you’ll know that the code required to give the browser enough choices and information in order to have it request the correct image can be somewhat verbose.
This article will cover the other side of the story, allowing the server to help with the decision of which image to show and ultimately greatly reducing the HTML required to achieve responsive images
In Chrome 46/47 Google introduced support for client hints, which allows us to shift some of this responsibility to the server; the browser can inform the server of pertinent information at the point of requesting the image, allowing the server to determine the best image to respond with.
Client Hints are HTTP headers that are optionally enabled and sent with each request when the initiating web page contains a special meta tag, informing the browser the server supports client hints:
<meta http-equiv="Accept-CH"

content="DPR, Viewport-Width, Width">
Request
When enabled, a request has extra information; if you enable your developer tools and visit a page with client hints, you’ll see something like this:
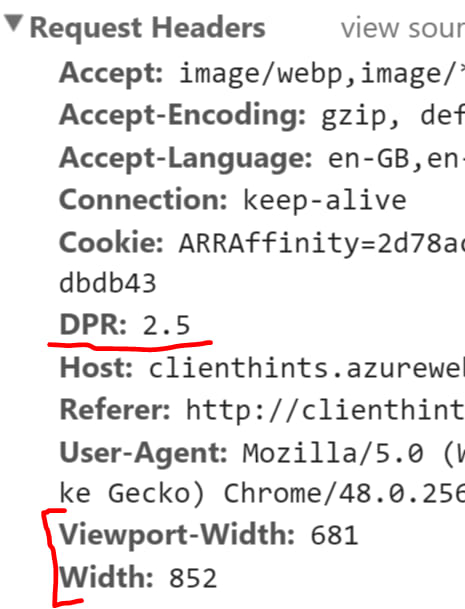
Let’s look through these and see what they mean.
Viewport-Width
The browser includes an HTTP Header with the current display’s width in pixels. Easy enough.
Width
The actual width of the requested image, taking into account both sizes and pixel density.
For example: if the viewport width is standard def (DPR 1) and 1200px width, and the image reference looked like:
<img src="img-dynamic.jpg" sizes="50vw" />
then the Width header would contain 600 (i.e., 1200 * 0.5).
If everything else is the same but the display is HD (DPR 2), then the Width header would contain 1200 (i.e., 1200 * 0.5 *2).
DPR
DPR is pixel density; how Standard Definition, High Definition, Retina, etc are represented as multipliers. It’s usually 1, 2, 2.5, 3, etc.
Response
If the server understands client hints (which it should, unless the meta tag in the html doc is a lie) then the image response will contain one extra header to assist the browser.

The Content-DPR header is letting the browser know that the image being returned is of a particular pixel density.
Show me the code
To implement client hints we need some special HTML and some server-side code. I’m using C# in the following examples, but the same is easily achieved in PHP, Ruby, or NodeJS, for example.
HTML
Let’s start by setting up a simple HTML file with the necessary meta tag and an image reference with a sizes attribute:
<!DOCTYPE html>
<html>
<head>
    <meta   http-equiv="Accept-CH"
            content="DPR, Viewport-Width, Width">
    <title>Inle</title>
</head>
<body>
<div>
    <h1>The Sunset from Inle Lake, Myanmar</h1>
    <img
        src="api/image/inle_lake"
        alt="Inle Lake Sunset"
        sizes="50vw"/>
</div>
</body>
</html>
So we’re going to request an image from api/image/inle_lake and we expect it to fill half of the viewport (50vw)
Reading the client hints
We can read DPR and Width client hints by writing server-side code like this C# example:
var pixelDensity =
double.Parse(Request.Headers.GetValues("DPR").First());

var width =
double.Parse(Request.Headers.GetValues("Width").First());
Now let’s resize the requested image – let’s assume that the original image already exists as a stream in imageStream :
var newImageStream = ResizeImage(imageStream, width);I chose to resize using the ImageResizer nuget package; many other solutions are available, and you could even hand code this yourself.
public MemoryStream ResizeImage(
    Stream inputStream,
    double width)
{
var outputStream = new MemoryStream();
var i = new ImageJob(
            inputStream,
            outputStream,
            new Instructions($"width={width}")
            );
i.Build();
return outputStream;
}
Now we can just build an HTTPResponseMessage and send the new stream on its way. Or can we? Not quite yet! We need to include the Content-DPR response header:
var res = new HttpResponseMessage
{
    Content = new
        ByteArrayContent(newImageStream.ToArray())
};

res.Content.Headers.ContentType =
    new MediaTypeHeaderValue("image/jpg");

res.Content.Headers.Add(
    "Content-DPR",
    pixelDensity.ToString()
    );

res.StatusCode = HttpStatusCode.OK;

return res;
For now, I’m defaulting to JPG – yes, there’s some great scope for expanding this to use the Accept header to send back a WebP image if it is supported, for example.
You can see this in action by heading over to the demo site and open up your dev tools. You’ll notice the image request has client hint headers as does the response; the image has been dynamically resized from a huge original one, to fill 50% of the width of your screen.
The repo can be found at: https://github.com/rposbo/clienthints/ with the main guts of this post in this one file – ImageController.cs
The demo site where you can resize your viewport and try it on various resolution devices to see the changes can found at http://clienthints.azurewebsites.net.
In subsequent posts I’ll expand on this idea to use in parallel with <picture> to help reduce the HTML needed. We’ll look at image type switching as well. Stay tuned!
Hopefully this has been helpful. Any questions, hit me up on twitter