The second main feature of the Speaker Recognition API is Speaker Identification, which can compare a piece of audio to a selection of voiceprints and tell you who was talking! For example, both Barclays and HSBC banks have investigated using passive speaker identification during customer support calls to give an added layer of user identification while you’re chatting to customer support. Or you could prime your profiles against all the speakers in a conference, and have their name automatically appear on screen when they’re talking in a panel discussion.
In this article I’m going to introduce you to the Speaker Identification API from the Cognitive Services and go through an example of using it for fun and profit! Though mainly fun.
These are the APIs that fall under the umbrella of Cognitive Services: Speech:

The Speaker Recognition API
The Speaker Recognition API is made up of two parts – verification and identification. In my previous article we played around with the Speaker Verification API; this time it’s the turn of the Speaker Identification API.
Identification API

For this flavour, instead of repeating a preset phrase three times, a piece of audio up to 5 minutes long is used to determine a voice print for a given profile.
From then on you are able to send a shorter segment of audio to the Speaker Identification API and receive a pretty speedy response containing a matching user’s profile id (if any) and a confidence level for the match. This won’t give you the high level of user confidence you might get from the verification endpoint, but it will give a handy “I think this person is talking” response.
Azure Setup
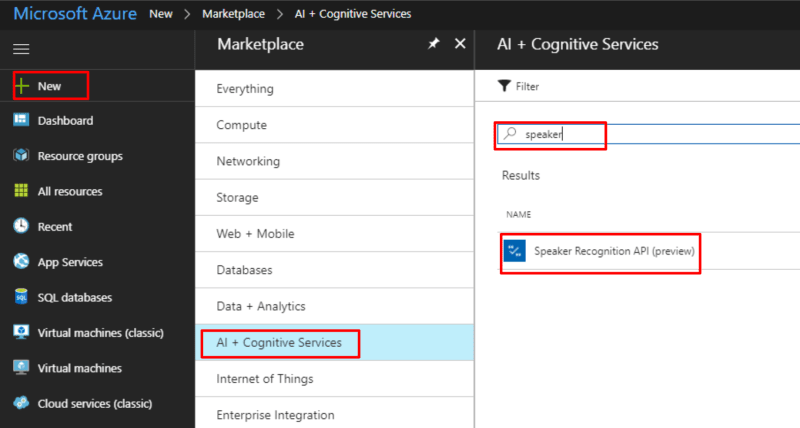
If you haven’t already done so, you need to head over to your Azure portal at portal.azure.com and create a new Cognitive Services subscription. Head over to your Azure Portal, tap on New, AI + Cognitive Services, and search for “speaker”, then tap “Speaker Recognition API”:
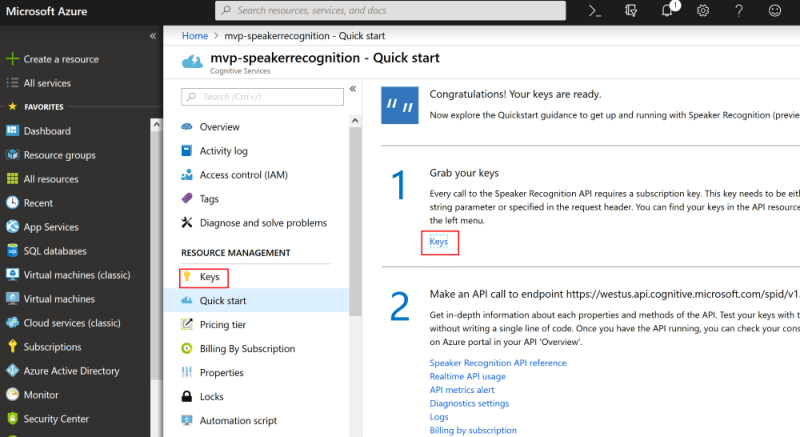
Once the creation process has completed you can grab your key:
To set up Identification we need to call three endpoints:
- Create Profile (create a placeholder with an ID)
- Enroll Profile (associate some audio with that ID)
- Poll for Enrollment status (we’re sending longer, unstructured, speech so it can take time to process)
Then to attempt to identify we need to call two more:
- Identify Profile (compare some audio to a list of profile IDs and see if it matches any of them)
- Poll for Identification status (this can take some time, so we need to keep pinging for a result)
1. Create Profile
The first step is to create a new profile ID; as with the Verification API this is merely creating a placeholder with an ID which we will later use to associate with a voiceprint – that is, the data representation of an audio recording:
// the cognitive services endpoint
var rootEndpoint =  'https://westus.api.cognitive.microsoft.com/spid/v1.0';

// the Identification endpoint to create a new profile
var create = rootEndpoint +
	'/identificationProfiles';

var request =  new XMLHttpRequest();
request.open("POST", create, true);
request.setRequestHeader('Content-Type','application/json');

// your cognitive services key goes in this header:
request.setRequestHeader('Ocp-Apim-Subscription-Key', key);

request.onload =  function () {
  var json = JSON.parse(request.responseText);
  var profileId = json.identificationProfileId;
};

request.send(JSON.stringify({ 'locale' :'en-us'}));
Notice the body in the request.send() method? The valid values for this are:
- es-ES (Castilian Spanish)
- en-US (American English)
- fr-FR (Standard French)
- zh-CN (Mandarin Chinese)
This time last year it was just US English and Mandarin Chinese, so in less than a year we’ve got twice as many languages supported for identification!
The response will look something like:
{
  "identificationProfileId": "862507c4-fb35-49af-a4d8-996624ff4659"
}
That just gave us a new profile ID to use in the subsequent API calls for this profile.
2. Enroll Profile
One key difference with the Speaker Identification API when compared to the Speaker Verification API is that instead of needing to repeat one specific phrase multiple times, we can just send a long piece of audio of the user’s voice – up to 5 minutes long – in one request, and let the Identification API do it’s magic in the background.
For the audio to be accepted, it must be:
- clearly recorded
- at least 15 seconds long
- audio in a specific format:
- WAV audio container
- 16K rate
- 16 bit sample format
- Mono
As before, if you’re trying to follow along by implementing this in client side JavaScript, then this is where it could get really tricky; recording audio in this very particular format via your web browser’s web audio API is an absolute PAIN. I had to reverse engineer the Microsoft demo page (un-minifying a load of JavaScript to understand the libraries and specific settings used), and have a custom version of the incredible open source RecorderJS library on the github repo for this article
Before we make this enrollment request, I’ll quickly point out the shortAudio querystring parameter; I’m using this to override the recommended audio length of 30 seconds and allow me to speed things up (but be less accurate).
shortAudio allows us to use a minimum of 1 second of audio – however this will create a much less accurate voiceprint for that user. Perhaps remove this parameter if you’re finding the identification service not particularly accurate and be sure to pass in at least 30 seconds of audio after removing silence. As such you will need to pass in a few more than 30 seconds of audio to allow for breaks between words.
// the cognitive services endpoint
var rootEndpoint =  'https://westus.api.cognitive.microsoft.com/spid/v1.0'";

var enroll =
  rootEndpoint
  + '/identificationProfiles/'
  + profileId
  + '/enroll?shortAudio=true';  // override the recommended limit of 30 seconds of audio;
				// remove this and pass in longer audio if it's not being accurate

var request =  new XMLHttpRequest();
request.open("POST", enroll, true);
request.setRequestHeader('Content-Type','multipart/form-data');

// your cognitive services key goes here
request.setRequestHeader('Ocp-Apim-Subscription-Key', key);

request.onload =  function () {
  // The response contains a location to poll for status
  var location = request.getResponseHeader('Operation-Location');

  if (location != null) {
    // ping that location to get the enrollment status
    pollForEnrollment(location, profileId);
  } else {
    console.log('Ugh. I can\'t poll, it\'s all gone wrong.');
  }
};

// the chunk of audio
request.send(blob);
As before, notice the
blobin therequest.send(blob)call? That’s the audio recorded via the browser, already encoded in the correct format; i.e. WAV container, mono (1 channel), 16K rate, 16 bit sample format. The details of how this was achieved are out of the scope of this article, since they’re specific to the Web Audio API and a custom version of the incredible RecorderJS, which can be found within my demo solution over on github. I honestly can’t remember all the changes I had to make to get this working as it was a lot of trial and error!
The initial response will return immediately with a 202 HTTP status code, and a header called Operation-Location containing the url to ping for the enrollment status.
3. Poll for Enrollment
The url in the Operation-Location header will let us know when that profile has completed the enrollment; i.e., the processing has completed and we have a voiceprint associated with the profile.
var location = 'the url from the operation-location header';

var enrolledInterval;

// hit the endpoint every few seconds
enrolledInterval = setInterval(function() {

  var request =  new XMLHttpRequest();
  request.open("GET", location, true);
  request.setRequestHeader('Content-Type','multipart/form-data');

  // your cognitive services key goes in here
  request.setRequestHeader('Ocp-Apim-Subscription-Key', key);

  request.onload =  function()
  {
    var json = JSON.parse(request.responseText);

    if (json.status ==  'succeeded'
     && json.processingResult.enrollmentStatus ==  'Enrolled')
    {
      // Woohoo! The audio was enrolled successfully!
      // stop polling
      clearInterval(enrolledInterval);
      console.log('enrollment complete!');
    }
    else
    if(json.status ==  'succeeded'
         && json.processingResult.remainingEnrollmentSpeechTime >  0)
   {
      // stop polling, the audio wasn't viable
      clearInterval(enrolledInterval);
      console.log('That audio wasn\'t long enough to use');
    }
    else
    {
      // keep polling
      console.log('Not done yet..');
    }
  };

request.send();
}, 4000); // repeat every 4 seconds
The response from this endpoint when the enrollment hasn’t completed yet looks like this:
{
  "status": "notstarted",
  "createdDateTime": "2018-09-29T20:03:13.4424092Z",
  "lastActionDateTime": "2018-09-29T20:03:13.4424092Z"
}
and then
{
  "status": "running",
  "createdDateTime": "2018-09-29T20:03:13.4424092Z",
  "lastActionDateTime": "2018-09-29T20:03:15.0596249Z"
}
When the enrollment has completed, you’ll get a response that looks like this:
{
  "status": "succeeded",
  "createdDateTime": "2018-09-29T20:03:13.4424092Z",
  "lastActionDateTime": "2018-09-29T20:03:16.5596404Z",
  "processingResult": {
    "enrollmentStatus": "Enrolled",
    "remainingEnrollmentSpeechTime": 0.0,
    "speechTime": 13.73,
    "enrollmentSpeechTime": 13.73
  }
}
Notice the speechTime values; in my example I explicitly recorded for 15 seconds, but there was only 13.73 seconds of speech – this means any gaps between words, like taking a breath, are removed from the overall voiceprint.
Make sure you take this into account when deciding how long to record for and whether you’ve used shortAudio or not.
To make the next section more interesting I suggest you repeat this process with two or three more people, to have a few distinct profiles set up.
4. Identify Profile
Ok, let’s assume you’ve got two or three different identification profiles set up – now we can test it! In order to do that, we send a new chunk of audio to a slightly different endoint along with a list of profile IDs to ask which profile that audio matches (if any).
As before, since it could be a long chunk of audio we need to submit it and then poll a different endpoint to get the result. Kicking off the identification process looks very similar to the profile enrollment process:
var Ids = 'comma delimited list of profile IDs we are comparing against';

// cognitive services endpoint
var rootEndpoint =
  'https://westus.api.cognitive.microsoft.com/spid/v1.0';

var identify = rootEndpoint
  + '/identify?identificationProfileIds='
  + Ids // all of the profiles we want to compare this audio to
  +  '&shortAudio=true'; // for the impatient! Remove this to improve accuracy

var request =  new XMLHttpRequest();

request.open("POST", identify, true);
request.setRequestHeader('Content-Type','application/json');

// your cognitive services key goes here
request.setRequestHeader('Ocp-Apim-Subscription-Key', key);

request.onload =  function () {
  // The response contains a location to poll for status
  var location = request.getResponseHeader('Operation-Location');

  if (location != null) {
    // ping that location to get the identification status
    pollForIdentification(location);
  } else {
    console.log('Ugh. I can\'t poll, it\'s all gone wrong.');
  }
};

// the chunk of audio
request.send(blob);
5. Poll for Identification
Same as before, now we need to ping that Operation-Location URL until we get a result:
var location = 'value from the operation-location header';
var identifiedInterval;
// hit the endpoint every few seconds
identifiedInterval = setInterval(function() {
var request = new XMLHttpRequest();
request.open("GET", location, true);
request.setRequestHeader('Content-Type','multipart/form-data');
// your cognitive services key goes here
request.setRequestHeader('Ocp-Apim-Subscription-Key', key);
request.onload = function()
{
var json = JSON.parse(request.responseText);
if (json.status == 'succeeded')
{
// Identification process has completed
clearInterval(identifiedInterval);
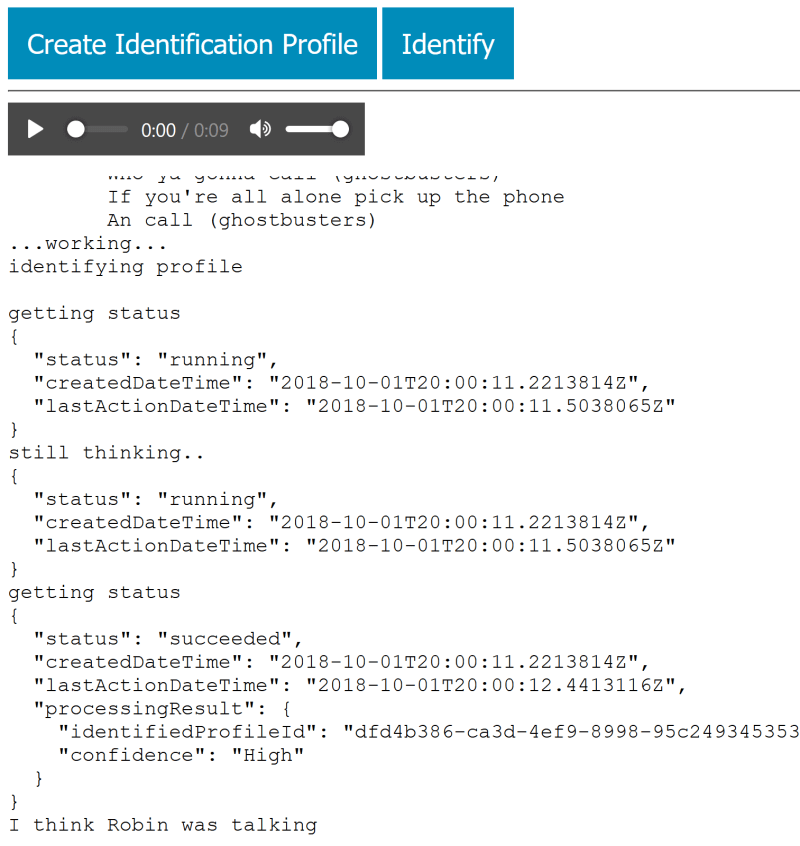
var matchedProfileId = json.processingResult.identifiedProfileId;
if (matchedProfileId != null && matchedProfileId.length > 0)
{
console.log('The profile with this ID was talking! '
+ matchedProfileId);
}
else
{
// Failed
console.log('I couldn\'t tell who was talking. So embarrassing.');
}
}
else
{
// Not done yet
console.log('still thinking..');
}
};
request.send();
}, 2000); // repeat every 2 seconds
The response from this endpoint when the identification hasn’t completed yet looks like this:
{
  "status": "running",
  "createdDateTime": "2018-09-29T20:07:45.4239275Z",
  "lastActionDateTime": "2018-09-29T20:07:46.8523181Z"
}
When the identification has completed, you’ll get a response that looks like this:
{
  "status": "succeeded",
  "createdDateTime": "2018-09-29T20:07:45.4239275Z",
  "lastActionDateTime": "2018-09-29T20:07:47.8454966Z",
  "processingResult": {
    "identifiedProfileId": "913e6f24-21a8-4dbf-9d9d-f47598d55636",
    "confidence": "High"
  }
}
The person whose voice was used to create the profile referred to in processingResult.identifiedProfileId is who the Speaker Identification API thought was talking, and you get a confidence score thrown in for good measure as well!
Summary
You can have a go yourself by checking out the github repo and playing with the demo; you just need to enter your cognitive services key in the box and tap GO.
Then you can tap the “Create Identification Profile” button, watch the responses come through, give your profile a name (to make the identification response nicer), Create Identification Profiles for a few other people, then tap the “Identify” button to see if it can match you with your profile!
Have a play around and let me know how you get on!
Troubleshooting
The documentation for the Speaker Recognition API is your best stop for issues with getting it working.
If you try out the demo and find the profiles aren’t matching very well, open a your browser’s debug console and type BurnItAll('identification') to delete all identification profiles associated with that cognitive services account; only do this when testing and playing around as it really will delete all profile voiceprints!
If you’d like to see this in action, then perhaps check out the LDN BotFramework Meetup session where I first talked about this: