In this article I’ll show you how to link that skill into your botframework chatbot.
Creating a botframework reply
Let’s dip back into BotFramework in order to create something that can respond to the incoming request.
Calculating a Chinese Zodiac animal based on the year is really simple; just get the remainder from dividing by 12 and apply a switch:
var match = new Regex(@"\d{4}").Match(message.Text);
var year = Convert.ToInt32(match.Value);
var animal = "";
switch (year%12)
{
    case 0:
        animal = "Monkey";
        break;
    case 1:
        animal = "Rooster";
        break;
    case 2:
        animal = "Dog";
        break;
    case 3:
        animal = "Pig";
        break;
    case 4:
        animal = "Rat";
        break;
    case 5:
        animal = "Ox";
        break;
    case 6:
        animal = "Tiger";
        break;
    case 7:
        animal = "Rabbit";
        break;
    case 8:
        animal = "Dragon";
        break;
    case 9:
        animal = "Snake";
        break;
    case 10:
        animal = "Horse";
        break;
    case 11:
        animal = "Sheep";
        break;
    default:
        animal = "Alien";
        break;
}

var reply = message.CreateReply($"The Chinese zodiac animal for {year}, is {animal}");
return reply;
Easy stuff, right? All this method does is:
- Check if the message contains a 4 digit number:
new Regex(@"\d{4}").Match(message.Text); - Gets the remainder from dividing by 12:
year%12 - Creates a reply:
message.CreateReply($"The Chinese zodiac animal for {year}, is {animal}");
By putting this logic into a botframework chatbot and configure it to fire on any message containing the word “zodiac”, it will look something like this:
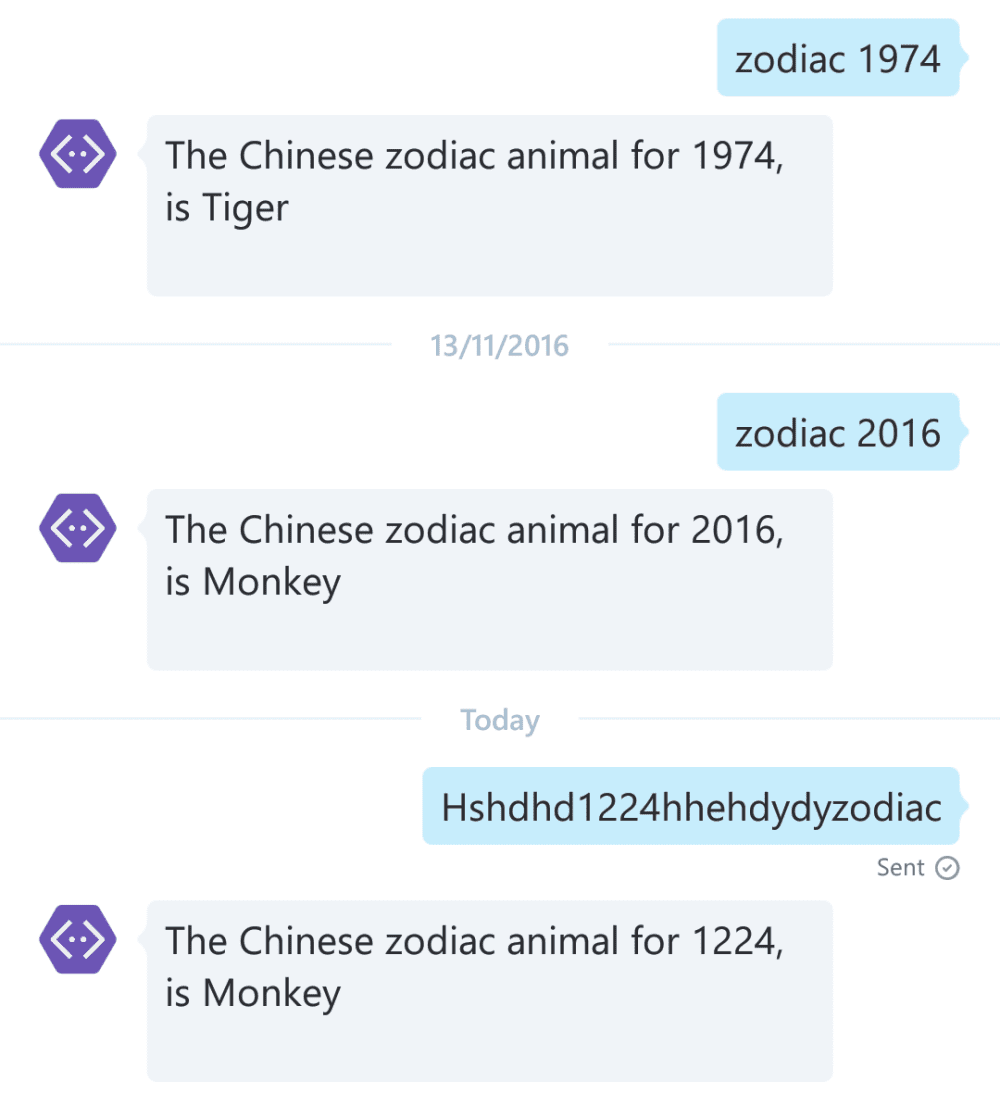
You can see it’s extremely basic in terms of “conversation”; the MessagesController literally finds the characters “zodiac” and a four digit number in the message, and responds if they appear.
Direct Line Client
Currently there is no link available between Alexa and a botframework chatbot; no “Skill” to install on an Alexa and no “channel” to enable in the botframework connector.
As such, in order to handle a message received from an Alexa Skill, we need to create a proxy to call the botframework chatbot.
In order to do this, let’s create our own C# directline client; “directline” is the name for the REST API which is configured for free within the Botframework connector dashboard. More details about the specific calls can be found on the documentation over on the botframework dev site.
The code below should be functional, but I wouldn’t put it into a production system without thoroughly testing!
Initiate the conversation
Much like going to a party at a circus where you don’t know anyone, using the directline API we need to jump through a few hoops to get a conversation started… 😉
Let’s start by creating a new HttpClient and setting the BaseAddress to https://directline.botframework.com:
var client = new HttpClient {
    BaseAddress = new Uri("https://directline.botframework.com")
};
Next up we need to set the appropriate headers for directline to accept our requests:
// get rid of any defaults
client.DefaultRequestHeaders.Accept.Clear();

// make sure we're only asking for JSON
client.DefaultRequestHeaders.Accept.Add(new MediaTypeWithQualityHeaderValue("application/json"));

// Set the authorization header using our bot's directline key
client.DefaultRequestHeaders.Authorization = new AuthenticationHeaderValue("BotConnector", _secret);

// to say that each request is to be treated as unique
client.DefaultRequestHeaders.Add("ETag", "*");
The _secret value here comes from the directline configuration in your botframework connector portal – head over to dev.botframework.com, tap “My Bots” and then the bot you want to hook Alexa up to:

Tap “edit ” and you’ll see the configuration page:

Grab one of those keys to use in your new directline client.
Be aware that this client code has only been tested on v 1.1 so will most likely not work with v3.0
Now we have an HttpClient it’s time to start a chat:
// swap our directline key for a scoped token
var response =
    await client.GetAsync("/api/tokens/", HttpCompletionOption.ResponseHeadersRead)
        .ConfigureAwait(false);

// make sure it worked
response.EnsureSuccessStatusCode();

// create a new conversation
response =
    await client.PostAsJsonAsync("/api/conversations/", new object())
    .ConfigureAwait(false);

// make sure it worked
response.EnsureSuccessStatusCode();

// get the conversation information
var conversationInfo =
    await response.Content.ReadAsAsync<JObject>();

// save the conversation id for use later on
_conversationId= (string)conversationInfo["conversationId"];

// swap our authorization header to use the new token
var scopedToken = (string)conversationInfo["token"];
client.DefaultRequestHeaders.Authorization =
    new AuthenticationHeaderValue("BotConnector", scopedToken);
Ok, we now have a new conversation with valid authorization headers and a conversation Id.
Say hello
Using the client we can create the most basic botframework message structure and post it to the correct endpoint, using the conversation id we created earlier:
// very basic message
var message =  new
        {
            id = Guid.NewGuid().ToString(),
            created = DateTime.UtcNow,
            from = "Alexa Proxy",
            text = "hello!",
            eTag = "*"
        };

// send the message
var response =
    await client.PostAsJsonAsync($"/api/conversations/{_conversationId}/messages", message)
     .ConfigureAwait(false);

// make sure it worked
response.EnsureSuccessStatusCode();
That should send a message to the bot.
Get a response
Now let’s find out what the bot has to say for itself! There is some further complexity when getting replies, which is to use a “watermark” so that you only ask for replies since a certain point in time; I’ll not cover that here, at least not in this article.
Here is the simplest implementation of getting responses from the botframework chatbot via directline:
// ask for replies
var json =
    await client.GetStringAsync($"/api/conversations/{_conversationId}/messages")
    .ConfigureAwait(false);

var messagesContainer =
    JsonConvert.DeserializeObject<JObject>(json);

// make sure any replies we get are for the correct conversation,
// and are not "from" our proxy (i.e. the message we just sent)
var recentReplies =
    messagesContainer["messages"]
    .Where(a => (string)a["from"] != _convoId
             && (string)a["from"] != "Alexa Proxy")
    .Select(m => ((string)m["text"])?.Trim());
Pulling it all together – a DirectLine C# Client
This client is by no means complete; you will need to implement a method to delete user data for stability and reliability, and implement watermarked reply checking for when your bot gives multiple responses to one message and/or takes a while to respond.
This should be a good start, and it works for our specific use case:
public class DirectlineClient : IDisposable
{
    private string _conversationId;
    private readonly string _from;
    private readonly string _secret;

    public HttpClient Client;
    private string MessagesPath => $"/api/conversations/{_conversationId}/messages";

    public DirectlineClient(string secret, string from)
    {
        _secret = secret;
        _from = from;
        Client = CreateHttpClient().Result;
    }

    private async Task<HttpClient> CreateHttpClient()
    {
        var client = new HttpClient {
            BaseAddress = new Uri("https://directline.botframework.com")
        };

        client.DefaultRequestHeaders.Accept.Clear();
        client.DefaultRequestHeaders.Accept.Add(new MediaTypeWithQualityHeaderValue("application/json"));

        client.DefaultRequestHeaders.Authorization = new AuthenticationHeaderValue("BotConnector", _secret);
        client.DefaultRequestHeaders.Add("ETag", "*");

        var response =
            await client.GetAsync("/api/tokens/", HttpCompletionOption.ResponseHeadersRead)
            .ConfigureAwait(false);
        response.EnsureSuccessStatusCode();

        response =
            await client.PostAsJsonAsync("/api/conversations/", new object())
            .ConfigureAwait(false);
        response.EnsureSuccessStatusCode();

        var conversationInfo =
            await response.Content.ReadAsAsync<JObject>()
            .ConfigureAwait(false);

        _conversationId = (string)conversationInfo["conversationId"];
        var scopedToken = (string)conversationInfo["token"];

        client.DefaultRequestHeaders.Authorization = new AuthenticationHeaderValue("BotConnector", scopedToken);

        return client;
    }

    public async Task<IEnumerable<string>> FetchRecentReplies()
    {
        var json =
            await Client.GetStringAsync(MessagesPath)
            .ConfigureAwait(false);

        var messagesContainer = JsonConvert.DeserializeObject<JObject>(json);

        var recentReplies = messagesContainer["messages"]
            .Where(a => (string)a["from"] != _conversationId
                     && (string)a["from"] != _from)
            .Select(m => ((string)m["text"])?.Trim());

        return recentReplies;
    }

    public async Task SendMessage(string outgoingText)
    {
        var message = new
        {
            id = Guid.NewGuid().ToString(),
            created = DateTime.UtcNow,
            from = _from,
            text = outgoingText,
            eTag = "*"
        };

        var response =
            await Client.PostAsJsonAsync(MessagesPath, message)
            .ConfigureAwait(false);
        response.EnsureSuccessStatusCode();
    }


    public void Dispose()
    {
        ((IDisposable)Client).Dispose();
    }
}
If you don’t use
ConfigureAwait(false)then it will just hang after the first directline call. Don’t ask me why. It took several days and a couple of github issues to figure out how to work around it!
This client doesn’t handle anything clever like user sessions; you’d have to handle that yourself!
Linking to Echo
Now we can call our botframework chatbot using some C#; let’s add that to a webapi controller:
public class AlexaController : ApiController
{
    private readonly DirectlineClient _client;

    public AlexaController()
    {
        var directLineSecret = ConfigurationManager.AppSettings["directlinesecret"];
        _client = new DirectlineClient(directLineSecret, "alexa" + Guid.NewGuid().ToString().Replace("-", ""));
    }
Botframework used to break if it looks like the same message is being sent from the same person in rapid succession; adding a guid to the “from” parameter to the directline client is the hard-fought solution I discovered to avoid this.
Now the main guts of the linking:
[HttpPost]
public async Task<JsonResult<AlexaResponse>> Post([FromBody] AlexaRequest alexaRequestObject)
{
    try
    {
        // pick out the "year" variable
        var year = alexaRequestObject.request.intent.slots.Year.value;

        // send a message that the botframework chatbot will understand
        await _client.SendMessage($"zodiac {year}");

        // get any responses...
        var messages = await _client.FetchRecentReplies();

        // ... find the one we want ...
        var message = (from m in messages where m.Contains(year) select m).FirstOrDefault();

        // ... build a response ...
        var response = new AlexaResponse
        {
            version = "1.0",
            response = new Response
            {
                outputSpeech = new Outputspeech
                {
                    type = "PlainText",
                    text = message
                },
                shouldEndSession = true
            }
        };

        // ... and send it back
        return Json(response);
    }
    catch (HttpRequestException)
    {

    }

    return null;
}
Paste Special – REALLY Special
But what’s an AlexaRequest and and AlexaResponse, Robin?! I’m glad you asked.
Remember the contents of the Service Simulator and ngrok in the last article? Here’s a reminder:
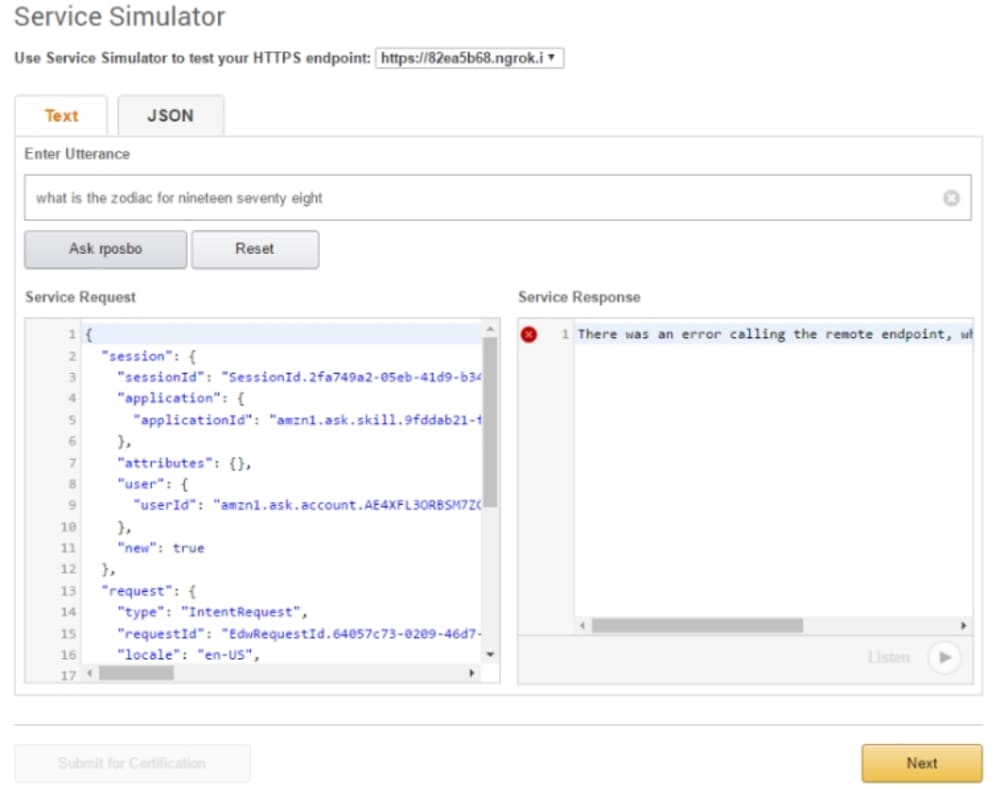
Highlight all of that JSON in “Service Request”, copy to your clipboard, and head over to Visual Studio. You’re going to love this..
Now in a new or existing file go to “Edit” -> “Paste Special” -> “Paste JSON as Classes”:

WOAH. After a little tidying up of the names used, you end up with a set of classes that match your specific intent:
public class AlexaRequest
{
    public Session session { get; set; }
    public Request request { get; set; }
    public string version { get; set; }
}
public class Session
{
    public string sessionId { get; set; }
    public Application application { get; set; }
    public Attributes attributes { get; set; }
    public User user { get; set; }
    public bool _new { get; set; }
}

public class Application
{
    public string applicationId { get; set; }
}

public class Attributes
{
}

public class User
{
    public string userId { get; set; }
}

public class Request
{
    public string type { get; set; }
    public string requestId { get; set; }
    public string locale { get; set; }
    public DateTime timestamp { get; set; }
    public Intent intent { get; set; }
}

public class Intent
{
    public string name { get; set; }
    public Slots slots { get; set; }
}

public class Slots
{
    public Year Year { get; set; }
}

public class Year
{
    public string name { get; set; }
    public string value { get; set; }
}
All of which allows me to do this:
var year = alexaRequestObject.request.intent.slots.Year.value;You can do the same thing for a response using the basic JSON I used in the previous article:
{
  "version": "1.0",
  "response": {
    "outputSpeech": {
      "type": "PlainText",
      "text": "the Chinese animal for the year 1978, is Horse"
    },
    "shouldEndSession": true
  }
}
Paste that as new classes to end up with something like:
public class AlexaResponse
{
    public string version { get; set; }
    public Response response { get; set; }
}

public class Response
{
    public Outputspeech outputSpeech { get; set; }
    public bool shouldEndSession { get; set; }
}

public class Outputspeech
{
    public string type { get; set; }
    public string text { get; set; }
}
Really simple stuff, much cleaner and more easily testable than anonymous types all over the place.
Summary
You now have a web api endpoint that can accept an Alexa skill request, make a connection to a botframework chatbot, receive a botframework response and map that to an Alexa skill response.
You can deploy this webapi or run it locally and test with ngrok some more; this will be a slow response when you talk to your Echo, but as a proof of concept it’s pretty cool! Remember to update your Alexa skill’s endpoint to point to this web api’s “/api/{your controller name}” route.
I have just added this controller to my botframework application, so it’s a single deployable unit.
Gotchas
One final thing; if this fails and you can’t work out why, some ngrok investigation will show you that canned is extremely liberal and sharing – it adds CORS headers all over the place to accept the incoming requests from Alexa.
Let’s compare IIS to canned:
IIS BotFramework
HTTP/1.1 200 OK
Cache-Control: no-cache
Pragma: no-cache
Content-Length: 144
Content-Type: application/json; charset=utf-8
Expires: -1
Server: Microsoft-IIS/10.0
X-AspNet-Version: 4.0.30319
X-SourceFiles: =?UTF-8?B?QzpcVXNlcnNcUm9iaW5cUmVwb3NccnBvc2JvLmJvdGZyYW1ld29yay5kZW1vYm90XHJwb3Niby5ib3RmcmFtZXdvcmsuZGVtb2JvdFxhcGlcYWxleGE=?=
X-Powered-By: ASP.NET
Date: Fri, 11 Nov 2016 14:16:59 GMT

{"version":"1.0","response":{"outputSpeech":{"type":"PlainText","text":"The Chinese zodiac animal for 1978, is Horse"},"shouldEndSession":true}}
CANNED
HTTP/1.1 200 OK
Content-Type: application/json
Access-Control-Allow-Origin: *
Access-Control-Allow-Headers: X-Requested-With
Access-Control-Allow-Methods: GET, POST, PUT, DELETE, OPTIONS
Date: Fri, 11 Nov 2016 14:20:36 GMT
Connection: keep-alive
Content-Length: 146

{"version":"1.0","response":{"outputSpeech":{"type":"PlainText","text":"the Chinese animal for the year 1978, is Horse"},"shouldEndSession":true}}
There is a recurring issue in botframework which sometimes requires CORS to be enabled, sometimes not. I think it’s easier to just force it to be enabled using the appropriate NuGet package and then in your WebApiConfig.cs add:
config.EnableCors();Happy coding! Let me know how you get on!
Good stuff, was musing over how hard it would be to hook these up after getting an Alexa over Crimbo.
And reference for this over github ?
Hi Robin,
Thanks for the article. I am using Azure Bot Service QnA Maker bot and want to integrate with Alexa. Could you please let me know how can I do that?
This is great integration sample code for Alexa and BotFramework. Is there a download link or a project on github?