Whatever your social media tool of choice is these days, it’s almost guaranteed to be filled with images and their associated hashtags #sorrynotsorry #lovelife #sunnyday
Sometimes coming up with those tags is more work than perfectly framing your latest #flatlay shot.
In the age of amazing image recognition tech, it must be possible to create something that can help us out and give us more time to move that light source around to cast the right shadow over your meal.
Turns out, it is possible! Yay! (of course..)
In this article I’ll show you how to automatically generate image hashtags via a chatbot using Microsoft’s Computer Vision API.
Microsoft’s Computer Vision API

The Computer Vision API is another facet of Microsoft’s Cognitive Services which allows you to send an image (or an image’s URL) for analysis, description, or even to read the text in the image:
Analyze Image: /analyse
This operation extracts a rich set of visual features based on the image content; this includes an image description (or caption)
Describe Image: /describe
This operation generates a description of an image in human readable language with complete sentences. The description is based on a collection of content tags, which are also returned by the operation. More than one description can be generated for each image. Descriptions are ordered by their confidence score.
Get Thumbnail: /generateThumbnail
This operation generates a thumbnail image with the user-specified width and height. By default, the service analyzes the image, identifies the region of interest (ROI), and generates smart cropping coordinates based on the ROI. Smart cropping helps when you specify an aspect ratio that differs from that of the input image
OCR: /ocr
Optical Character Recognition (OCR) detects text in an image and extracts the recognized characters into a machine-usable character stream.
Recognize Domain Specific Content: /models/{model}/analyse
This operation recognizes content within an image by applying a domain-specific model. The list of domain-specific models that are supported by the Computer Vision API can be retrieved using the /models GET request. Currently, the API only provides a single domain-specific model: celebrities.
List Domain Specific Models: /models
This operation returns the list of domain-specific models that are supported by the Computer Vision API. Currently, the API only supports one domain-specific model: a celebrity recognizer.
Tag Image: /tag
This operation generates a list of words, or tags, that are relevant to the content of the supplied image. The Computer Vision API can return tags based on objects, living beings, scenery or actions found in images.
Unlike categories, tags are not organized according to a hierarchical classification system, but correspond to image content.
Tags may contain hints to avoid ambiguity or provide context, for example the tag “cello” may be accompanied by the hint “musical instrument”.
Set up
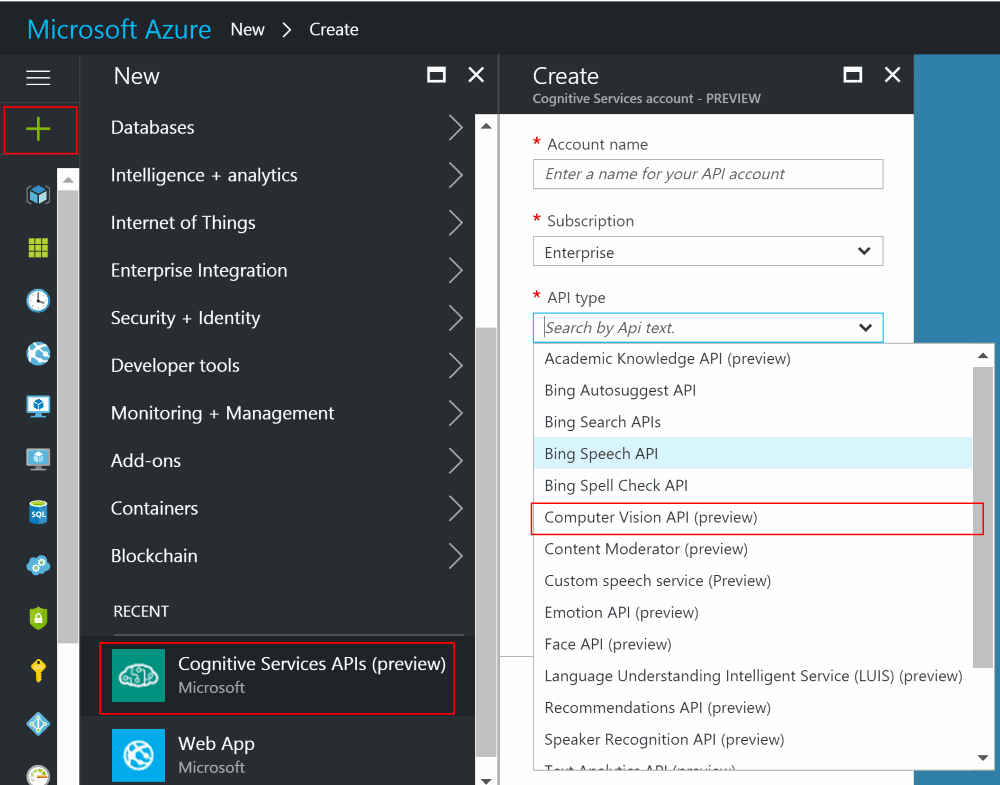
In order to use the Computer Vision API, you’ll need to sign up for Azure and get a Cognitive Services key.
First sign up for Cognitive Services APIs and select “Computer Vision API (preview)”:
Once that’s created you’ll need to pick up the key as we’ll use that shortly to authenticate our API calls:

Image Analysis: /analyse
Using the analyse endpoint we can define the structure of the response we would like; in this case I’m choosing “Description” (to get the long list of tags), “Tags” (to get the shorter list along with a confidence score), and “Color” to pick up the dominant colours in the picture.
Build the request
Let’s initially assume we have an imagedata variable as a byte array – I’ll go into how one method of creating that from within botframework shortly – then we can create an HttpClient and submit a request to the image analysis cognitive services endpoint:
var client = new HttpClient())

client.DefaultRequestHeaders
    .Add(
        "Ocp-Apim-Subscription-Key",
        "<your key goes here>"
    );

// specify which fields we want returned:
// tags, description, and color details
var request = new HttpRequestMessage(
 HttpMethod.Post,
    "https://westus.api.cognitive.microsoft.com/vision/v1.0/analyse/?visualFeatures=Tags,Description,Color")
{
    Content = new ByteArrayContent(data)
};
request.Content.Headers.ContentType =
    new MediaTypeHeaderValue("application/octet-stream");

// send the request
var response =
    await client.SendAsync(request).ConfigureAwait(false);
Process the response
Using the parameters “visualFeatures=Tags,Description,Color” we should receive a response that looks like this, according to the documentation for this operation:
{
  "tags": [
    {
      "name": "person",
      "confidence": 0.98979085683822632
    },
    {
      "name": "man",
      "confidence": 0.94493889808654785
    },
    {
      "name": "outdoor",
      "confidence": 0.938492476940155
    },
    {
      "name": "window",
      "confidence": 0.89513939619064331
    }
  ],
  "description": {
    "tags": [
      "person",
      "man",
      "outdoor",
      "window",
      "glasses"
    ],
    "captions": [
      {
        "text": "Man sitting on a bench",
        "confidence": 0.48293603002174407
      }
    ]
  },
  "requestId": "0dbec5ad-a3d3-4f7e-96b4-dfd57efe967d",
  "metadata": {
    "width": 1500,
    "height": 1000,
    "format": "Jpeg"
  },
  "color": {
    "dominantColorForeground": "Brown",
    "dominantColorBackground": "Brown",
    "dominantColors": [
      "Brown",
      "Black"
    ],
    "accentColor": "873B59",
    "isBWImg": false
  }
}
With that in mind, let’s pull the response apart with some dynamic and JObject goodness:
// dynamics are fun!
// Deserialize the response
dynamic dynamicResponse =
    JsonConvert.DeserializeObject(
        await response.Content.ReadAsStringAsync()
    );

// Get the long list of tags from the description
JArray descriptionTags =
    dynamicResponse.description.tags;

var longTagList = "Long list: " +
    string.Join(" ", from t in descriptionTags select $"#{t}");

// Get the short list of tags with confidence scores
JArray tags =
    dynamicResponse.tags;

// only use the tags with a confidence
// score above 0.5
var taglist = (
    from dynamic t in tags
    where t.confidence > 0.5
    select t.name.ToString())
    .Cast<string>()
    .ToList();

var shortList = "Short list: " +
    string.Join(" ", from t in taglist select $"#{t}");

// Get the dominant colours
JArray colors =
    dynamicResponse.color.dominantColors;

var colorList = "Color list: " +
    string.Join(" ", from c in colors select $"#{c}");
Wiring up to a botframework chatbot
If this logic is hooked into an IDialog implementation, then we can use the code below to receive the image send to the botframework chatbot, submit it to cognitive services, process the response, and send the results back to the user:
public async Task MessageReceivedAsync(
    IDialogContext context,
    IAwaitable<IMessageActivity> argument)
{
    // await the message:
    var message = await argument;

    // get the image attachment
    var image = message.
        Attachments?.
        FirstOrDefault(x =>
            x
            .ContentType
            .ToLowerInvariant()
            .Contains("image"));

    var connector =
        new ConnectorClient(new Uri(message.ServiceUrl));

    // if the image was passed as byte data in Content, use that
    var data = image.Content as byte[] ??
               // if not, download it from the ContentUrl
               connector
                   .HttpClient
                   .GetByteArrayAsync(image.ContentUrl)
                   .Result;

    using (var client = new HttpClient())
    {
        client.DefaultRequestHeaders
            .Add(
                "Ocp-Apim-Subscription-Key",
                "<your key goes here>"
            );

        // specify which fields we want returned
        var request = new HttpRequestMessage(
            HttpMethod.Post,
            "https://westus.api.cognitive.microsoft.com/vision/v1.0/analyse/?visualFeatures=Tags,Description,Color")
        {
            Content = new ByteArrayContent(data)
        };
        request.Content.Headers.ContentType =
            new MediaTypeHeaderValue("application/octet-stream");

        // send the request
        var response =
            await client.SendAsync(request).ConfigureAwait(false);

        // dynamics are fun!
        // Descerialize the response
        dynamic dynamicResponse =
            JsonConvert.DeserializeObject(
                await response.Content.ReadAsStringAsync()
            );

        // Get the long list of tags from the description
        JArray descriptionTags =
            dynamicResponse.description.tags;

        await context.PostAsync(
            "Long list: " +
            string.Join(" ", from t in descriptionTags select $"#{t}"));

        // get the short list of tags with confidence scores
        JArray tags =
            dynamicResponse.tags;

        // only use the tags with a confidence
        // score above 0.5
        var taglist = (
            from dynamic t in tags
            where t.confidence > 0.5
            select t.name.ToString())
            .Cast<string>()
            .ToList();

        await context.PostAsync(
            "Short list: " +
            string.Join(" ", from t in taglist select $"#{t}"));

        // get the dominant colours
        JArray colors =
            dynamicResponse.color.dominantColors;

        await context.PostAsync(
            "Color list: " +
            string.Join(" ", from c in colors select $"#{c}"));

        context.Wait(MessageReceivedAsync);
    }
}
Sending an image to your bot will now result in a selection of potentially useful terms coming back, preformatted as hashtags all ready for you to copy/paste into your image-sharing social network of choice!

Bonus: Just Tagging: /tag
If you’re not interested in the long list of tags nor the dominant colours in an image, then you can just use the “tag” endpoint instead.
This will give a slightly smaller response, according to the documentation:
{
  "tags": [
    {
      "name": "grass",
      "confidence": 0.9999997615814209
    },
    {
      "name": "outdoor",
      "confidence": 0.99997067451477051
    },
    {
      "name": "sky",
      "confidence": 0.99928975105285645
    },
    {
      "name": "building",
      "confidence": 0.99646323919296265
    },
    {
      "name": "house",
      "confidence": 0.99279803037643433
    },
    {
      "name": "lawn",
      "confidence": 0.82268029451370239
    },
    {
      "name": "green",
      "confidence": 0.64122253656387329
    },
    {
      "name": "residential",
      "confidence": 0.31403225660324097
    }
  ],
  "requestId": "1ad0e45e-b7b4-4be3-8042-53be96103337",
  "metadata": {
    "width": 400,
    "height": 400,
    "format": "Jpeg"
  }
}
Botframework /tag implementation
A couple of small changes from the previous version of the code are all that’s needed here; a different endpoint (no parameters needed either) and remove the processing of the “description” and “color” elements:
// Use the "tag" endpoint instead of "analyse"
 var request = new HttpRequestMessage(
     HttpMethod.Post,
     "https://westus.api.cognitive.microsoft.com/vision/v1.0/tag")
 {
     Content = new ByteArrayContent(data)
 };
 request.Content.Headers.ContentType =
     new MediaTypeHeaderValue("application/octet-stream");

// send the request
 var response =
     await client.SendAsync(request).ConfigureAwait(false);

// dynamics are fun!
 dynamic dynamicResponse =
     JsonConvert.DeserializeObject(
         await response.Content.ReadAsStringAsync()
     );

 // get the list of tags with confidence scores
 JArray tags = dynamicResponse.tags;

 // only use the tags with a confidence
 // score above 0.5
 var taglist = (
     from dynamic t in tags
     where t.confidence > 0.5
     select t.name.ToString())
     .Cast<string>()
     .ToList();

 await context.PostAsync(
     "Short list: " +
     string.Join(" ", from t in taglist select $"#{t}")
);
This looks something like:

As you can see, these are the same results as the analyse endpoint’s tags collection; perhaps the response time is quicker if the image is only being processed for tags instead of the full analysis… not sure.
Summary
Interesting stuff, right? Writing your own Auto-Instagram bot is one afternoon’s hacking away! Have a go and let me know how you get on.